Leaderboard

.thumb.jpg.f3cd5ec0a1803457d0dc9bd21eff8f08.jpg)


Popular Content
Showing content with the highest reputation on 09/25/2021 in all areas
-
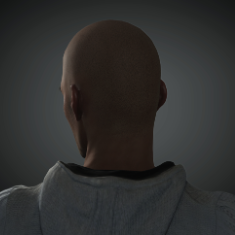
Btw, he sells his body and face rig together with the meshes for Blender on Gumroad: https://sites.google.com/view/universalhuman/home https://cjones.gumroad.com/3 points
-
I've been working on a teeth shader in Arnold recently for a project, and while I haven't tried to replicate it in Cycles, I would say that the key to realistic teeth is nailing it's translucency, through the sss and/or the refraction channels. The attached image shows a tooth shader being driven completely by sss. (The character is kinda gross, so please try to disregard all the gunk and cracks in the model 🥴)2 points
-
Not by me Explanation: https://blenderartists.org/t/human-progress/1143224/8912 points
-
Ah yes. I think you may be right there. Hopefully they are addressing that. CBR1 point
-
thanks a lot, I will try that 🙂1 point
-
Adding some details to the ship. I want it to look like It was shot down, and potentially patched up by a few kids with welding skills. I tried to make a weld around the detour sign. Couldn’t get it to look like a row of dimes laid down, but then I was thinking if a kid was doing it it wouldn’t be a perfect world anyway, lol.1 point
-
i created a lot of shorts and commercial character work in c4d, granted, most don't have more than 2 characters in one shot at a time, but if you're clever about it and work with layers (nitro-mans magic solo is also pretty good to just be able to focus on the stuff you need in a scene for animating the shot) it is workable. i too get the issue with c4d slowing down after manipulating many keyframes at once, and i don't really know why that happens, maybe a data leak or something. what i usually do when that happens is to close the scene and re-open it. then it's "fast" again. i recently rigged 16 characters for aixponza, and can (the creator of the l'artista" short) animated them, and he said he could run 11 characters in the scene at realtime. granted, those characters where very simple low poly geo and i made super simple performance optimized rigs for them. but yeah, it is kinda frustrating.. so i get you. i also try to learn blender atm, as time does allow it. the performance seems to be a bit better over there.1 point
-
Thank you. Actually that one I did it in Blender. I have others in Zbrush (like the one attached), I used cinema for uvmapping and moving the UVs into position for the Udim workflow, exported the parts to Substance Painter and then I was gonna render it back in Cinema with Redshift but my Redshift license ran out, so I had to go to Cycles, but I dont know how to do multipass in cycles to postprocess in after effects, so I never finished the scene. Blender isn't the enemy, you guys can use both Blender and Cinema, because Blender has a fantastic modeler and Cinema not so much, and on the other hand, Cinema is fantastic for motion graphics and Insydium simulations are very easy to setup and is a lot less of a headache than learning Houdini ( I also ran out of Insydium subscription, else my mecha would be firing). Anyway, I dont want to derail the thread talking about a personal project. The one below I did it in Zbrush / Cinema / Insydium / Redshift a couple of years ago, when Covid wasn't here, and yes, it has a lot of errors but... It was fun and also Cinema multipass was crucial and easy to setup for post processing the image, and the floor and rocks were done with mograph cloner in a couple of clicks, and for the little experience I have I can humbly say that Cinema strengths really excels when you are in a rush and have to work fast when life gets in the way, and that is why I love working with it, even if I really, really hate modeling in Cinema. edit I forgot to add.. on image below, hair was Cinema, and materials were cinema because I haven't learned substance at that particular moment.1 point
-
I have watched this conversation, on GreyscaleGorilla. If you don't want to see it all, at least watch the last 15 minutes. They both give R25 a rather lukewarm welcome, to say the least. Especially Chad Ashley has some very valid comments abut the new version. I am sure, even if it is not said directly, that he (and maybe Nick Campbell too) fears that the new features, when ready for production, will come too late, and too wrong. And that he (they) do not like the direction things are taking. In any case - this video convinced me that I should skip at least one C4D version. It is sad. -Ingvar1 point
-
@Pinin Ah yes, Chris Jones! He used to be an avid LightWave user, achieving similar results. But at some point he made the switch to B, and his work got even better. Here's his famous LightWave eye: And his Blender version later: Scary how well done these are. He knows his stuff 🙂1 point
-
yes, you are right. I didn't noticed it, because you have first to decide what you want, then pressing shift or alt and then click and drag. It sould work on the fly like in After Effects: First click and drag and change the sensitivity while holding or releasing Alt and Shift. I know, thanks, but the Nodeeditor still has some way to go for redshift.... Thanks for hearing me and your answers!1 point
-
You can do selections by using "select" node and designate the selection you want to use. Check the scene 🙂 NODE Windows from Polygons_mod.c4d1 point
-
We can look into that. Our analytics didn't show this feature was being used a whole lot, and honestly it seemed slow and troublesome - particularly with network drives. But we've heard the feedback on this. This should work exactly like that - it does here. Shift changes x10 and Alt x0.1 Some icons were omitted with the goal of making the menus clearer - to offer some 'placemarking'. We realize that's caused problems when some of these commands are used in palettes and we're working out a solution. Sometimes this isn't ideal - if you shut down and lose internet access (or hop on a plane). We do make it really easy to deactivate (remotely) via my.maxon.net Definitely something we'll be continuing to work on. Some of the Render Settings UI work for S24 was the first step. With R25 we added the conversion to RS lights, tweaked the light UI and embedded RS light types in menus. These efforts will continue. BTW if you don't know the preview for RS Node Materials is a little better than the Xpresso-based materials.1 point
-
So, since Maxon people are listening to this forum and I don't know any other way to give maxon feedback or a wishlist, I try it here: First of all, I like the new interface a lot. Even if I always rearrange the editors and windows to my 4k-Display which makes the 4 "hot-corner-buttons" somewhat useless, it feels much more up-to-date and sophisticated to me. BUT: 1) The top toolbar distracts the fast access of the menues. While it's great to copy things between projects via tabs, it is a thick bar on the top and all the menues are below it which makes ist harder to access (probably not on Mac - I'm on a PC). So, I would like a preference setting to switch the top toolbar on and off. 2) The Conten Browser is gone now (shock for me) and I imported all my 200 Gigs of stuff into the asset browser - resulting in an asset library of 23934 directories with 230,971 files! I hope I'm not running in some limitation of the capacity of the assetbrowser or the windows file system..... But what I miss a lot now, is the ability to browse on the harddrive. With the content browser, I was able to quickly browse through my HDRI files which were fast displayed as miniatures (100x faster than the "content browser" in Maya). That option is now gone and I tried to find some replacement (perhaps Adobe Bridge, but I don't like it). Of course I coud import all HDRI to the asset browser too, but these are GBytes and afterwards I have hundred of duplicates on my system). So please bring back some sort of Filebrowsing with Icons. 3) I like the Virtual Sliders on Numeric Attributes but it could be improved. In After Effects, you can do similar but while pressing the Alt-Key, the sensitivity changes that you can better finetune. What about pressing Shift while sliding changes x10 and Alt /10. (Hope you understand what I mean). That would be nice to have. 4) It seems, that yet not all Icons were ready for release (i.e. "QuickShading Lines"). I hope, they are coming soon 😉 5) Another whish while I'm whishing: Since I have 2 computers but 1 license it would be nice to have a preference option to free the license when quitting as a default. Even made as a button in the interface, I too often close the window to exit. 6) Redshift integration. This topic is to to big for now and sould be addressed to the redshift-forum, but a working viewport resemblence of lights and redshiftmaterials would be more than welcome. So much for now, best wishes, Marco1 point
-
I barely charge this amount/hourly and i have clients like Microsoft and Apple among other stuff.. And i do actual work... Ridiculous and the analogy with someone's "time" when u spend thousands of euros in a software and they repeatedly charge you is simply bad policy. Of course people will jump to other software like this... And what companies dont understand is that good artists advertise ur software. Not good marketing, but good artists... Try to hold to them. I ll mention here the GSG plus policy that wants to charge me for using HDRI Link 400$ per year... Even though I own all of their stuff before plus, from plugins to tutorials... Everyone is looking to milk whatever they can...1 point
-
I was following this live, but honestly, these knee jerk reactions tend to be over the top, in both directions. From my experience it takes a few weeks until people actualy had a chance to get their hands on the new version and functions and actually gave it a good try. I have read it a couple of times on this forum as well "This is (fantastic/rubbish) ... maybe i can try it in a few days". That initial reaction always changes to something different, either a more realistic impression of the same basic feeling, or a reversal. I get it, the first contact is often emotional, but the important part is to actually double check. Given the limited ressources we have, we try to not do things that we do not see as ultimately useful and better. Of course we make mistakes, thats why we have betatesters to tell us so early on (sometimes we even listen 😉 ), and then we watch the reactions of our users, sometimes hands on like here on this forum. We get a lot of direct feedback from studios and it is interesting to see how divergent from public feedback that can be. Pretty often the topics that come up are quite different from what comes up here.1 point
-
I agree - and indeed the icons I have in my regular layout look quite good on the right over there. For your reference, when you first drag them into the layout a small bug means all the icons in the panel you drag to will go to maximum size, which you'll need to reset by right clicking the palette and choosing 'medium' size... CBR1 point
-
I wonder if HB_Modelling Bundle will get an update for R25. Cannot live without that.1 point
-

From the album: Batman '89
1 point -
I was thinking very much the same thing. But the isssue here is more so with *the audio* than the animation. George Lucas says: 1/2 of the movie is audio. The audio sounds more like light wooden fragments, something not only lacking volume, but lacking the brittle sound needed. The audio needs to convey: volume, compound sounds of impact, fracture, and many chunks of various sizes all landing. We are talking a large metal item flying at high speed. This audio should THUMP, RATTLE, SHEER, HUM and SHAKE. Layered SFX could do a lot. And still further: consider the difference in sound of tooth picks, mouth swabs hitting the ground versus multi-size chunks of ceramic w/associated powder. (shrill, cutting, pingy, vibrating sound along w/the main thump). Close your eyes, play the clip, and ask what your ears are "seeing" Finally: -A camera shake might also be considered to convey impact. -The music/SFX mix should give way to louder SFX impact. I'd consider even cutting the music abruptly to get an emotional jarring effect...or retiming audio mix there so sfx extends past music. (Don't know how this would work contextually)1 point
-
You're rendering the perspective view. You need to render to picture viewer. Be sure to choose VRAY in the render settings and location on your computer where to save the file.1 point