

Cerbera
-
Posts
17,803 -
Joined
-
Days Won
698
Content Type
Profiles
Blogs
Forums
Gallery
Pipeline Tools
3D Wiki
Plugin List
Store
Downloads
Videos
Posts posted by Cerbera
-
-
Hmmm. Our swatch functionality is pretty much limited to saving and loading them so that we can get consistency across different materials and I don't think there is a way to address them outside of the usual places we find them. However assigned colours in materials can be addressed by things like takes and Xpresso, so I guess that is the way to control things more globally / programmatically...
CBR
1 -
Measure and Construction cannot be accused of being intuitive to use, but once you can use it, it is actually quite helpful, and can do what you are asking for IF your models meet its requirements, which are, basically, that your meshes are editable poly objects, and that you set it up carefully enough.
The procedure is as follows:
1. Prep - make sure your meshes are editable, and have their axes in the correct place for rotation.
2. Activate point snapping. The Tool itself should auto-snap even without this, but this aspect of it is flaky, so rely on proper snap instead !
3. Get M&C Tool from Tools / Guide / M&C. A red line should appear arbitrarily placed in viewport.
4. Drag the start of the red arrow to the nearest vertex to your intended hinge point, then the end of it to an equivalent point at the end of the object.
5. Hold control and click again to establish a second measure (green line), and snap / align that relative to the first.
At this point the angle between the 2 should be displayed and selectable for editing simply by changing the rotation value in the M&C attributes. Here is a quick video in which I attempt to demonstrate that...
CBR
3 -
Please upload that scene file so we can more thoroughly see what is going on. In theory, if weld is off it shouldn't change anything about the way a displacer works.
CBR
0 -
We can't diagnose anything without the scene file used so we can see your settings... pls upload it.
CBR
0 -
Yep, Mesh Deformer is one way, and using another object as collision shape in a (Bullet) Rigid Body tag is another.
CBR
1 -
2 hours ago, 3D-Pangel said:
Very informative.
One other issue that I keep coming across is using the Axis Center command and rather than having the axis move to the center of the object, the object's center moves to the existing location of the axis.
This happens regardless of the axis center command settings (or so I think) but only on rare occasions.Any ideas why?
Thank you in advance!!
Dave
That should never happen. Is it possible that you accidentally / occasionally mis-click and hit Object Centre, which is right underneath it in the list ? With new, somewhat similar icons it is sometimes easy to hit the wrong one...
CBR
0 -
Yeah, I don't think that is gonna be as easy as 'throw a mesh deformer in the group and chuck the cage in an emitter'...
I suspect the problem is that the emitted cages don't exist at the time you must bind / initialize them to the high res model.
Now, with a cloned setup we can circumnavigate that problem by duplicating the high res cloner for a low res equivalent, and then using correction deformers / connect objects to make one deform the other as a whole, but not sure that is possible with an emitter. Here's the procedure for the cloned dynamics - perhaps you could try something similar with the emitters, though for some reason I don't like your chances...
Look forward to hearing what everyone else has to say about this...
CBR
1 -
We could also deal with this via dynamics, if that would suit your goals more...
If we popped both those original splines into an extrude object and gave it some physical height, we could use them as dynamic colliders, and add some actual geometry to the spinning flower things, get them travelling along a circular spline via align to spline tag or similar, but then make them dynamic and use either mix animation (new simulation) or Follow position (Bullet) to force them to conform to the colliding boundaries ? Of course I can foresee problems with that, not least of which would be potential 'logjams' because we still can't easily conform the size to the containing walls...
CBR
0 -
OK, I have a plan, though it's not particularly big or clever, but it does work...
What about putting your inner and outer animated splines into a linear cloner set to Blend mode and 3 clones ? That will give you a third spline in the middle of the originals that you could then clone a single flower spline to via another cloner in object mode...
We can then either keyframe the Offset of that to provide rotation along those splines, or just turn the rate up, and use a Mograph Selection object in conjunction with the visibility (or scale-1) controls in a Plain Effector to hide the clones on the inner and outer races, just leaving the ones on the middle, 'average' spline, which is always half way between the originals...
I set the cloner mode to even here, so not sure why there are still gaps in it...
And of course if we have copies of the original splines in the cloner outside it, then we can hide the whole first cloner so we don't see the spline in the middle...
So, not particularly elegant, as I said, but if it gets the job done etc etc...
Here's a scene file to play with...
Distortion along splines CBR.c4d
An obvious limitation of this method is that I can't immediately see a way to scale clones as they make their way round to fit within the bounds of the containing splines, but that may or may not matter to you...
Anyway, hope it helps, or at least gives you ideas for a superior solution, which I'm sure exists...
CBR
0 -
Welcome to the Core !
That's a very interesting problem ! I have to go out now alas, but will give this some thought while I am away...
CBR
1 -
34 minutes ago, mikeh said:
Win 11, latest C4D 2023, latest nVidia driver, 4090
Ah nuts, I was hoping something about Win 11 might have made a difference, and it was only us old Win 10 hangers-on that were getting the vp freeze issues, but apparently not...
I am unable to find any specific trigger for it. It can happen at any time, during normal navigation, during a tool action, and sometimes just while the system is sitting there waiting for input. And yet there can be whole runs of days where the software is open all day, and remains fine. Mysterioso Maxima.
CBR
0 -
Ah yes, sorry - should have said, my default renderer is RS, and I hadn't setup any render stuff with the example scene - it was only there to show you the techniques involved. You can fix the license thing by just switching to Standard or Physical render, and recreating the materials.
As far as a modulating wave goes, yes we can definitely do that, but unsure if we can do so in the formula spline alone or if we need a slightly different setup. I'll have a think about that...
CBR
1 -
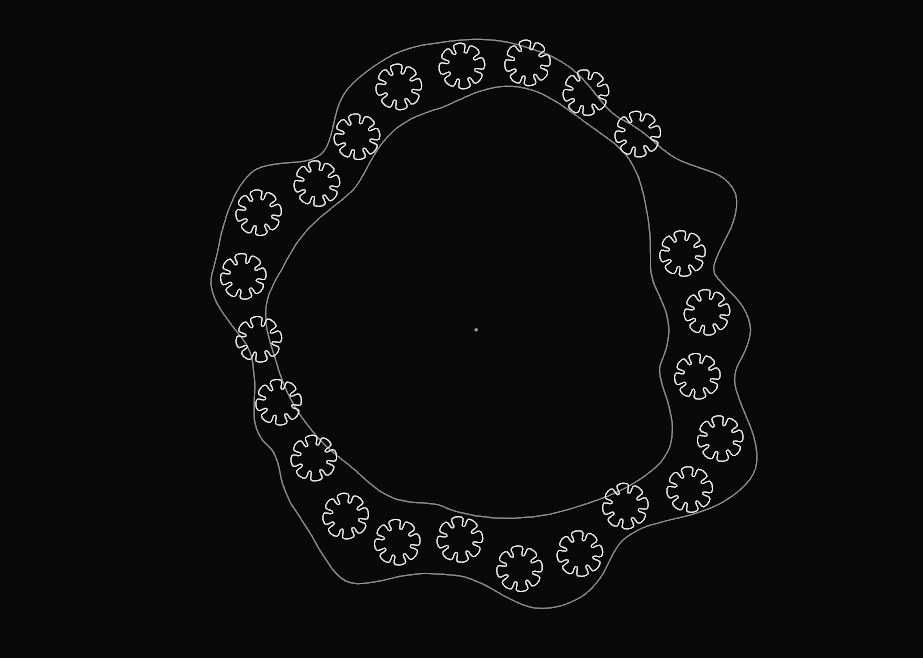
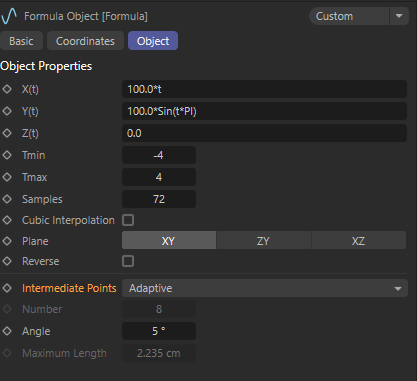
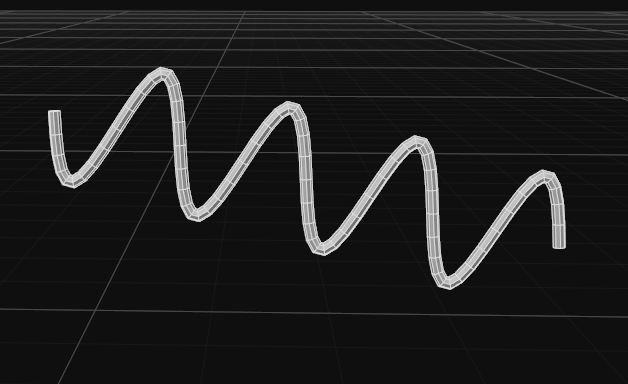
Yep, we can sort that. 2 emitters, one emitting instances of spheres, cubes, or short cylinders, and the second, emitting fewer particles doing instances of a wiggly lines model you have knocked up using a Formula spline with these settings (tweak to taste) inside a sweep object.
That'll give you these little puppies....
...you can fly about from your second emitter. Destructor forces cull their progress, as we can see in the attached file...
CBR
2 -
6 hours ago, Jaee said:
In Cinema 4D, when I zoom in while working on UVs in the Texture UV Editor window in UV Edit mode, the perspective view and UV window screens freeze. All other buttons work, but the screens freeze. Do you know why this is happening? I have to keep shutting down and restarting Cinema 4D.
Most probably linked to graphics card driver. I have an identical hardware setup to you, and sometimes get that, though not in the UV view any more than any other I would say. At least we can save before we restart ! Maxon is aware, but it's a very difficult issue to diagnose as it doesn't generate error reports.
CBR
0 -
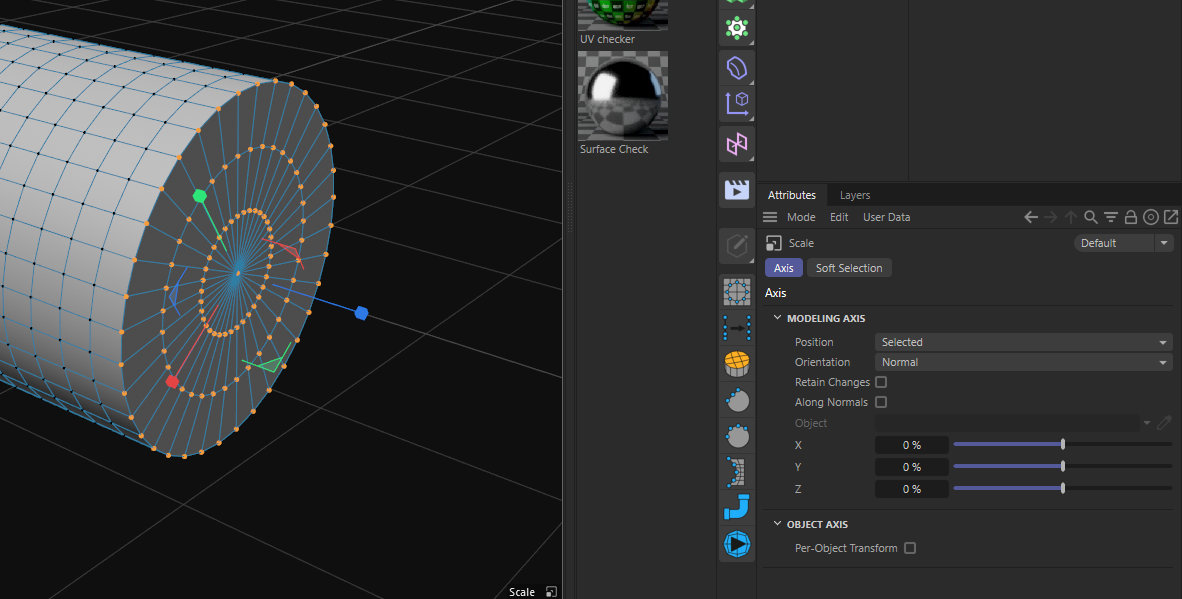
10 hours ago, Keith Vick said:
I'm trying to get these points back into a same position on the x so the end of my model is straight.
Click on the scale tool, and look in the attributes manager under the Axis tab. Orientation there is probably set to Axis, matching the overall model axis, which is probably wrong. So, easiest thing to do is change that setting to Normal, which should give you a gizmo with Z pointing straight out.
CBR
0 -
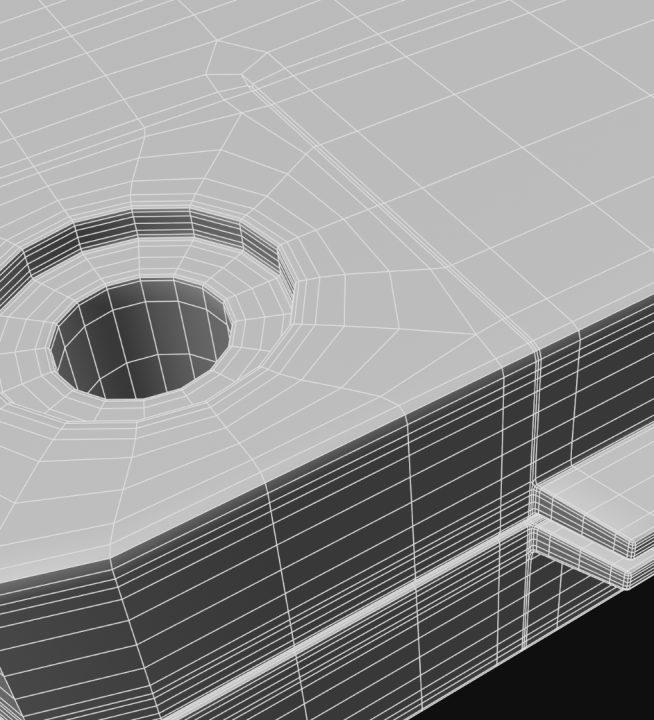
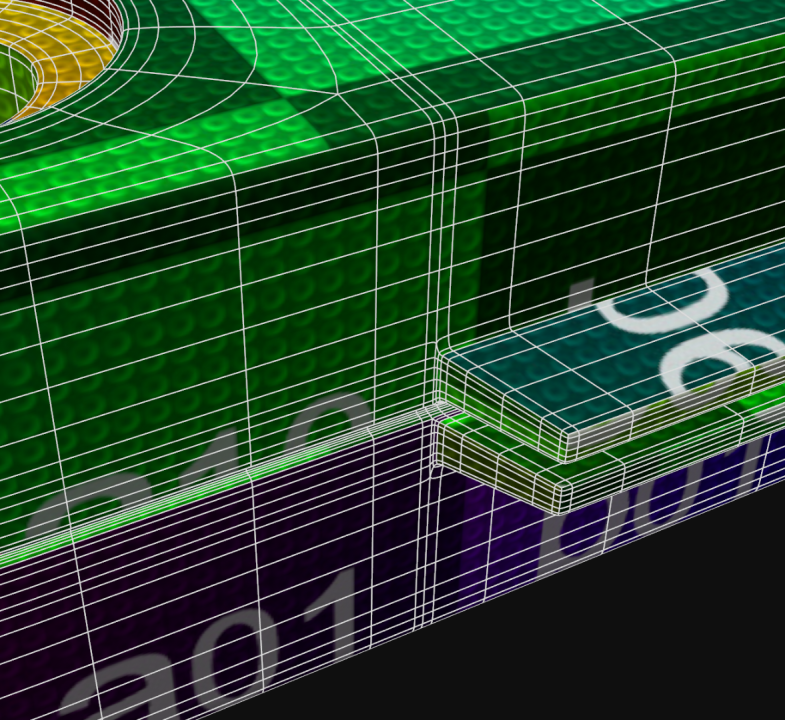
What you are seeing here is SDS-based tension Distortion, not UV distortion.
It is caused by the inconsistent polygon density, changing edge loop directions, and only half the control edges in place.
Therefore we need to change the underlying topology so the SDS distortion is much more confined in where it can run to. This we can achieve by doing 2 things:
1. Add another edge loop on the other side of the jutting out edge sections, and run this and its equivalent the other side up to the top where you can solve them back down again on a flat section away from borders where it doesn't matter. Like this...

2. Apply 1 level of subdivision to the mesh before you UV map it, which will increase resolution, which will restrict SDS distortion by half. Like this...
...which, when we UV that, and put it in a new SDS (max L2), then we find our SDS distortion has all but disappeared...
CBR
0 -
4 hours ago, prowl said:
Anyone else with a space mouse on a Mac? Not working on 2024... despite the recent new Maxon/3d Connexion driver,
Unfortunately, 3DConnexion's request to Maxon to remove their (Maxon's) previously perfectly functioning space mouse driver (version 2023.2.0) so that they can replace it with their own independently running one has been an absolute disaster as far as I can see, and the new driver they provide not only has terrible installation problems, but also has serious problems and negative effects on Cinema's stability for everyone I know that uses one including myself. I have never seen such a terrible case of self-sabotage from a company, and now I simply can't use my space mouse because it affects Cinema so negatively. I suggest you write to 3DConexxion like I did and complain vociferously, not that they appear to be listening. They seem to have a mistaken case of 'our driver is fine' syndrome, which it definitely isn't ! I am furious that I can't use my new Space Explorer in any version past 2023.1.2, and that they needlessly deprecated my previous model, which was still 100% perfectly functioning, and replaced it with a version that is deeply unreliable and unstable. Appalling behaviour.
CBR
1 -
41 minutes ago, jbatista said:
the option is active in one menu but in the viewport menu doesnt show as active
Thanks, you and HP - reported.
CBR
1 -
6 minutes ago, HappyPolygon said:
Where ? Didn't see that in the listed features ? Is this a capsule thing in the Asset Manager ?
Well yes, but it should be in the primitives menu !
 6 minutes ago, HappyPolygon said:
How could this benefit VB ? You mean melting two textured meshes together and transferring their textures to the VB ?
It means you can UV map a remeshed, easy-to-deal-with low res proxy of your several million poly VB creation, and then transfer the UVs to the high res original..
CBR
1 -
34 minutes ago, jbatista said:
Its a minor bug. But each time i activate the point vertex in the viewport the icon doesnt change its state to on. So it looks like its always off.
Sorry dude - not quite understanding what you mean there - could you elaborate ?

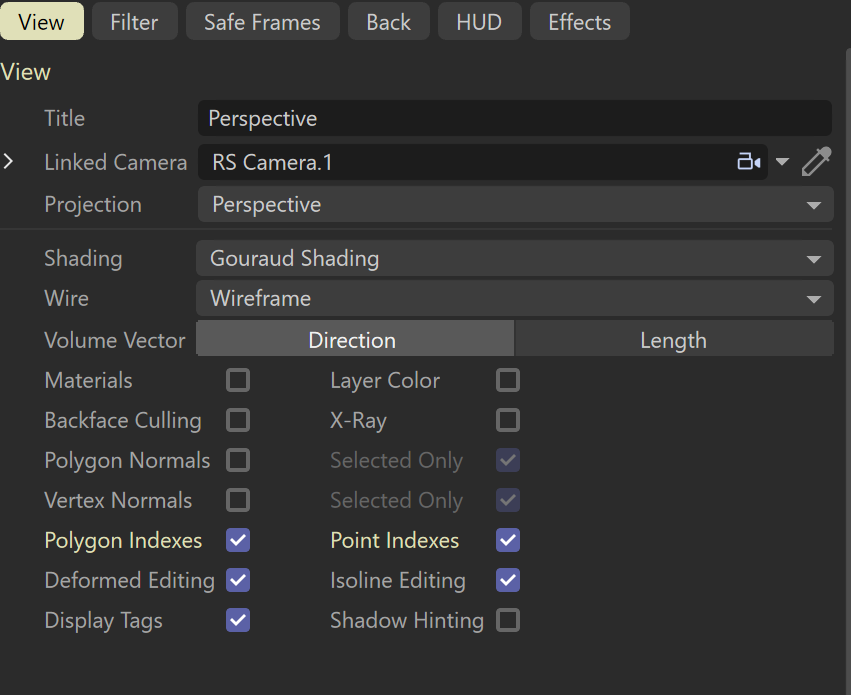
If I drag Point indexes to VP, then it does change colour for me to show it is on...

here moving from white (off) to purple (on)
CBR
0 -
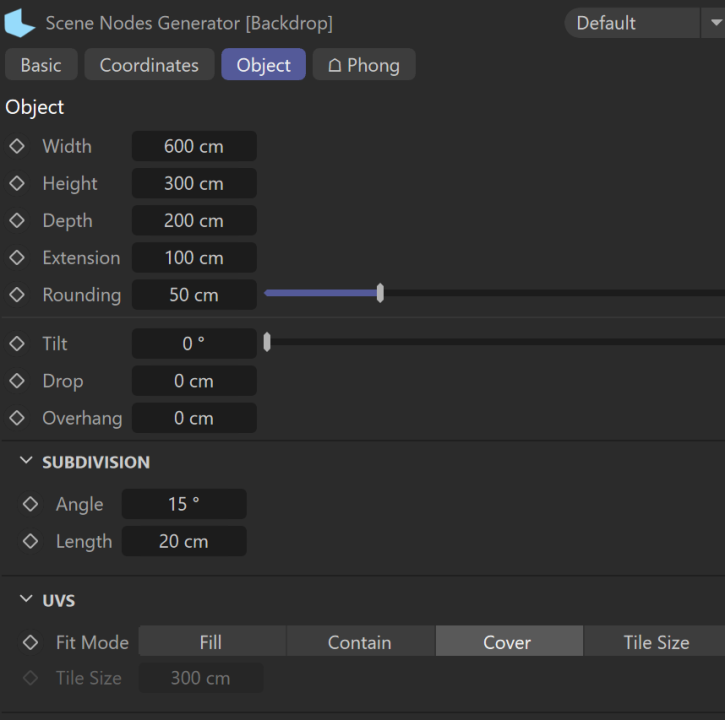
Very glad to be able to talk about new things here at last. It's a VERY good release in my book...
Modelling department
- Subdivision Surface - now with linear pre-subdivision
- Normal Editing and proper control over normals (at last)
- Square weighted Phong shading / rendering
- Speed improvements are fairly huge for modelling too - deformers etc are no longer single thread.
- Pattern Select gives us very helpful new selection mode
- VAMP transfer of normals and UVs (for VB meshes)
- New Backdrop Primitive
- Brush tool improvements / New Modes (surface smear / preserve boundaries)
and that's just in the modelling department. This release makes me very happy there.
And of course in the simulation department things got pretty good too, with Rigid Bodies joining the fully unified simulation system.
CBR
3 -
I think it's because when the computer sees it has more to do in one go it tries a bit harder. Sorry - couldn't resist.
CBR
1 -
33 minutes ago, Mash said:
you may have accidentally activated c4d's second axis lock tool.
Good spot there Mash - indeed 1 axis of his screenshot is white, which is what happens if the mystery lock is in place...
CBR
1 -
Welcome to the Core !
2 hours ago, Oliv formotion said:As in my screenshot : I'm in scale tool, no XYZ axis lock, in Model mode (not Object mode), and I can't find a way to have a uniform scale, even with CTRL or SHIFT, it only scales on 1 or 2 axis...
Make sure there are no axis locks in place, and then just get the scale tool, and click & drag anywhere in the viewport EXCEPT the gizmo, to scale uniformly on all axes !
Additionally you can enter size or scale values directly in the Coordinates manager (lower right hot-corner).
CBR
1


Export Dynamics To FBX Question
in Cinema 4D
Posted
Yeah, no Cinema simulated components are going to make it into an exchange format without being baked first.
If that is for animation, then bake to Alembic or Bake object are reasonable options, but if it's only a still you need, then cache the simulation, move to the frame you want, and do Current State to Object on the simulated object / remove any sim tags from copy, and you should get a baked still at the right frame, that doesn't reset on timeline 0 and can be exported anywhere, anyhow...
CBR