


LeChuck
-
Posts
56 -
Joined
-
Last visited
-
Days Won
2
Content Type
Profiles
Blogs
Forums
Gallery
Pipeline Tools
3D Wiki
Plugin List
Store
Downloads
Videos
Everything posted by LeChuck
-
Thanks both for your feedback. Super interesting responses and things I would not have considered as this is my first build. Have specced in the suggestions i.e. 96GB 6000Mhz RAM, SSD + HDD, 4000D case and an AIO cooler. Have added an UPS which seems good to the list (just in case) but the power where I am in the UK is pretty reliable (had one power cut in about three years). But like you say as the new system will be such an investment best not to risk anything. New spec: CPU: AMD Ryzen 9 7950X 4.5 GHz 16-Core Processor CPU cooler: Corsair iCUE H150i ELITE CAPELLIX XT 65.57 CFM Liquid CPU Cooler Thermal paste: Corsair XTM70 3 g Thermal Paste GPU: Gigabyte GAMING OC GeForce RTX 4090 24 GB Video Card Motherboard: Gigabyte B650 GAMING X AX ATX AM5 Motherboard RAM: Corsair Vengeance 96 GB (2 x 48 GB) DDR5-6000 CL30 Memory SSD: Seagate FireCuda 540 2 TB M.2-2280 PCIe 5.0 X4 NVME Solid State Drive HDD: Seagate BarraCuda Pro 8 TB 3.5" 7200 RPM Internal Hard Drive PSU: Corsair RM1000e (2023) 1000 W 80+ Gold Certified Fully Modular ATX Power Supply Case: Corsair 4000D Airflow ATX Mid Tower Case Operating system: Microsoft Windows 11 Pro Retail - Download 64-bit UPS: APC BACK-UPS ES - BE650G2-UK - Uninterruptible Power Supply 650VA Thanks again!
-
Hi all, Looking for some advice on a PC build for C4D + Redshift. Not using yet, but After Effects and possibly Houdini down the line would be a consideration as well. So far for my budget I have specced the below: CPU: AMD Ryzen 9 7950X 4.5 GHz 16-Core Processor CPU Cooler: Noctua NH-D15 82.5 CFM CPU Cooler GPU: Nvidia GeForce RTX 4090 24 GB Motherboard: Gigabyte X670E AORUS PRO X ATX AM5 Motherboard RAM: Corsair Vengeance RGB 128 GB DDR5 (4 x 32 GB) Case: Lian Li O11 Dynamic Mini Snow Edition ATX Mid Tower Case PSU: Cooler Master V SFX Platinum 1100 W Storage: Samsung 990 Pro 4 TB M.2-2280 PCIe 4.0 X4 NVME Solid State Drive Questions: I have an old 2070 SUPER 8GB card and was hoping to include it into the build for a bit of extra render power, but unsure if it would be worth it with heating considerations etc. and would I be better off just selling the 2070 to go towards the cost of the new build. Have specced in a 1100W PSU in case I do go double graphic card route. The motherboard has 3x PCIe x16 Slots so hoping this means it’s SLI/Crossfire compatible? I couldn’t find any info saying directly the motherboard is SLI. Have specced a 4TB SSD drive but have seen people online say it’s better to get two or three separate drives (one for OS, one for files etc.)? For the case I just chose what PCPartPicker said was compatible and I liked the look of – are there any things in particular I should be looking out for when choosing a case? Bit of an off-topic question but I currently use an M1 Max MacBook Pro and quite like the workflow of Mac but obviously would want the render power of the PC build. Is it possible to have the PC act as a kind of home render farm via team render? Not saying this is the route I will go down but wanted to see if it was a viable option. Spec so far is coming in about £4k which is the budget I’d like to keep to. Would be interested to see if people think I have got the balance right for this build within the budget. PCPartPicker says all parts will work with each other but as this is my first time building from scratch (previous build was done for me) I wanted to see if there are any optimisations I could be making. Thanks, Chris
-
Thanks for the tips and advice! Very helpful indeed. I have scaled down my lights so they are a bit more real-world scale in relation to the product and simplified the amount of lights which has helped. But really to get my visuals to look great I need to do more research into photographic lighting and studio set-ups, as you say. Will look into getting some books on the subject. 👨🎓 Thanks again for your help.
-
Hi, I am struggling to light a product shot where there is a standard printed carton with a foiled logo on the front. Also the carton is an off-white colour which I’m finding difficult not to have blow out if I up the intensity of the lights too much. I am using C4D 2023 with Redshift. The product is coffee pod packaging with the shot ultimately being used for marketing purposes and online shopping images – so going for a standard ‘studio’ product shot. My material is basically a diffuse/print material which is then blended with a foil material via an alpha mask so only the logo part reveals the foil. Then there is a blurred logo texture which is used in conjunction to create an inward displacement ‘deboss’ effect (like you see on foil blocked products where the die dents the cardboard inwards). I have got the scene and lighting to stage where I’m 90% happy but do not feel that the foiling looks quite right. I wonder if perhaps it’s easier to light the foil and the carton separately with two AOV light groups and then recomp later in Photoshop? I wasn’t sure if this is a bodge or actually a standard work practice? I’m a bit new to C4D and my lighting experience is not all there yet. If anyone has any tips or tricks on how to light this shot it would be much appreciated. Below is a top view of the lighting set up, which I don't know if people think is a disaster or not? Likewise if anyone knows any good courses or resource out there for lighting in C4D and Redshift, with studio lighting in mind, that would be really helpful as well. I also understand reading books on real-world photography and lighting is going to aid me here. Thanks in advance! Chris
-
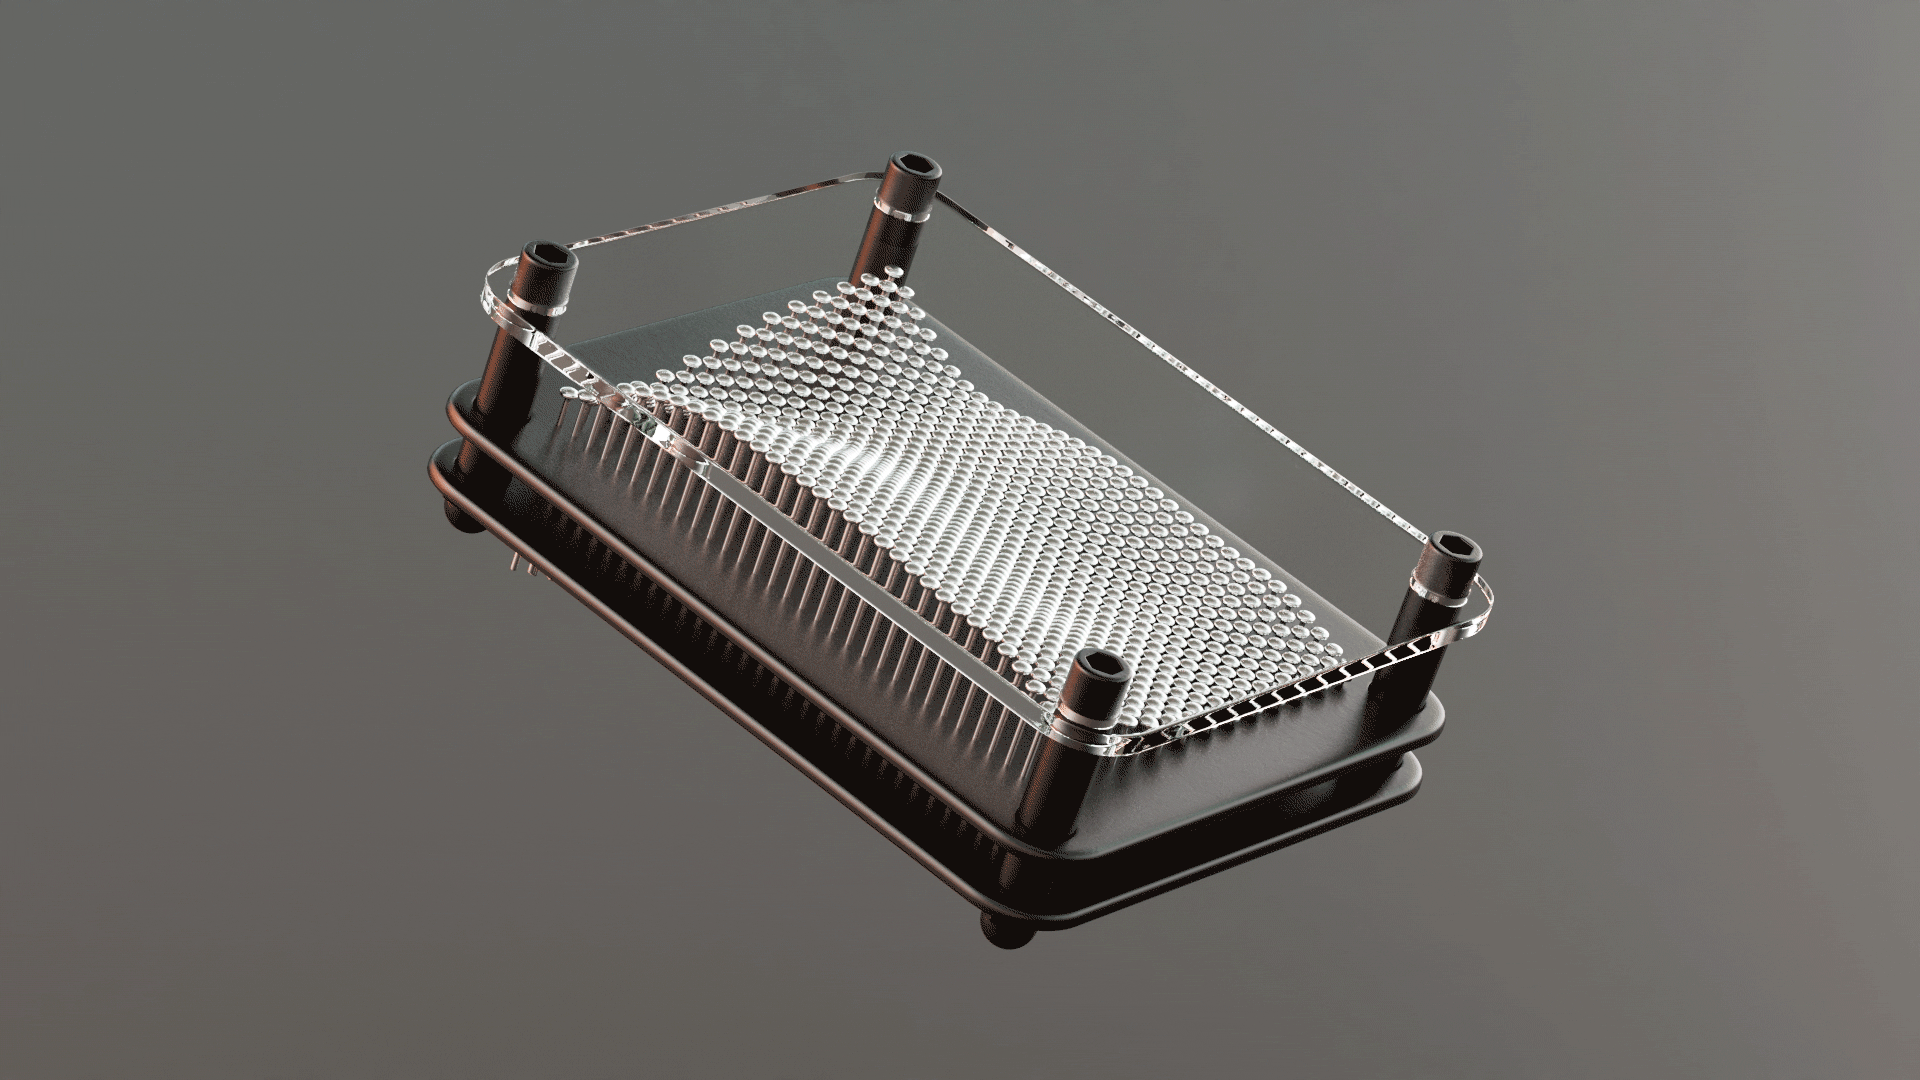
From the album: Pin art toy animation
-
Pin art toy animation demo. Any feedback welcomed #cinema4d #redshift3d #animation #fields #productrendering
-
-
Thanks! Will do. For my particular scene that was maxing out, it was caused by a C4D native subdivision surface which had some quite high res poly geometry within it. As I'm using Redshift, I used Redshift's Object tag for the subdivision so it kept the geometry low poly in the viewport. This for me solved the issue so it must have been my polycount was too high for my M1 Max MBP to handle. Total poly count after subdivision was 2.4 million in total – not sure if that’s generally too big a number for a normal system to handle? 🥵 It might be whatever is in your scene is also maxing out the memory. Not sure if LOD, hiding or instancing certain things will help reduce memory usage. Thanks, Chris
-
Hi, I am also using Cinema 4D 2023 with Redshift on an M1 Max MacBook Pro 64GB and having this exact same problem. Pretty sure it’s a 2023 issue as have run older versions of Cinema on my M1 MacBook Pro with no issues. I have seen in other forums some other people are having a similar issue with 2023 and M1. I also get issues with materials not previewing properly (and quite often just black squares) and general laggyness throughout the software. Eventually when the memory maxes out I get a warning on Redshift aborting the render so I have to force quit and restart Cinema. Where/what is the best way to report to Maxon? Thanks
-

From the album: Tabasco product render
Tabasco hot sauce product render (Cinema 4D + Redshift). -
Tabasco hot sauce product render (Cinema 4D + Redshift).
-
-
Product visuals I have created using Cinema 4D + Redshift on Mac M1 Max. These are the first renders I have created, any tips or feedback to improve these would be much appreciated as I have spent too long looking at them Thanks
-
-
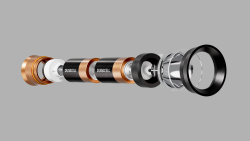
From the album: Torch product visuals
Exploded view -

From the album: Torch product visuals
Volumetric lighting test -

From the album: Torch product visuals
Beauty visual -
Thanks CERBERA. You are correct, I really need to model in those ridges to get the best result. For the time being I have done a cheap fix by fading in the ridges near the hole edges in the displacement map so you can't see those faces as much. Thanks as always for your advice 👍
-
Hi, I have a small issue where I’m trying to displace an embossed effect into a watch strap so the grip design is pushed down into the geometry. The issue I’m having is when this is displaced it leaves in the adjacent faces of the holes so you can see them as almost an additional face. I have also included a screen shot of my UV map – perhaps these need to be laid out differently to ensure I get a seamless emboss? The inner faces of the holes are the x8 UV islands to the right of the main strap. I tried inverting my Redshift ‘Change Range’ values but the same issue happened just in the other direction i.e. like a polygon hole on the geometry that had been pushed upwards. Any help is much appreciated. Thanks! Chris
-
Thanks! I had to keep my original 24 rotation segments for other parts of the model but luckily I managed to down step from 24 edges to 8 pretty easily. Cheers
-
Hi, I am wondering what is the best way to model a rounded apex on a cone. If I close the circle and make a super pole, and then apply the subdivision surface, it kind of gives me the result I want but of course with shading artefacts. I also tried slicing a hexahedron sphere in half and patching in the dome but again didn't get a great result and you could see a kind of square impression on the tip of the cone. Does anyone have a smarter way to create this? I hope I am not missing something really obvious 😅 Thanks, Chris
-
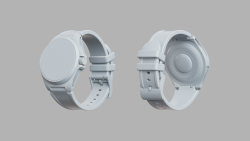
From the album: WIP sports watch
-
-
-
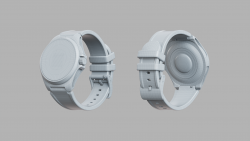
From the album: WIP sports watch
-
95 polygons in total. Much harder than I thought to keep the poly count down. Have gone for a simple hard-surface style LED model. Hopefully other people have brighter ideas than me! 😉 LED_Model.c4d
-
 So I have managed to get the result I wanted, kind of by accident really. I ended up ditching the liquid material from the original images I posted and created a new one from scratch. I wonder if something was activated within that material that was causing it to look weird. I also played around with my white backdrop and made it wider as I wonder if there was a backdrop reflection on the bottle which looked like the edge refraction of the bottle. Unchecking 'Block Volumes in Sub-Surface Mediums' in the liquid material's 'Advanced' tab helped with the surface of the liquid at the top. I also played around with the 'Affected by Refraction' options in the Details tabs of the lights/HDRI (think I settled on 'Always' for my scene). Thanks again for your help!
 -
Thanks Kws, I am using a floor object and a background plane as the scene. Then for the lights I am using a dome light HDRI in combination with area lights. The floor is pure reflectance and the backdrop is white with a point light in-between them to give the background a bit of a glow. I have attached the scene file. I have swapped materials for RS defaults so there are no missing textures but everything else is the same. I think the issue is I am rendering out with the background scene but if I render without the background scene then I do not get the correct refractions on the base of the bottle and everything looks kind of wrong... Glass_Test_1.c4d
-
Hi, I am hoping to be able to render a glass juice bottle with liquid inside onto a transparent background so that I can comp in a coloured background (images below for reference). At the moment when I do this I get white/grey edges which do not look very good. Also note on the upright bottle the gap above the juice is showing the white background used in the scene. Does anyone have any advice on how to make this look better? I wonder if the IOR is not right or needs to be cheated. Perhaps there is a clever way of doing it with AOVs? FYI I am using Redshift to render. Thanks in advance!