.jpg.d80468e5c005f837b37e8ccac1b2c9c1.jpg)
Matches
-
Posts
70 -
Joined
-
Last visited
-
Days Won
5
Content Type
Profiles
Blogs
Forums
Gallery
Pipeline Tools
3D Wiki
Plugin List
Store
Downloads
Videos
Everything posted by Matches
-
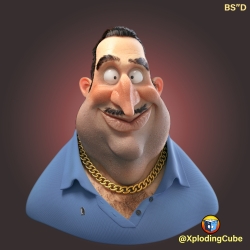
From the album: Matches' Makes
This was made with C4D and Zbrush, rendered out with Arnold, and finished in Photoshop -
Thanks kbar, I checked out what you mentioned regarding the "Surface Distance", and that is indeed what I was looking for. I must have missed this, since this is option is only available on the "Grab" brush and not the other ones for some reason. Regardless I'm glad to know about this function and I'm grateful you pointed it out . Concerning what you mentioned about the sculpting layers, while I appreciate that you've expanded C4D's sculpting toolset, I still don't think it answers why C4D itself doesn't ship with these features, especially since the sculpting module was introduced way back in R14 and has remained virtually untouched since then. I believe that remeshing is an expected feature for modern digital sculpting, and really should be included in any self respecting software that wants to stay competitive and advertises a fully functional sculpting workflow, as opposed to an addendum toolset to modeling. I've experimented with the "Remesh" and found the results to be very unimpressive, especially compared to the auto-topo solutions from Zbrush, 3dcoat, mudbox, the Exoside plugin, and even blender. My point is not to bash Maxon's efforts, but rather to point out that they've allowed themselves to fall way behind the trend, and if they want to catch up and stay competitive then they've got to step it up, especially considering that they introduced sculpting almost ten years ago. As far as Bodypaint is concerned, I respectfully reject the notion that C4D users are disinterested in Bodypaint and it's future development. Your experience with your "Symmetry" addition and it's dramatic change in downloads ratio, should tell you that Bodypaint users are not disinterested, but rather unwilling to pay any extra to gain basic features that are standard in other packages and should come with no additional fee. Also, the idea that Bodypaint was abandoned because users expect live feedback confuses me. Many years ago, Bodypaint was a prominent staple in professional pipelines and had a strong foothold in the industry; Why would it be traded for other programs that are identically deficient? The fact is that Bodypaint has been neglected for years, and I remember 3dKiwi ranting about this years ago and still nothing's changed even up until now. In fact, his Bodypaint tutorial course from about (over) ten years ago is probably still completely accurate. Substance is a relatively new software, but I remember even a few years ago, when hand-painted textures were a bigger market, 3dCoat was much more prolific than Bodypaint, and offered a much more feature-rich solution for painting. Even today 3dCoat continues to stay competitive with the integration of a BPR workflow, smart materials, and masks etc. Blender has also become a much better solution for painting and general workflow, is constantly being updated and developed, and for many is the Swiss Army knife tool that a lot of studios are adopting for the majority of their work. And is also free. I want to reiterate that my intention is not to "hate" on Maxon, but rather to voice my criticism and hope that they decide to up their game. Competition is what motivates the industry, and those program devs that are content to stay in their respective lanes or get too full of themselves, will fall by the wayside to other packages that are eager to dominate and become number one; Zbrush, Houdini, and Blender are good examples of upward trending, highly competitive programs.
-
Cinema 4D is a great package, but there are so many area that are neglected and should really get some attention, before new features are introduced. Just a quick disclaimer before I start ranting: I am a big fan of Cinema 4D, and the following is not meant to be inflammatory or insulting to the Maxon team, I'm just submitting my frank opinion as constructive criticism. Motion trails are useful, but have some serious shortcomings, and I would love to see a proper arc tracker, like the ones available for Maya, such as the Atools' arc tracker. Also having the pan/zoom tool would be a welcome addition for animation, and long overdue. Cinema's sculpting module could also use some love, like having a "Surface" option for the brushes, like there is for "soft selection" editing. Or being able to duplicate layers - I can't believe such a basic feature isn't available. A basic remesher would be nice, or dynamic topology. PLA is SUCH a cool feature, but it could be so much more, with just a few additions that would allow much more control. Like a PLA brush set, that can allow animators to intensify, tween, smooth, or erase PLA modifications, without having to go point by tedious point to get good results. In my opinion, PLA could be a real game changer for animation, and really set C4D apart from other packages. Even though I'm a fan of C4D's symmetry generator, symmetrical modeling would be a welcome addition and a very useful option. While on the subject of symmetry, symmetrical painting in the very neglected BodyPaint3d would be nice, as well as some general updates and baking options, to make it more user friendly and modern to be competitive with Substance and Mari. In my opinion, BodyPaint3d is a missed opportunity, and could have really been a serious alternative to Substance Painter, like 3dCoat tries to be, if Maxon had kept up with BodyPaint3d and the new workflows emerging in the industry. Also, something must be done about Cinema's rendering. For a few years Maxon was promising a GPU renderer in the form of ProRender, which never got off the ground, and turned out to be a huge disappointment and waste of time. Maxon went on to purchase Redshift, but refuses to integrate it with Cinema as a default renderer, so they can maximize sales, which is understandable, but nevertheless, leaving the Maxon customer base high and dry is unacceptable. The standard and physical renderers were very good in their times, but desperately need an update. Either integrate Redshift into C4D, like Autodesk did with Arnold, or give Cinema 4D users, a viable alternative. Another area that could use some love, would be the hair module. I really enjoy the hair tools, and Maxon was way ahead of the trend, when it came to hair and grooming, but they've allowed themselves to fall behind other hair packages, like XGen, Ornatrix, Yeti, etc. which capitalize on a procedural workflow. I would welcome Maxon to convert C4d Hair to a more procedural workflow, but even without that, it wouldn't take much to stay competitive. Even just a few features to stay relevant, like Strand groups, region painting, more controlled clumping, more intuitive hair material (modifier) stacking etc. Also, C4D's viewport does not handle hair well, and slows to a crawl unless most hairs are hidden, making it harder to get decent feedback while working. Cinema's dynamics system is really lacking, and could use some attention. There are other features that I would like to see, but these are some that have been at the top my list for a while. Thanks for reading, and putting up with my rant 😉.
-
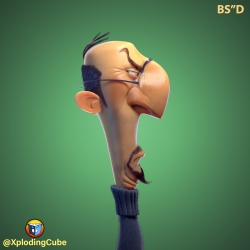 Sorry, I forgot to mention, it was rendered with Arnold. Thanks, Igor.
 -
From the album: Matches' Makes
An image made with C4D, Zbrush, and photoshop. Based on a design by my brother. -
 Thanks so much, Igor - I really appreciate it
 -
-
.thumb.jpg.f3cd5ec0a1803457d0dc9bd21eff8f08.jpg)
Cinema 4D How do I fix IK dynamics behaving differently if scaled?
Matches replied to Rofix's topic in Rigging - Do Not Post Here
I think the problem can be avoided by making sure that your joints (and their parent nulls) remain at a scale of 1 in the attributes manager. If you want to adjust the length of the joint chain, either adjust the position of the individual joints, or scale the chain using the scale tool in model mode and not in object mode, so the objects remain at a scale of 1 in the attributes manager. I'm pretty sure that should solve the problem 🙂. -
 Thanks so much for the kind words. For most of the objects, basic box modeling techniques were enough to get the job done. For more complex objects, like the head, it was a back-and-forth between box modeling tools, to block out the basic model and refine it's topology, and then the sculpting tools to refine the shapes organically, and smooth out the topology. The Cloth Surface generator (Cloth Nurbs) was used for the collar, jacket, waist coat, cuffs, hair ribbon, etc. to add thickness to these objects and avoid modeling two sides of the geo. Thanks again for your kind words .
 -
always finish your fruit, or this is what happens!
Matches commented on VECTOR's gallery image in Final Renders
 Heh, this pic makes me laugh . Great job on the design and shaders btw.
 -
There are several solutions to this challenge, the most obvious would be to drive the skirt movement with a cloth sim. Unfortunately, Cinema 4D's dynamics system isn't nearly as feature rich as a lot of other 3d packages, and desperately needs an update. The better solution would be to rig the skirt with standard joint chains, or IK Spline chains, or even rig a lo-poly cage, and use that to drive the actual skirt geo with a mesh deformer. To automate the movement of the rig, you can use some basic xpresso (Range Mapper, math) nodes, to drive the position/rotation of the joints, based on the rotation of the leg joints. For an additional level of control, you can apply the automation to parent nulls, to get the rig controls into the general right spot, and then use the controls themselves to customize the skirt's deformation, to better fit the pose, or add some cloth movement, etc. Hand animating clothes can get tedious, but this is the way to go if you want some basic movement, or very precise control without dealing with sims. I hope this helps.
-
.jpg.1b749618132071d687a40f775cea2909.jpg)
From the album: Matches' Makes
-
From the album: Matches' Makes
This was a character, I made a few years back, as a mascot for a digital music notation software. -
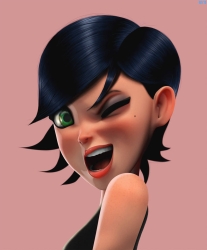 Thanks . It had some minimal rigging, just to get her roughly into shape, and the rest was customized through the geo directly.
 -
From the album: Matches' Makes
I made this one a few years back for a contest. It was modeled and rendered out of C4D, and finished in Photoshop. -
Cinema 4D Correctional PSD morph with multiple joint positions?
Matches replied to adrencg's topic in Rigging - Do Not Post Here
The three approaches that I know of, when working with corrective morphs is: 1) Having a good morph for an extreme pose, like an arm bending 90 degrees, and adjusting the morph's strength to a desired effect for all the inbetween rotations, like the arm at 45 degrees. 2) Having an additional morph, mix in to help the original along, when it's not getting the job done on it's own. 3) Having separate morphs entirely, and cycling through them as needed. Having separate or mixing morphs can seem like a pain, but fortunately, they can be automated for animation with minimal effort, and I've found that these methods are much more efficient than noodling over one morph, trying to get it just right, so it fits all. I hope this is useful. -
Applying IK-Spline to joints breaks joint positions
Matches replied to ddkk's topic in Rigging - Do Not Post Here
Hi, SYLXERIA Having looked over the file, and not seeing the initial setup, my guess would be, that the joint orientation was setup with the z axis pointing up the chain instead of down, which caused all of the joints associated with the ik spline, to flip approx. 180 degrees around each one's respective x axis. When setting up an ik spline chain, make sure all the joints' alignment matches the axis in the ik spline tag's align field, and that they point with their positive side facing down the chain, from the root to the end. If you have an earlier version of your scene, take a look and confirm the direction the joints were facing before you applied the ik spline tag, and see if that fixes the problem. I hope this helps you 🙂 -
Cinema 4D Delete selected layers with objects
Matches replied to ROMAN ZHAMALETDINOV's topic in Miscellaneous - Do Not Post Here
If you right click on the layer there is a "select from layer" option, which will select all the objects associated with the layer. The layer and objects need to be deleted separately, but it's just an extra click, and much easier than using solo selection. Cheers. -
Applying IK-Spline to joints breaks joint positions
Matches replied to ddkk's topic in Rigging - Do Not Post Here
Hey DDKK I found that either switching the spline IK tag from fit to relative, or switching the spline type to another type can give more accurate initial placement. However, if you specifically want the IK Spline to have the "Fit" behavior and the spline to interpolate linearly, a neat little cheat would be to set the spline to bezier, and to set all the vertices to hard interpolation; All the points should remain in place when setting up the IK Spline. I hope this helps. SYLXERIA if you could post a your scene, I wouldn't mind taking a look and trying to help. 🙂


Watermark.jpg.d75523cf8d5e8421c9b0d467e4eec1a4.jpg)