Rectro
-
Posts
3,798 -
Joined
-
Days Won
102
Content Type
Profiles
Blogs
Forums
Gallery
Pipeline Tools
3D Wiki
Plugin List
Store
Downloads
Status Updates posted by Rectro
-
Check out the new Ornatrix videos and renders,
-
Work flows
Iv been spending some time putting together some workflows that need ti be streamlined as much as possible, and in the process its inevitable that technical issues will come. I will talk about these workflows in sections. I will cover C4D workflows with other popular apps that I use such as MODO, Zbrush, and Marvelous Designer.
Work flows: 01: C4D To MODO (Rigged)
Assuming that we have a character rigged within C4D and want to use some of MODO features we will want to keep as much data from C4D as we can, and the main thing here is weighting. We export as FBX format, and as it stands for MODO 902 it only supports up to FBX 2013.
Load this into MODO using the unit scale of cm. The next stage is to use a plugin called ACS2 which is much like the Character tool found in C4D Studio, only it has some features that are better than C4D, more on that later on.
We build the ACS rig to match the positioning of the joints from C4D so when we bind the ACS rig it will detect that out mesh has weighting from the C4D rig. The weighting is setup to work with the position of the joints to get the same deformation. (I need to look into how to use the snap features to aid in joint placement)
The weighting in C4D is contained within a skin tag which is a child of the mesh object, while in Modo its called a Normalizing folder.
We can now delete the C4D rig, and also the normalising/skin tag it came with a this can cause issues when exporting FBX files having two skin/normalising tags.
Next is to use the super features of ACS2. It has far superior methods of sculpting correctional morphs as it automatically creates a joint driver, it does it all for you. Also is the Mocap which I talk about now.
ACS allows you to import Mocap/bvh files into layers in a easy step by step method, 4 steps actualy. What it does that C4D dont do is allow you to still have full control of the FK/IK and overide or blend your own key frame animation or corrections. You should first make a layer for the Tpose character, then add more layers to import and bake down bvh files.
There is a known issue that if you arms are too low in base pose it can cause issues with bvh files, so a A pose or T pose in the higher position is best.
Once the layers are made you should have saved two project files by now. One is the rigged project, and the other is with baked MDD files. The 3rd project file should be the next stage, and thats to bake all the layers. This is done from the ACS character menu. All the control rig is lost at this point and now we have a basic rig with all layers of bvh applied.
First export the Tpose as FBX, then export each fbx for the bvh applied animations. In this example I have Tpose, Walk , Jump, Idle fbx files.
In C4d we import our Tpose fbx, and select either the root joint or the null object in which its all contain within, and go to animation tab where we make a motion clip. The motion tag is applied to the object with its post motion clip, a Tpose. To open the Time line we select the Motion clip tag and click on Open in TL button.
Next we merge from the file menu each fbx file doing the following one by one. Select the new FXB which is imported with the mesh in the options menu. then select this and apply the motion clip, as soon as we done this delete the whole imported file leaving just the Tpose character in place. What this will do is leave behind the motion for the imported mesh. Do this as many times as you wish until you have all the motion clips.
Next we drag n drop each motion clip into the timeline, over lapping to get a cross fade. If the next clip starts from a different footing position, the select that clip and in the object manager/advanced make a new pivot null. This will let you move the object into place. You can set a keyframe for this. By the end your have a nice animation.
Next we need to get the animation exported. To do this in the Time Line window for animation we have a Motion System menu. Click on (convert layer to keyframe animation.) rThis basicly puts keyframes from all the motion clips onto the geometry or root joints.
We next need a plugin called MDDIO. In the scale setting set it to 100, and select the mesh and export MDD.
We already have the Tpose rigged fbx, but we also need the same mesh as a OBJ if we dont already. We now need to save our project ideal before we covert the layers to keyframes.
-
Work flows: 01: Rigging in MODO weighting in C4D
After we have rigged and weighted with the ACS it may be the case that we want to do out weighting within C4D. If this is the case this is what we do.
1: Save project in MODO bake down the rig. Export the baked rigged as fbx and bring into C4D to do weighting. Save the mesh back out with new weighting as FBX 2013.
2: Open the rigged project, Unbind the normalising, and then Unbind assigned mesh. This removes the weighting and mesh from the ACS folders bind meshes folder. We can delete this mesh.
3: Bring in newly weighted mesh. select it and bind mesh, then normalise it. It will find new weightng and then select yes when prompted. Your new mesh is ready for animation.
-
Work flows: 01 C4D to Marvelouse Designer.
Now we have our Obj, our FBX files, and our MDD data for the character animation. The next stage is cloth simulation in Marvelous Designer. Im using v4.
1: Bring the obj into Marvelouse Designer (MD for short for now on) Choose cm as its import scale.
2: Import the MDD file which was exported from the MDDIO plugin with the scale setting of 100. The scale within MD is set to Meters. Took me ages to get this scale right.
3: In the animation room we can play the character animation. Go back to design room make your cloth. I recommend that you use the low poly mesh when designing the clothes for the Tpose character but the animation data is medium to high poly, this is because the blocky polygons will show in the cloth simulation from the body.
To do this make sure you convert the motion clips to key frame animation otherwise the fbx file will flip the left arm and leg inside out when loaded back in as a fbx. Take this file into MODO and apply 1 level of SD and export it. In MODO it does not change the point order and thus you have a higher poly version. You can now bring this higher poly version back into C4D to produce the new MDD file, or do this in MODO. Now you can delete the avatar thats low poly in MD and import the new high poly version with its own MDD file for final simulation againts the smooth geometry.
-
To get a high poly animation out of MODO you just simply import the low poly fbx from C4D, and sub divide the mesh once in MODO. In animation menu select export MDD and export the obj file. In MD import the mesh at the scale in meters, and the MDD as meters. This is due to MODO default unit as being meters.
-
-
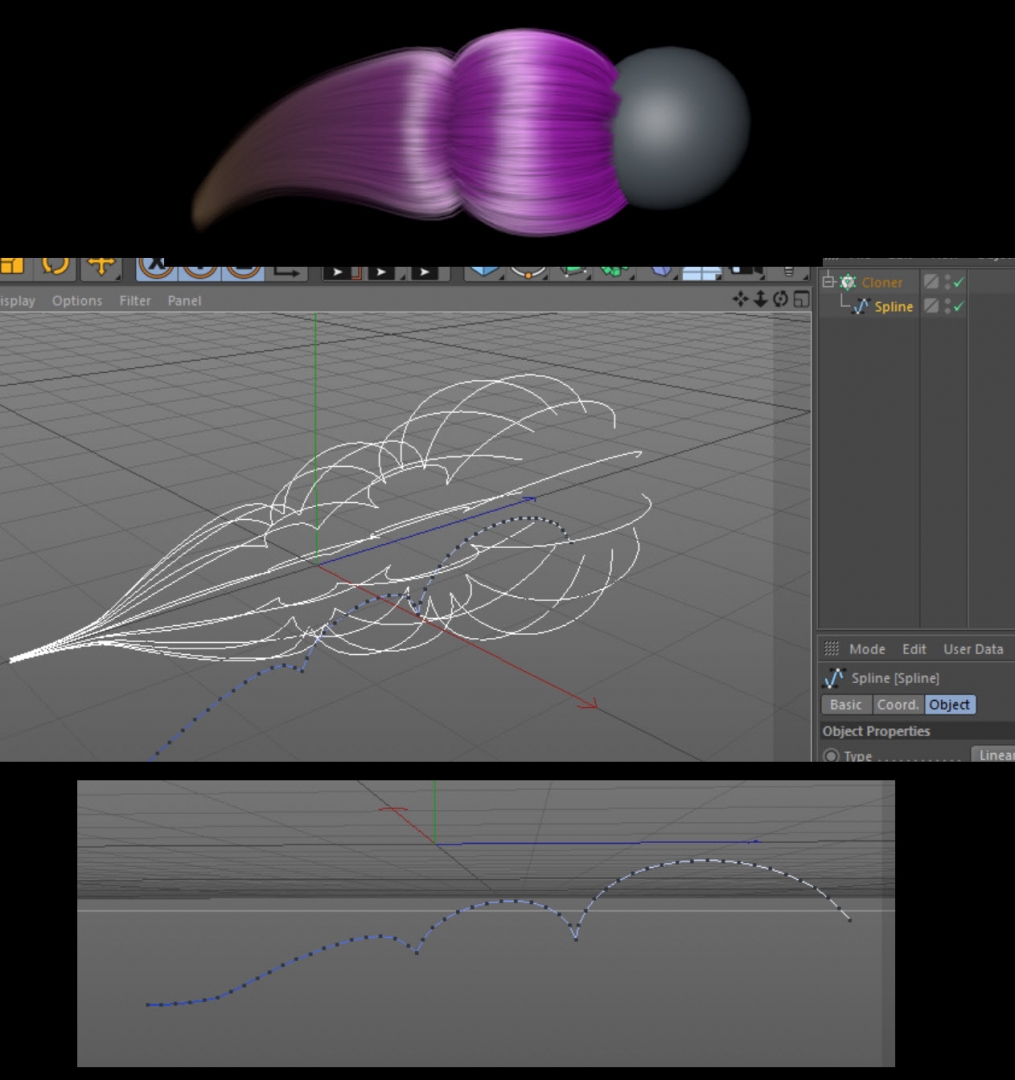
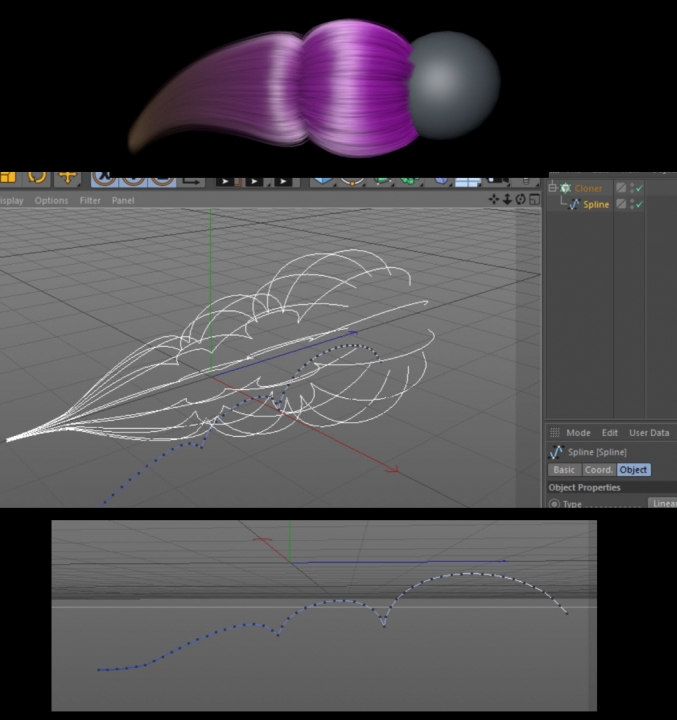
A Cloud of Hair
Been helping another member with cloud like hair, and recommended a method I had come across a few months ago. In short the method is to use the sketch spine tool to produce a cloud like wave in which gets cloned. This clone is then converted to hair, then styled. The results are quite nice, even in a short amount of time creating a very basic mock up.
It sounds easier than it is, one of the things that I found limiting a few months ago was having to use the spine to be the guide tag, this meant there is no hair guides as such, so no styling was possible with the grooming tools. After converting spines to guides I found that if I tried to root guides to an object the guides would move away from the object as soon as I apply a polygon selection tag. This is dealt with by storing its position in the hair object then restoring its position afterwards. The guides would still move, but as soon as I moved the geometry the guides pop back into place and remain there.
In either case there was a workflow that dealt with all limitations, and from this workflow I will make a short tutorial on in the week.
Dan
-
Here is the playlist that belongs to my first complete project within Cinema 4D. This is a set of videos that show a time-lapse of the whole process, and is not intended to teach. I do have all the original real time video footage, so if I had enough request it can be made into a Tutorial.
- Show previous comments 1 more
-
-
Thank you for your comments.
When I did this project I was learning C4Ds modelling tools so this took me longer than If I had done this in my normal software I use. Because this was my first project in C4D I recorded it to keep notes on certain problems I encountered, and how I got around them but also thought it my stir up some interest if I put the recordings into a time lapse, which it seems to have done. Like yourself iv not seen much done or shown character creation wise within C4D so thought this is a good chance to show C4D can do it.
Loops are a tricky one to start with when your doing your first 10 or so characters, but I found the best way is to give priority to certain loops and then fill in the gaps between. The eyes, nasal labia fold, mouth, jaw line, hair line must have top priority with as few polygons as posible to start with. I make sure I must have at least 3 loops flowing the same direction so edge loop in the middle is a true loop. Body is the same, loop priority is to have the pectoralis major, deltoids, scapula formed by loops. The articulation areas such as shoulder, elbow, upper leg, knee must have true loops meeting no pols from redirected edge flow.
Dan
-