

Logimite
-
Posts
26 -
Joined
-
Last visited
Content Type
Profiles
Blogs
Forums
Gallery
Pipeline Tools
3D Wiki
Plugin List
Store
Downloads
Posts posted by Logimite
-
-
hi, corona render newbie here.
I am rendering something in corona render, and when I click the corona IR the screen is pure black! The scene doesn't respond to any lighting I give it. I find this strange since I used an HDRi.. and it was working until now.
https://drive.google.com/file/d/1G9PjNomtsaZ77mMZjMPQYTd1eWCQbs1a/view?usp=sharing
File ^^^
0 -
17 hours ago, Rectro said:
Hi.
The level of skill to make that particular character is high in terms of pure modeling, but I understand this is only an example. Accesories could pose a challenge as in essence these are modeling sessions within them self, this would include clothes, belts, shoes, glasses e.c.t. As your not making an animation you can get away with sculpting on a basic mesh, but each case requires an evaluation on how you go about each part. You need to nail down the concept either draw it or find a design, this is important as it will keep you on track during the process and enable you to plan ahead. If you have a backstory which would include the world that character lives in, its role, gender, attributes, technologies e.c.t the character can be designed based on these things.
Once you have your design down you can use primitive shapes that hold a close shape to the part of the body, such as a Hexahedron sphere for head, cylinder tubes for limbs. The character could wear a jumpsuit which would simplify the clothing.
If you have Zbrush, even the core version this would enable you to play with a concept, even do it entirely, so see if this is a possibility with the school.
Dan
This seems like a complicated endeavor. Are there any free humanoids? It doesn't necessarily have to look like that guy, and I am not even going to model any accessories.
0 -
thanks so much for the in depth reply! It really helped.
0 -
On 4/16/2021 at 11:54 AM, Rectro said:
Hi
Is it to be animated or a still? Can you post a example of what your trying to make?
Dan.
I am making it still. I am trying to make something like this
 On 4/16/2021 at 3:47 PM, Cerbera said:
Also, what is your level of modelling skill ?
CBR
My level of modeling skill is intermediate.
0 -
I made this concept art a while ago, and I want to convert it into 3d but I am confused how I will make the tree in this drawing. Any advice on how to approach this?
 0
0 -
I am doing a school project and I need a pixar looking character for a render I am making. However, online I cannot find anything online, all of them are hyperrealistic. Any ideas how I can go about making such a character? Thanks.
0 -
I just got the corona render edu license and the redshift edu licensee and I am not sure which one to use for my short film I am making. Which one is faster and which on is more suited for films?
0 -
still waiting for this to happen
0 -
On 2/13/2021 at 2:48 PM, Cerbera said:
Yes that's totally doable with mograph. It really is as easy as dragging your target mesh into the object field of the cloner, setting it to object and surface mode, and adjusting the amount of clones you want. The things that get cloned are made children of the cloner. Effectors then control distribution for spreading them out and rotating / scaling them etc...
If that cloner is not under another generator then you can also use Render or Multi instances, which seriously speed up viewport.
CBR
Thanks I will try that!
0 -
20 minutes ago, Cerbera said:
You wouldn't. However, Mograph can get you very close so that'll be the way to go. But as you haven't given us any detail about what you need to scatter, how many, or where, it is difficult to advise specifically, other than to tell you to use object / surface mode of the cloner, and to use effectors and fields and vertex maps to limit and further control how and where things are scattered...
CBR
I just want to copy what this guy did can I do this with mograph? I also copied the link at the time I am talking about so you can see.
0 -
So I am following a tutorial and the guy said to use something called "octane scatter". I don't have octane render, only Corona. So how would I use octane scatter in corona render?
0 -
By the way I just bought world creator so I wish I participated in this challenge, maybe I could have won.
0 -
On 1/28/2021 at 11:22 AM, Hrvoje said:
We hope to have new one relatively soon but we have to organize collection of really valuable prizes. For this challenge prizes were on the very top and we would like to keep it that way since this generated top quality images

Nice! Can't wait to participate in my first challange!
0 -
Nice! When is the next one?
0 -
Hello I want to become a roblox animator, or somebody who animates for roblox games, and I am not sure which software has better animation capabilities. I feel like using Cinema 4D because I paid for it, but many people are telling me that Blender is better. For somebody who has never animated before which one is more user friendly and which one has better capabilities?
0 -
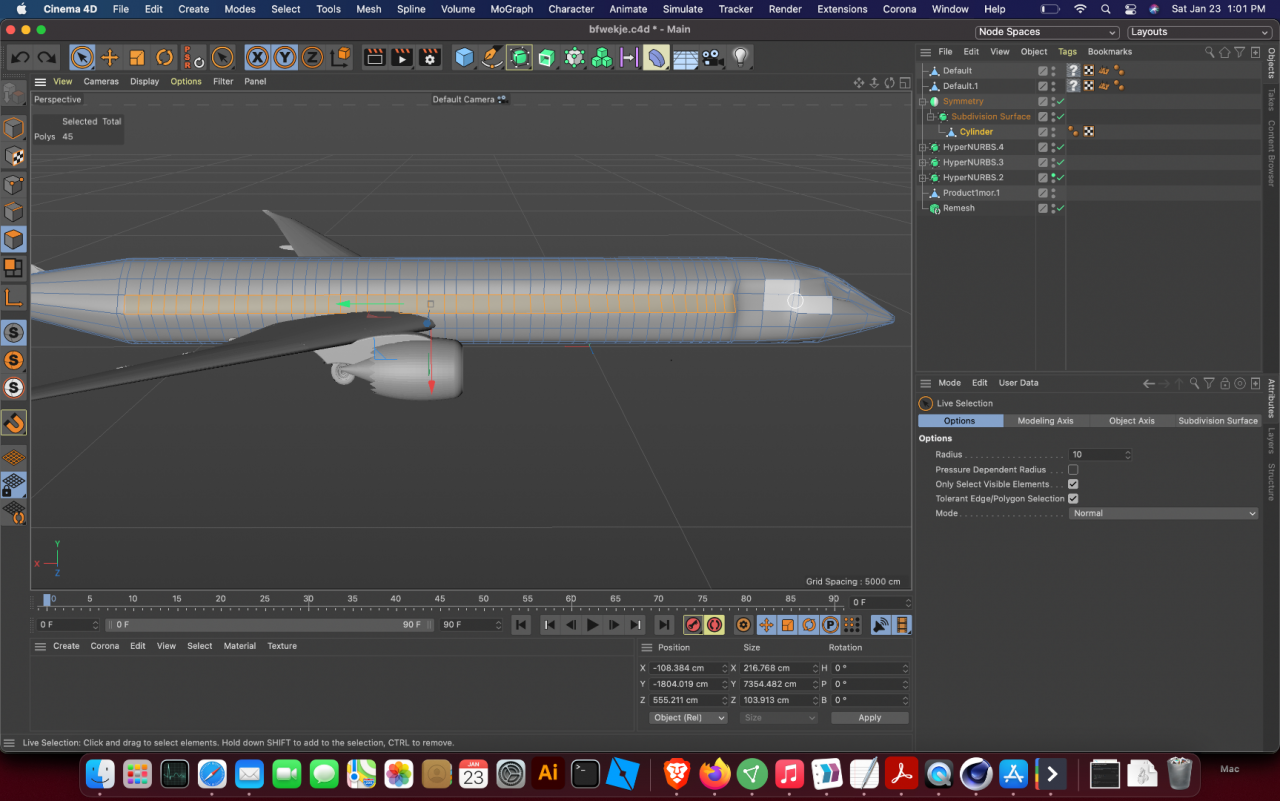
Longtime blender user who switched to C4D. I made this model but something feels off about it. It is supposed to be a Boeing 787 Dreamliner.
https://drive.google.com/file/d/1ZlEtpdbdNh4ni5migvdtcf41F6yJ2XPX/view?usp=sharing
This is my file and it is my finished model, the first one I have done in cinema 4d. Any suggestions on how to make it better?
0 -
1 hour ago, Cerbera said:
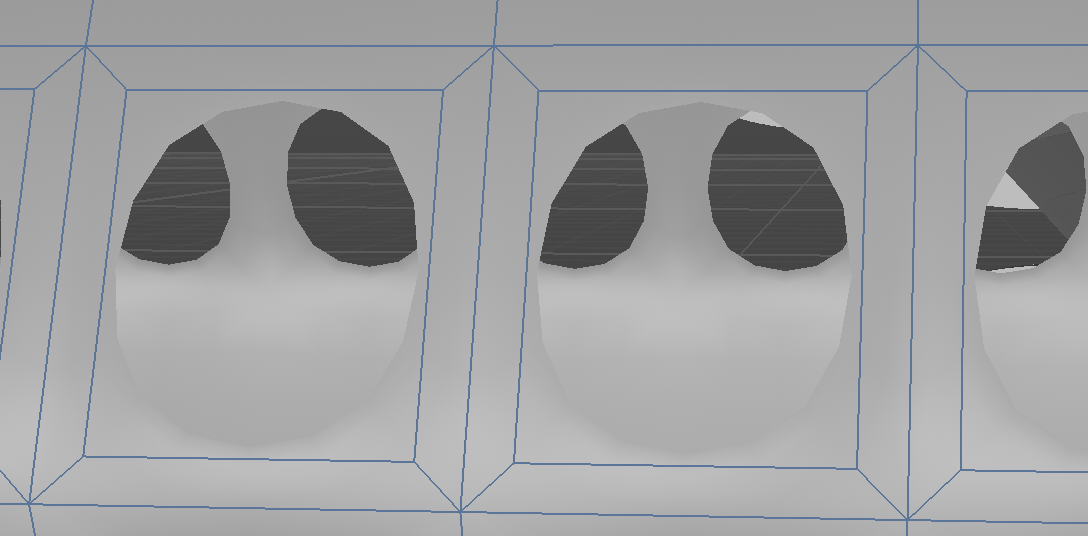
That's not a weird bevel - that is exactly what happens if you try and use subdivision surfaces without following any of the rules in which they work ! There are no control edges in this mesh so of course it collapses under subdivision. The corner edge flow is also incorrect if you want square-form windows, and you have complex poles (more than 5 points converging on a vertex) on a curved surface, which is a big no with SDS - you need closed box corners instead to truly give sharp cornering, although we can certainly tighten your existing corners another way too, Also you have an SDS inside a symmetry, which is incorrect in this context - that should be the other way round.
Here is the difference between a control loop-reinforced porthole and your other ones. One collapses under subdivsion, whereas my centre window does not, except in the places where my new edges have reinforced those too.
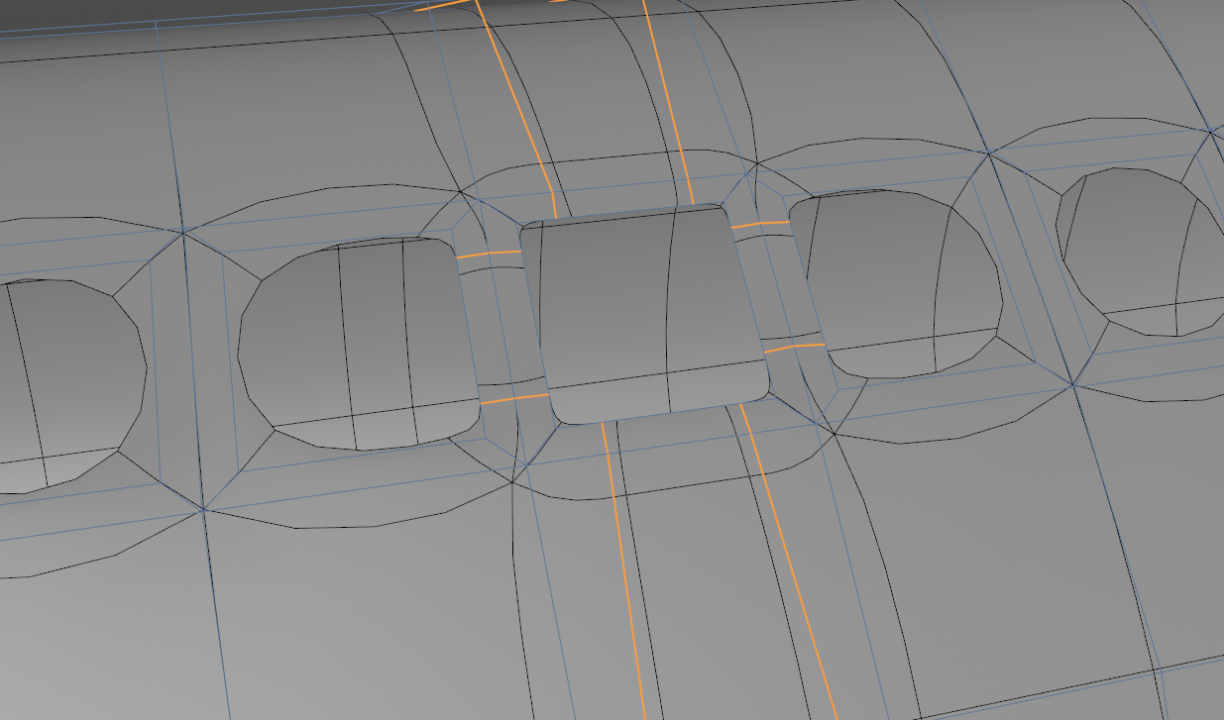
You need to add the edges shown to all windows, but of course doing that along the horizontal flow will compromise your circular body profile unless you then take the time to fix the curvature and restored to the correct profile, and that is a lot of work with that many loops if you don't have HB modelling bundle. For those reasons you shouldn't be cutting in portholes while the mesh is still this low poly density. You need to apply at least 2 levels of subdivision and THEN cut out your windows once you have polygon density that adequately establishes your curvature. This technique is essential in making planes like this, and is called 'staged subdivision'
To be honest a plane like this is not a beginner modelling project, and you have a lot of mistakes in your mesh (particularly up the cockpit end where the edge flow is much more disastrous) that suggest you lack the basic modelling workflow knowledge to tackle something at this level. I would start with much simpler forms and learn the golden rules of polygon modelling particularly with regard to subdivision surfaces. Principally those are:
- No ngons or triangles allowed, particularly on curved surfaces
- No complex poles
- 100% regular even quads
- Reinforced corners (control loops)
- No contra-flow edge angle changes on curved surfaces.
- Minimally-varying poly density
CBR
Yes I tried doing it with loop cuts but then I don't want to do it for all of it. Thanks for the advice
0 -
-
Hello, I am modeling an airplane for a roblox game so I need to take out the windows in it, but whenever I try to delete the faces, it has this weird bevel.
How do I fix it?
 0
0 -
1 hour ago, Cerbera said:
Unless you have HB modelling bundle, and its even distribution script, it will take longer to manually sort those out than it would to just remove them and do them again, but evenly.
So select all the uneven loops, and dissolve them away, then do U,B to ring select the rotation edges, and this time use use Edge cut to cut in the sections; click and drag right in the viewport until you have required loop density.
But before you do that make sure the start and end loop of that section are 100% correct, as all the new ones you insert will follow them, and you don't want to be changing those individually later...
CBR
0 -
Thanks! I will try doing that
0 -
-
So I was modeling an airplane and I made some loop cuts for the windows, but how do I get the windows to be the same length and angle?
 0
0


Help in corona render hdri not showing up!
in Rendering - Do Not Post Here
Posted
Ok, thanks I'll try that.
Edit: Tried it, didn't work