gutster
-
Posts
46 -
Joined
-
Last visited
Content Type
Profiles
Blogs
Forums
Gallery
Pipeline Tools
3D Wiki
Plugin List
Store
Downloads
Everything posted by gutster
-
Already tried that, the cloth gets only attracted to a point, its not really that the cloth in the reference gets squished into a single point
-
Hey guys, I have this reference: https://www.vitalygrossmann.com/wp-content/uploads/2021/01/espn-vitalygrossmann_brandfilm-11_1.mp4 How do you get those flouting, a bit fluid looking cloth sim? I tried a lot of stuff with Force Fields and different cloth settings, damping also around 20% but I cant get the look done.
-
Yea that is the thing that throws me off, without the connect it works, with the MoSpline solution that @bezosuggested it also works. But I wonder why the connect solution doesnt work. I even went back to R25 to double check but it also doesnt work there.
-
Merry Christmas everyone, I have following issue, either I am dumb or something is broke with C4D (usually I am dumb) I have this spline setup, that I clone into a torus. I want to project a clone object on it. When I clone the Matrix directly on the cloner, it works. When I put the cloner into a connect object, so I can use the rate variation value of the Matrix, it doesnt do anything. Same when I clone a cloner object onto the connect object. I attached the scene, but from my understanding it should work. cloner.c4d
-
That is a whole new world for me 😄 I will take a look thanks man
-
Latest 2023.1
-
Sometimes the easy things are the hardest to do. We want to animate a rolling triangle on a flat surface. We could handanimate every rotation, which seems kinda stupid tbh, its just a triangle shouldnt be that hard. Does anyone know a way to roll a triangle on a surface. The goal would be to have the flat sides fully sit on the ground and rotate 120° from there on. Because the rotation point changes every rotation, I dont have a solution for the problem.
-
I only got it to work now when my collision object was a Soft Body with the stiffest settings possible. Other than that nothing really worked. Having only a Cloth Tag on it always resulted in a cloth sim of the collision object. Anwendung_Produktvisu_rgb.mp4
-
This is the part I am struggling. When I do that, my object always simulates as it was cloth. But obviously it shouldnt. Do you have any special settings in the cloth activated or deactivated?
-
Hello guys, I am currently experimenting with cloth sims. Now my, maybe noobish, question: I want to let a object fall into a cloth sheet, that basicly catches the object, making some nice wrinkles and maybe bounce it up back in the air. I get the cloth setup, but how do I get a collider to interact with gravity? I tried to combine the riged body bullet sim, but that results in ignoring the collider tag, which was expected because those are different simulation systems right? Is that something that isnt implemented it or do I miss something? Best regards
-
Update: I think I finally got the hang of it: I ignored a kinda perfect seemless transition to the tips, really didnt got it properly working. So what I do now is a combination of splines and texture work: I use the Spline Deformer to generate the displacement, pretty straight forward. I generate the shape I want and done. In the next step I generate a Alpha texture by using the Base-Spline for the Deformer und use it with a boole to cut a small line into the geometry. Therefore I get the areas for the different colors seperated. That texture I edit in Photoshop to my liking. Because the Spline Deformer doesnt destroy the UVs it just a simple texture job at this point. So basicly the color and displacement part is done. To generate the gold edge, I use a sweep of a base-form, in my case a rounded triangulare shape. Than I use a spline wrap, using the base-spline to wrap it around and for the correct orientation of the wrap, I use a third spline as a rail spline. That spline is a bit higher positioned than the modified spline I use for the deformer. To clip the scale of the wrap, I just enable the "Scale from Rail" option in the spline wrap deformer. And there it basicly it. That costed me way too much time in the end 😄 But I like the result. The project is attached if someone wants to have a look or maybe has suggestions to optimize the workflow. Now I just have to figure out a smart way to move those splines organicly around 😅 Test_Splines.zip
-
First try with a semi cool lighting, could be worse IMO
-
New try: High-Poly Plane, Spline Deformers to get the displacement, using the Spline I use for the modified spline option as a Sweep spline. Hiding those nasty geo errors with sweeped geometry. Will update later with a result
-
The fundamental issue I have now is that is has to be animated. If it was a static image, I wouldnt really have those problems 😄 *$!* this is way more complex than I thought it would be
-
Major let down, I get reflection problem with my mesh, it doesnt smooth well, the plane itself is already 1Mio polygons, happens with Quads and Triangles 😕
-
I am overthinking stuff I guess 😄 PoC: I created Alpha Masks and a Height Map in AE applied it to materials and it basicly makes what I want. Now I just have to figure a smart way out to rig the textures in AE and a way to control a bit the shape of the extrude
-
That is a interesting idea. Only issue I see for my use-case would be the lack of controlability of the waves with a Suma noise. But maybe I have to do this basicly your way but with a custom animated texture, which I can control how I want it to be. My second issue I also have to encounter now is that the areas should be in different colors. Say if I had a line that is seperated by a golden line on the top, the left side has to be blue and the right side is red. I just cant get my head wrapped around it. I initially thought that you could use spline for that. But that itself has some issues as well
-
Sorry for the bad describtion of my problem. I updated it, hope its more clear now
-
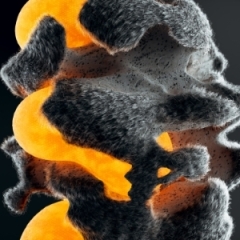
Hello again, I updated the description of my problem: I recently found this image and I think it really inspirating for a project I am working on. My goal is that I can use this kind of geometry as a looped background/plane. The waves should be moving organicly and also in height. My issue now is that I am not really knowing how to get the shading working. The goal is that I have this "paper/leather" texture for the bottom of the geometry and the "tip" of the geometry in a different material. Basicly the same as in the image. In the image I think, as others already said, it could be blending between materials. But I cant figure out a smart way to blend those materials. My current workflow Idea is to use a High Poly plane and use the Spline Deformer to create such waves. Maybe that is already the false idea to generate those shapes. I hope that my problem is now clearer than before. Thanks in advance for your suggestions
-
I already enjoying that I spend money to access this forum 😄 Great suggestions by all of you, will have look into them, once our client gives us the go.
-
Hey people, A client of us asked us if we could remodel a glas bottle that is wrapped with paper, something simular like that: From my understanding a cloth sim is basicly useless because fabrics /= paper. So besides having a base mesh and sculpt the wrinkles into the geometry, is there another good way of creating that deformation? Greets and thanks in advance