
rasputin
-
Posts
1,167 -
Joined
-
Last visited
-
Days Won
8
Content Type
Profiles
Blogs
Forums
Gallery
Pipeline Tools
3D Wiki
Plugin List
Store
Downloads
Everything posted by rasputin
-
Please register for full access
-
Please register for full access
-
 Please register for full access
 -
Please register for full access
-
Please register for full access
-
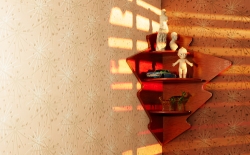
From the album: Rasputin's Gallery III
My main purpose was to see if I could create that gobo effect on the walls. Corona doesn't natively permit this effect, so you have to deploy a C4D light to get the gobo effect. -
Please register for full access
-
Please register for full access
-
Please register for full access
-
Please register for full access
-
Please register for full access
-
Please register for full access
-
Please register for full access
-
Please register for full access
-
Please register for full access
-
Please register for full access
-
Please register for full access
-
Please register for full access
-
Please register for full access
-
Please register for full access
-
Please register for full access
-

From the album: Rasputin's Gallery III
In which I was trying to reproduce the look of aged metal as closely as I could. -
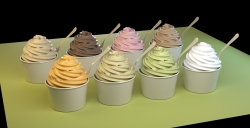 Cerbera: at first I thought I could just sweep a star spline primitive over a helix spline. But that was unconvincing, and did not look like the ice cream photos I was looking at on Google Images. And the Star spline primitive wasn't quite right, either, because its "teeth" weren't acute enough at their tips. My final solution was to create a special star shape in Illustrator... merge it into C4D, then extrude it into a long pipe shape. Then I used a "Twist" deformer to twist the long star/pipe shape along its length. This was key, I observed, because the real-life ice cream swirls get twisted AS they distribute the ice cream into a pile. From there I used the Spline Wrap deformer to bend that twisted pipe into a spiral shape using the Helix as my spline. That basically worked, but was too sharp-edged. So exactly as you observed, I ran it all through the Volume Builder to soften the overall look and let the "ice cream' sort of melt into itself at various junctures. From there I just tried to make my Material include all the little qualities of a semi-frozen milk-based product... lots of SSS, AO used to make tonal variations, and my attempt to make the surface "sparkle" a little bit to represent frozen crystals. There is a frozen yogurt store in my town... and these 8 flavors are the ones they serve. vanilla, chocolate, strawberry, coffee, mango, banana, green apple and unflavored.
 -
I think I was trying to create a design like a Warhol or a Wayne Thiebaud, where images are repeated rather dumbly and cryptically.
-
Thanks, Igor. I hear ya. I was so hell-bent on trying to create the swirl pattern and material-look of frozen soft-serve ice cream that nothing else mattered.