

rasputin
-
Posts
1,167 -
Joined
-
Last visited
-
Days Won
8
Content Type
Profiles
Blogs
Forums
Gallery
Pipeline Tools
3D Wiki
Plugin List
Store
Downloads
Videos
Everything posted by rasputin
-
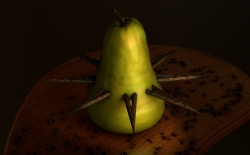
From the album: Rasputin Gallery II
Modeled in R19, Corona Render, 64 passes. -

From the album: Rasputin Gallery II
R19, Physical render, 64 passes. -
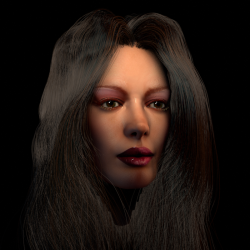
From the album: Rasputin Gallery II
My latest attempt at doing a 3D head in C4D. November 2018. The head mesh was modeled and morphed in POSER 8, but all the rest was done natively in C4D R20. Physical render, 46 passes. About 30min render time. Physical Render can now anti-alias Hair properly, I see. -

Clarify this passage from HELPFILES...
rasputin replied to rasputin's topic in Modelling - Do Not Post Here
Wow... very cool, Bezo. Thank you for taking the time to set this up and upload it for me. Very helpful. -
Clarify this passage from HELPFILES...
rasputin replied to rasputin's topic in Modelling - Do Not Post Here
I think I have solved my own problem: You have to drag the Vertex Map down into the deformer's Falloff region. Thus it falls under the new concept of Fields... which I am only beginning to understand... -
Hi Gang, I am experimenting today with Vertex Weighting. Attached here is the C4D Helpfiles entry which discusses Vertex Weights. It says that Vertex Maps can be used to affect Deformers. ie., you can use a Vertex Map to control degree of influence of a deformer (like BEND, TAPER, TWIST, etc.) Yet, how would you make that happen? Where would you place that Vertex Map to make a Deformer affect only part of your mesh? Thanks, ras
-
Node based materials repository
rasputin replied to Hrvoje's topic in Tips | Tricks | Mini Tutorials
Agreed. It's GET CONTEXT and SET CONTEXT that mystify me the most. They are to work in tandem? Especially I don't know how to connect them with wires to other Nodes, don't see where they belong in a "chain". The helpfiles are indeed cryptic here. -
Hey guys, I don't know if you've encountered this problem when seeking to share your C4D renders on Facebook: Facebook's image publishing algorithm features a rather harsh compression standard. (I guess they have to use it, given the bazillions of images they are forced to store on their servers everyday.) In most images you publish, Facebook is going to make them come out with nasty artifacting, especially all sorts of ugliness around your sharp edges. It also tends to make your fields of solid color full of bad artifacting, and will make your color gradients come out with ugly banding. The more "toon-y" and less photorealistic is your image, the worse will be the artifacting. I've had a couple of my image posts almost completely ruined by Facebook's compression, which bummed me out plenty. Even if your render is already compressed and low-filesize--- as with a JPG--- Facebook will even compress it further. Well, I think I've discovered a bit of a workaround to making your image posts to Facebook look better, a bit closer to how they originally looked when you first rendered them in C4D. Export your C4D render as a 16-bit PNG. Import your C4D render into Photoshop, then choose the ADD NOISE filter. Make sure the filter is set to Gaussian and Monochrome. Then you want to dial in a Noise setting that is extremely subtle, like 0.5% or 0.6% The resulting noise should be extremely subtle, and not change your C4D picture unduly. You can always FADE the effect under EDIT after application, until the noise is almost imperceptible. I don't know why--- someone clever here will perhaps know--- but the slight noise added to the image completely "short-circuits" Facebook's compression algorithm, and your image will be posted with very little... almost no... banding and artifacting (which were far worse, visually, than the slight Noise you're adding) I also notice that Facebook tends to post your image slightly cooler and slightly less saturated than it appeared when first rendered. You can prep for this by making your image 2-3 degrees warmer in Photoshop under HUE/SATURATION, and you can use 2-3 degrees of Vibrance added, before you post to Facebook. With these steps-- admittedly, they are a workaround, not a cure--- your image in Facebook should look closer to your original artistic vision. ras
-
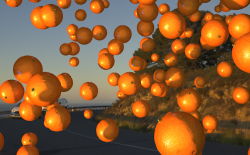
From the album: Rasputin Gallery II
Physical render, 46 passes. Here, my goals were to see if I could: paint my own orange-peel material in Photoshop, just to see if I could manually recreate the look, instead of sourcing a real photograph match the 3D objects as closely as possible to the existing light of this HDRI for a convincing composite use EMBREE SMALLER, just to see what it does use Volume Mesh to create that little "navel" object on the orange play around with different anti-aliasing filter settings to gauge the effect... finally settled on 2+2 use three layers of Reflectance in order to best simulate a naturalistic falloff on the orange (as a sphere) -
Node based materials repository
rasputin replied to Hrvoje's topic in Tips | Tricks | Mini Tutorials
Very cool, Srek! Yes, I do see the difference. I shall have to use the Triplanar Node to avoid stretches in texures. -
Node based materials repository
rasputin replied to Hrvoje's topic in Tips | Tricks | Mini Tutorials
Okay, I'll submit one! It's the first good "trick" I've learned on my own using Nodes. The Triplanar Node is allowing you to assign 6 different colors to an object--- a simple Sphere--- based on the Sphere's 6 local axes orientations. Four pure white Lights are shining on it. If you can do this with colors, imagine what you can do with bitmaps or generated procedurals... Things can get real fancy, real quick! No big deal, really, but it's my first little "breakthrough" with Nodes. (The circular plane beneath is textured with an ordinary Material) ras triplanar colors.c4d -
Node based materials repository
rasputin replied to Hrvoje's topic in Tips | Tricks | Mini Tutorials
It's the manipulating UV's that most interests me, I think, with the Nodes. I need to learn the features of GET CONTEXT, which are eluding me at present... -

From the album: Rasputin Gallery II
A study in contrast of textures. (Oct. 10, 2018) Physical Render, 50 passes. -
Poly-reduced meshes not Sculpt-able?
rasputin replied to rasputin's topic in Modelling - Do Not Post Here
Bingo. That was it. Now it's working. Thanks, fastbee. I will be more attentive to the Mode next time... -
Hey gang, I just tried something that didn't work (see screencap) I first made an complex object out of Mesh Volumes then I made it Editable (ie., turned the whole Volumes stack into a mesh via Current State To Object) then I applied a Polygon Reduction to it, reducing it by 75% then I tried to Sculpt it further, by subdividing and using Sculpt Tools I see that Sculpt is not available to me in this context? I guess the Polygon Reduction process creates a special kind of polymesh that cannot be further sculpted? Sculpt only works on regular, organized polygons? I was (seemingly) able to do a Sculpt Subdivision... but none of the Sculpt Tools had any effect at all. Thanks, ras
-
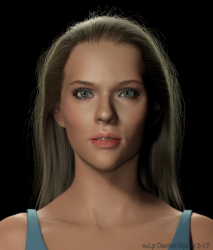 Excellent work, Dan! You did the right thing of making her sclera (eye whites) not too white. That is the #1 thing that 3D portraitists get wrong. And you didn't go overboard with the SSS... quite correct.
 -
Hey guys, I'm wondering: What category, under PREFERENCES--->INTERFACE COLORS, governs the border of a Node? (see my screencap... the amber/orange color bordering my node). I want to change how my Nodes' border colors appear when selected. Yet I can't seem to locate the category in PREFERENCES that would govern this color. I know, not a big deal. Yet it is to me... Thanks, ras
-
Just FWIW, there is a free C4D plugin called "Easy Chesterfield". Available somewhere online. It should work in R14, maybe? It does essentially what has been described in this thread. The hardest part, towards realism, is not so much getting the indentations... but getting the surrounding "fabric" to fold/crease as it does in real-life upholstery.
-
Node based materials repository
rasputin replied to Hrvoje's topic in Tips | Tricks | Mini Tutorials
Thanks so much, hsrdelic!! Yes, I think the best way for me to understand node-based materials.... would be to dissect some well-made, sophisticated ones. I see this ZigZag node-based shader of yours is more complicated than it appears at first! I swear I still don't understand this whole "vector/float" thing, though... Would very much love to see a discussion of these parameters somewhere, in a written or video tutorial... What they intellectually mean is not enough; I need to see them in practical action. Thanks, ras P.S. Is that your little girl? She's adorable! P.P.S. One thing's sure: These R20 Nodes represent a huge C4D innovation... and I suspect it will prove to be a "Rubicon" of sorts... a "line in the sand"... dramatically separating C4D users into those who can implement it and understand it.... and those who cannot. -
Hey guys, I know how to customize a C4D interface palette... just drag 'n' drop from the customizer inventory. But how do you DELETE an icon from a Palette? (see screencap) I can't find this information anywhere in the Helpfiles. Just activating it and clicking your keyboard's DELETE button doesn't do it. Thanks, ras
-
Hey guys, I have been trying to learn the new R20 Node Material system... just by diving in. Here is a "dummy" scene I've created, with an abstract object, that doesn't mean anything, modeled from Volumes. I just understand the very basic concepts of Nodal materials... but I hope to eventually understand the more mathematical aspects of it. My biggest hope with Nodes is that I'll be able to start creating Materials, made with bitmaps, where the texture repeats absolutely don't show at all. Any tricks you know in this department? Best, ras
-
Wowee, thanks, guys. I see I am not alone in wondering this, which is reassuring, haha. I'll try using the correction deformer approach. It never occurred to me that a Volume-built mesh could be considered just another Deformation.
-
Hey gang, This is definitely a dumb n00B question... The answer is surely simple, if only I could figure it out. I'm building compound Volume objects, using the new R20 Volume Builder approach (see screencap). When I drop my mesh objects as Children of the Volume Builder, the Materials they had been earlier assigned are no longer visible, either in Viewport or render. In this case, my array of cones should be red; my sphere, blue. But the compound Volume object created is just whitish. What's the trick to getting your individual Volume objects to retain their Material? (I will probably kick myself when it's shown to me). Thanks, ras
-
Wow, excellent... Thanks, bezo!
-
R20 no longer supports a COFFEE plugin I've used for years: DROP TO FLOOR and DROP TO OBJECT. They did what they say: drop an object onto the 3D floor, or drop an object so that it sits perfectly on top of another object. Is there a way to automatically do this natively in C4D ? Something about calculating what the lowest Point in an object is, and making it fall to a defined surface? Thanks, ras