

kingcoma
-
Posts
629 -
Joined
-
Last visited
-
Days Won
22
Content Type
Profiles
Blogs
Forums
Gallery
Pipeline Tools
3D Wiki
Plugin List
Store
Downloads
Videos
Posts posted by kingcoma
-
-
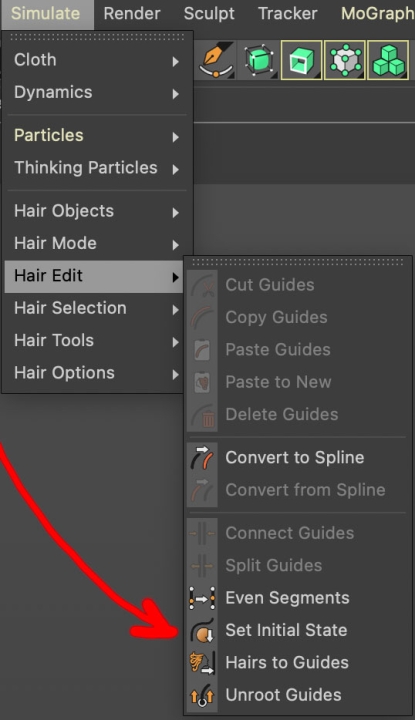
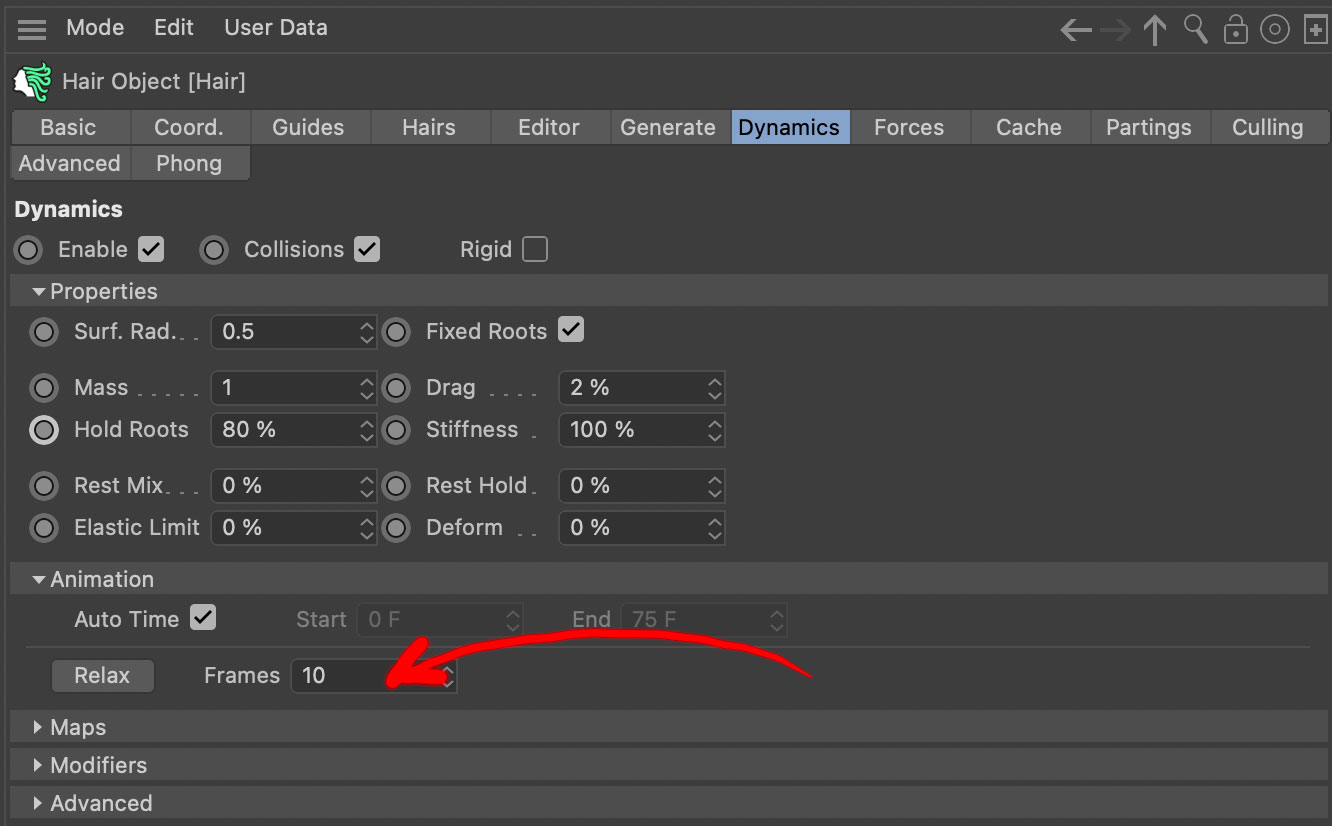
About the frame 3 thing:
Go to the hair object > under 'dynamics' there's an option 'animation'. Set the frames to '3' (in your case) and click on 'relax'. This will play the animation for 3 frames.
After that, go to Hair > Hair edit > set initial state. This will freeze the current state of the hairs. You can then go back to the Hair object and disable the 'dynamics', to make sure the hair stays the same.
 2
2 -
So I'm wondering now.. How do the people that drive this car look like? =D The chairs and headrests are pretty normal, but the roof is super high. So to they have enormous foreheads or are they like coneheads? =D
Personally, I would do the exhaust smoke in post.. smoke or vapor in 3d (no pyro) doesn't give the same effect as a smoke-texture would do.
But, great stuff, love your work, as always! Keep it up, man!
0 -
Nice animation and smart setup!
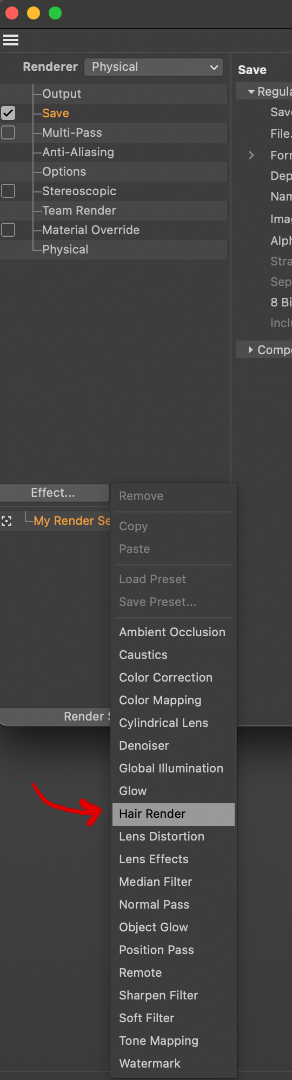
I'm not sure I understand the following:
"I just found out that one cannot render the hair directly as it does not preload the animation when using the Physical or Standard renderer."
Why not? If you add hair to anything, it should come up in your render settings and should be visible in render (both standard and physical)
 0
0 -
2 hours ago, HappyPolygon said:
I have some questions ....
What's the difference between an Art Director and a Creative Director ?
Does the Creative and Art Directors get paid more than the Designers ?
What Live Action ? the hand ? so they hired an other studio for the hand ?
What's a DOP ?
What profession is a Talent ?
They hired an other studio for Clean up & Colour ?
Sooo... 3 studios and more than 14 people where involved for a 30 sec animation... How much could that cost ?
Dop= director of photography
it’s not uncommon to have lots of people or different studios working on one 30” commercial, though.
*edit: i think creative directors are ‘higher in rank’ to art directors, and those are ‘higher in rank’ to designers. Art directors are responsible for all creative things: if a designer has to design something, it’s mostly the idea of the art director, or the art director gives advice / tips / recommendations to the designer to make the design better. Art directors are also in closer contact with the client, as designers communicate more with the art directors.
And yes, they are paid more because they have more responsibilities (or the end responsibility for the final design)
1 -
Are you using compositing tags with the ‘matte’ option enabled? This can render the last image you posted (red and black) in an instant without a ‘beauty’ pass> the matte render would be the beauty pass.
0 -
Got a request from a client, and they sent me a moodboard with some examples of things they like. There was one image in there I liked, but thought to myself: 'this could be funnier..' So I made a whole set:


 2
2 -
19 hours ago, keppn said:
@MashYeah, but when the null has keyframes of its own? Then the track shows its own keyframes + all keyframes of child-objects.
No other app I use has this strange behaviour, it's so messy

Tested this, and you're right, but if you drag and drop each item you want in the dope sheet, it only shows the keyframes from that object (parent, child, doesn't matter). It'll only show all keyframes in the 'summary' at the top.
Then again, this might be confusing because you can't see which one is a child of what in the dopesheet (you can however if you look at your hierarchy in the objects manager.)
I also didn't know about those layer colors in the dopesheet, so thanks! Unfortunately I never use layers. :'D
1 -
To be honest, the screenshot doesn't look cluttered at all, it looks very neat and tidy.
There are a lot of ways to work in de dopesheet, and a lot of different view-options as well.
Working with a long animation and VO, it's sometimes more handy to have everything in one file rather then to split this up in different files. Especially when you have to edit the timings.
The organization of the dopesheet hierarchy depends on the hierarchy you have in the object manager. You can use 'automatic' mode, which show you all animated items, but you can also drag and drop an object from the object manager into the dopesheet. You'll only see the keyframes from that single object. If you want to drag more object into it, you can do this as wel.
You can drag individual keyframes, or drag over a set of keyframes and move them all at the same time. If you click on an object on the left side of the dopesheet, you select all keyframes from that object, which you can then reposition or edit further.
Lots of possibilities, and without having the actual file or 'briefing' of what needs to be changed, hard to say. You can always send me a PM and I can try to explain / make a screengrab if you like.
2 -
8 hours ago, HappyPolygon said:
Does the fur simulate correctly in the real-time viewport ? Do guides always point outwards ?
Yes it does and yes they do. It all works and looks normal, it just sometimes renders, sometimes it doesn't. Pose doesn't matter, because if rotated, it sometimes does render, rotate the model a bit further, nope, no more hair.
Also tried copy pasting it in a new scene (sometimes helps with stuff) but got sort of the same problem: in the original scene the hands sometimes didn't render the hair, and now in the new scene, the arms have this problem and the hands are fine.@igor: I know, and I would love to share it, but it's a client-job-thing..
0 -
Hi everyone,
I have a weird problem I haven't encountered before:
I've made a character (a raccoon) with hair. The model is split in different parts: head, hands, arms, legs, etc. For each of those parts I added hair and brushed it as I normally do. Model is completely rigged, no problems there. Made a couple of poses per keyframe, so I can render it as a sequence.
The weird thing: on some poses / keyframes it renders all hairs on all objects perfectly. On other frames, the hairs on the hands for instance are missing. If I test it in the viewport with a preview render, it has the same problem.. An even weirder thing: let's say pose 2 on frame 2: hairs on hands are missing / not rendering. When I rotate the model 90° or something, hairs still missing. When I rotate the model say.. 221,6° BOOM! Hairs are there.
Never had this problem before, and I have no idea why or where this is coming from..
Any thoughts?
0 -
Shoes could use some bulginess indeed, but decent cartoony shoes are pretty hard with all those fine details and shapes. Great model of shoes either way!
Also loving the shapes of the fingers and hand behind his back! Maybe some lines are a bit harsh/hard, but they really define the shape of the fingers quite nicely.1 -
On 11/27/2022 at 2:37 PM, DasFrodo said:
Idk what's happening there, but it looks weird

Yeah, when modeling characters I always use some basic shapes for ears, teeth, eyebrows.. In this case this is still just a cilinder, hence the super smooth look of the teeth. I'll fix them in the next round
 1
1 -
Hard to tell from just one screenshot and little info, without a scene file.
But first thought is that the skin or weighttag looks at a previous state of the joints. If you disable the skin tag, select the weighttag and press 'set bind pose' in the attributes manager. Then enable the skin tag again.
0 -
@DasFrodoDo tell?
Or are you talking about the fact that there are no separate teeth? #crapimissedthat
0 -
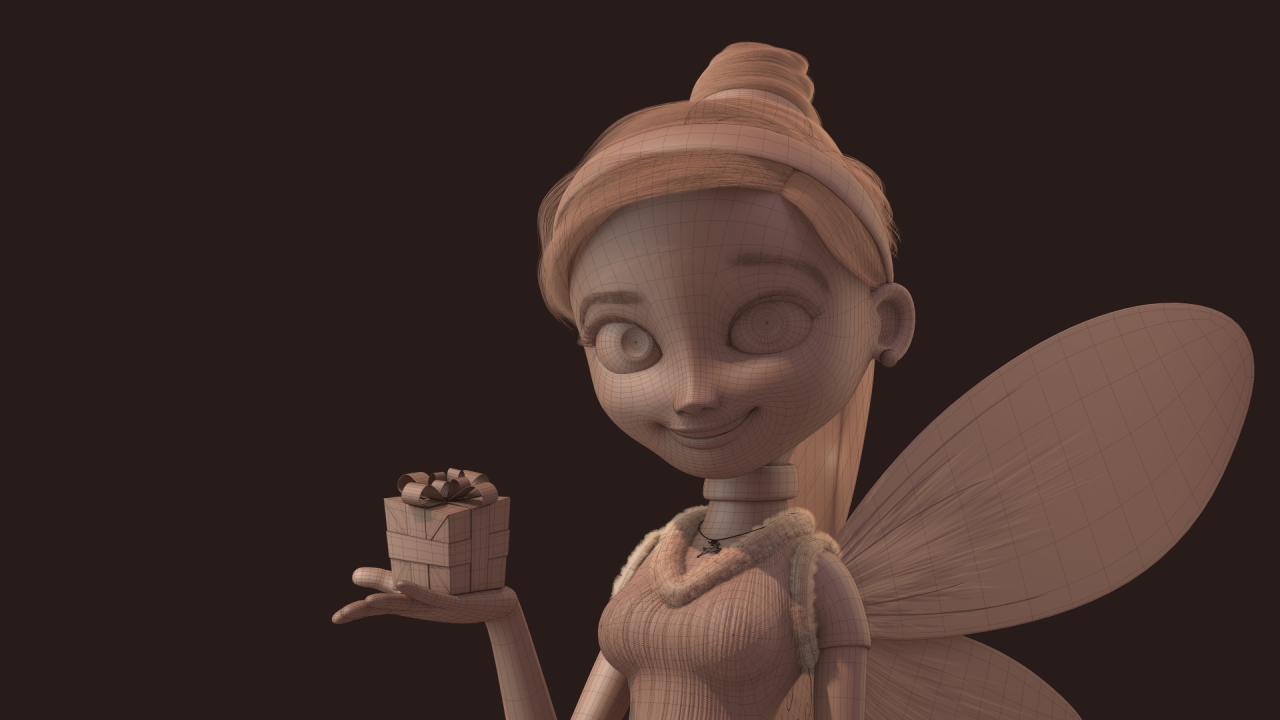
Finally some time between jobs and made a new character! Lots of tweaks on the face topology, and a nice practice again with hair.

 1
1 -
Duplicate the spline, and call it 'spline rail'. Move this spline rail just a little on the Z axis. Click on the Spline wrap object and put this new spline rail in the 'rail' tab.
Should work.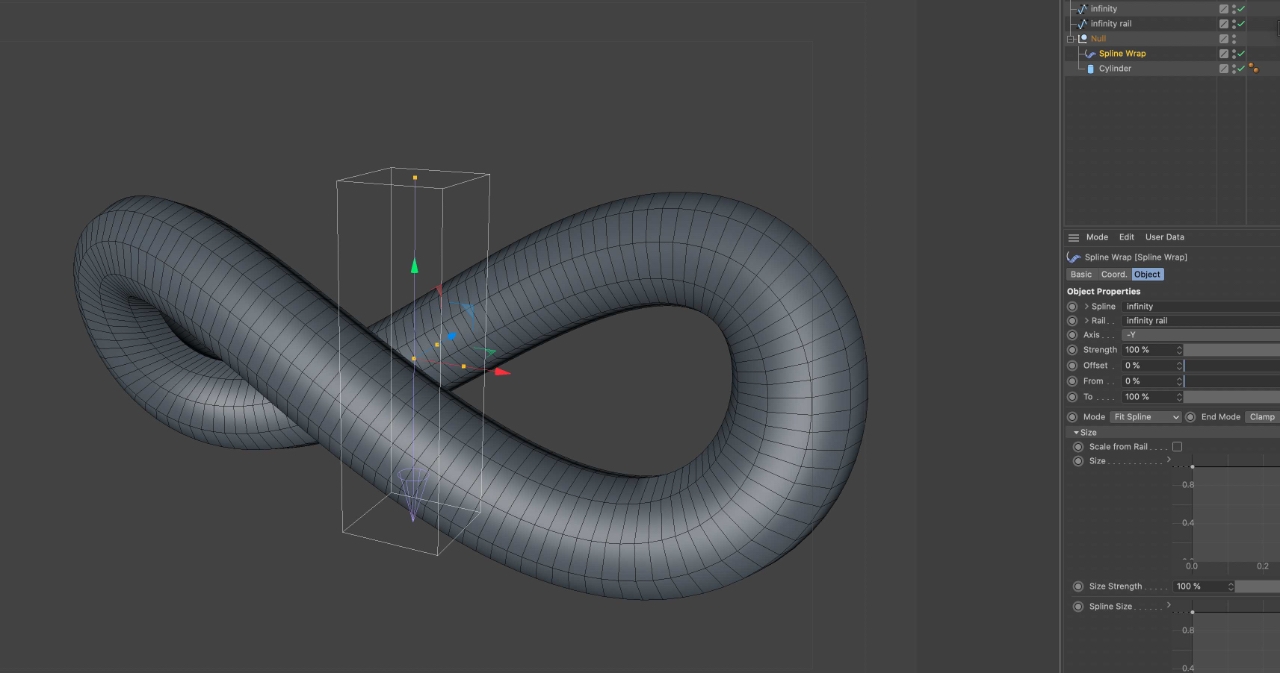 0
0 -
Well, they only saw the sketch, and are still discussing which one they'll take.
Finished with the rigging! HAPPY! Too bad I'm still stuck on R21, R23 has this cartoon rig? Don't know if it's something handy and easy to use. This took me about 7h from start to finish, but I do start from scratch. Not the biggest fan of the charactercomponent, for a bit more custom controls it gets too complicated and slows my program / Mac down a lot. Or maybe it's just me. =D 1
1 -
Added more detail, textures and finished the model. Starting rigging now

 1
1 -
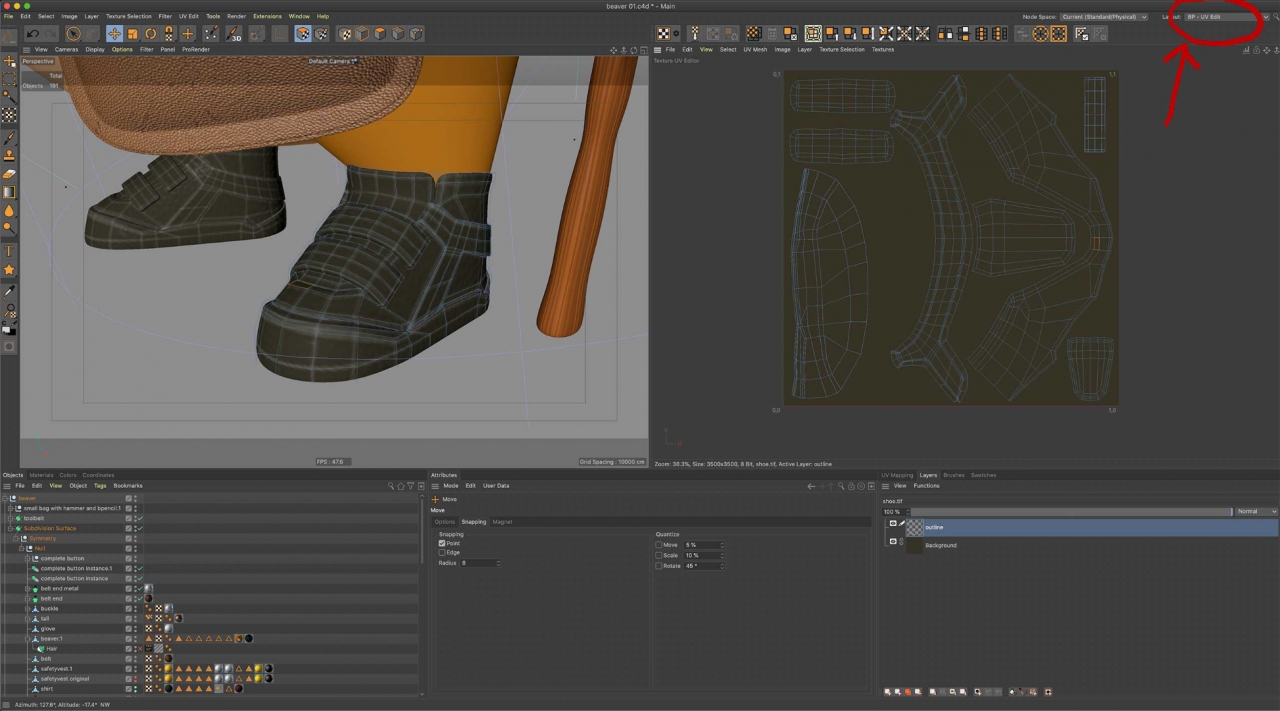
No, just some UV mapping. I'm not sure it looks the same on R23, but you can switch to UV edit layout in the top right corner (and other layouts)
 0
0 -
Well, your texture is being projected pretty flat, looking at your UV map. You can either make a flat projection with a selection tag (2 materials for the front and the back, otherwise it still would be mirrored) or you can adjust your UV map and flip the backside of the balloon. Or you can make a better UV map in case you need different things on each side of the balloon.
Example screenshot of UV map separated:

Here's your file again, with a flipped back, and rotated properly so you don't have to flip your text in your texture file.
0 -
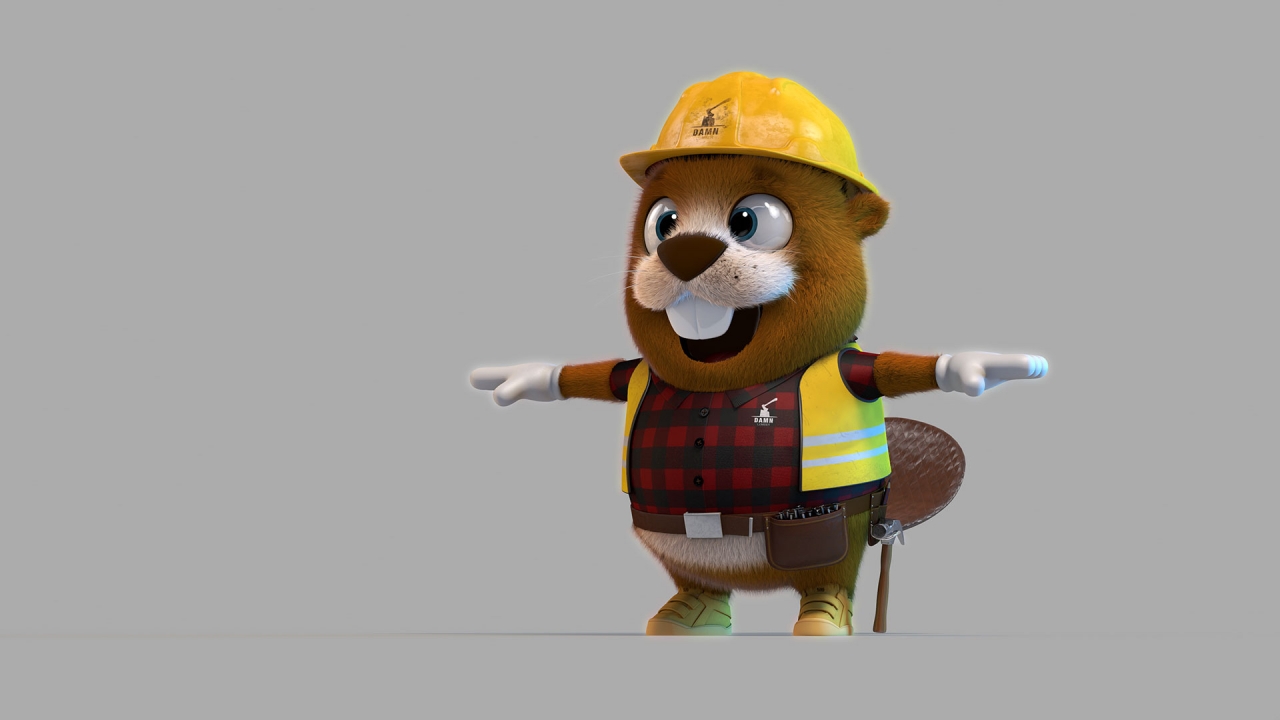
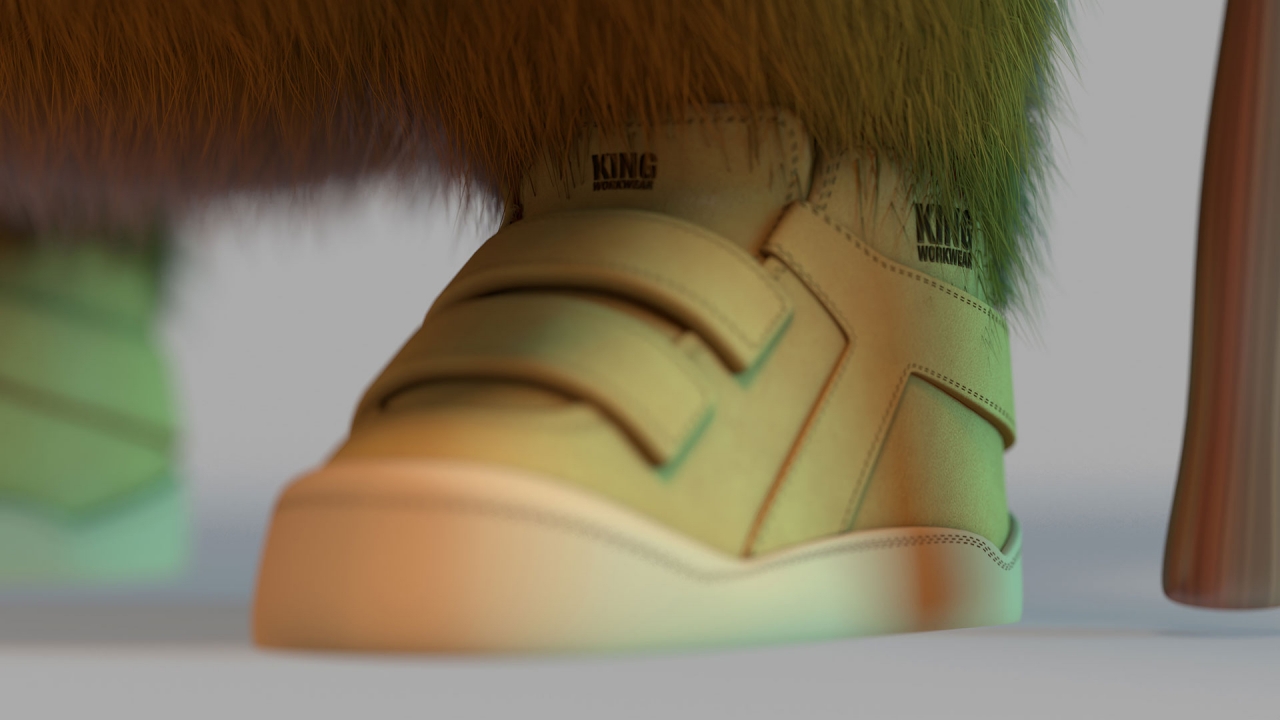
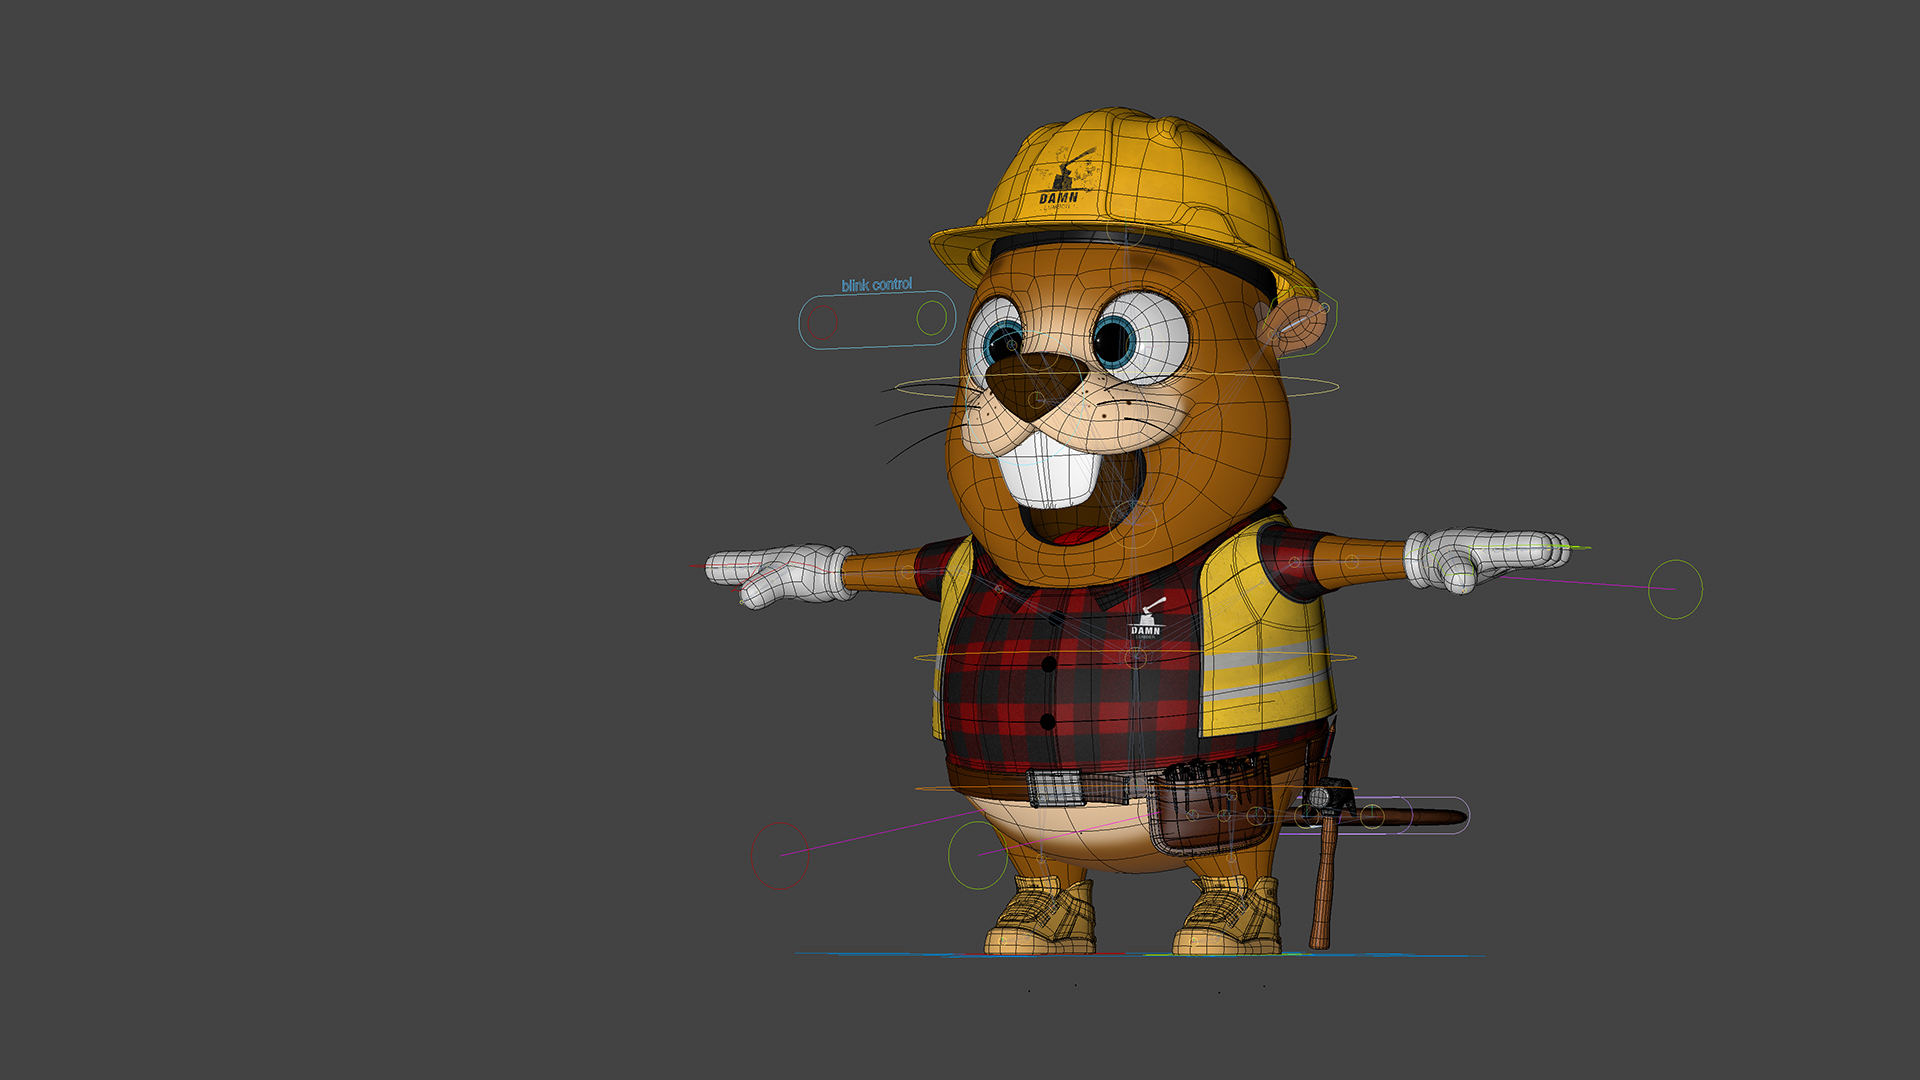
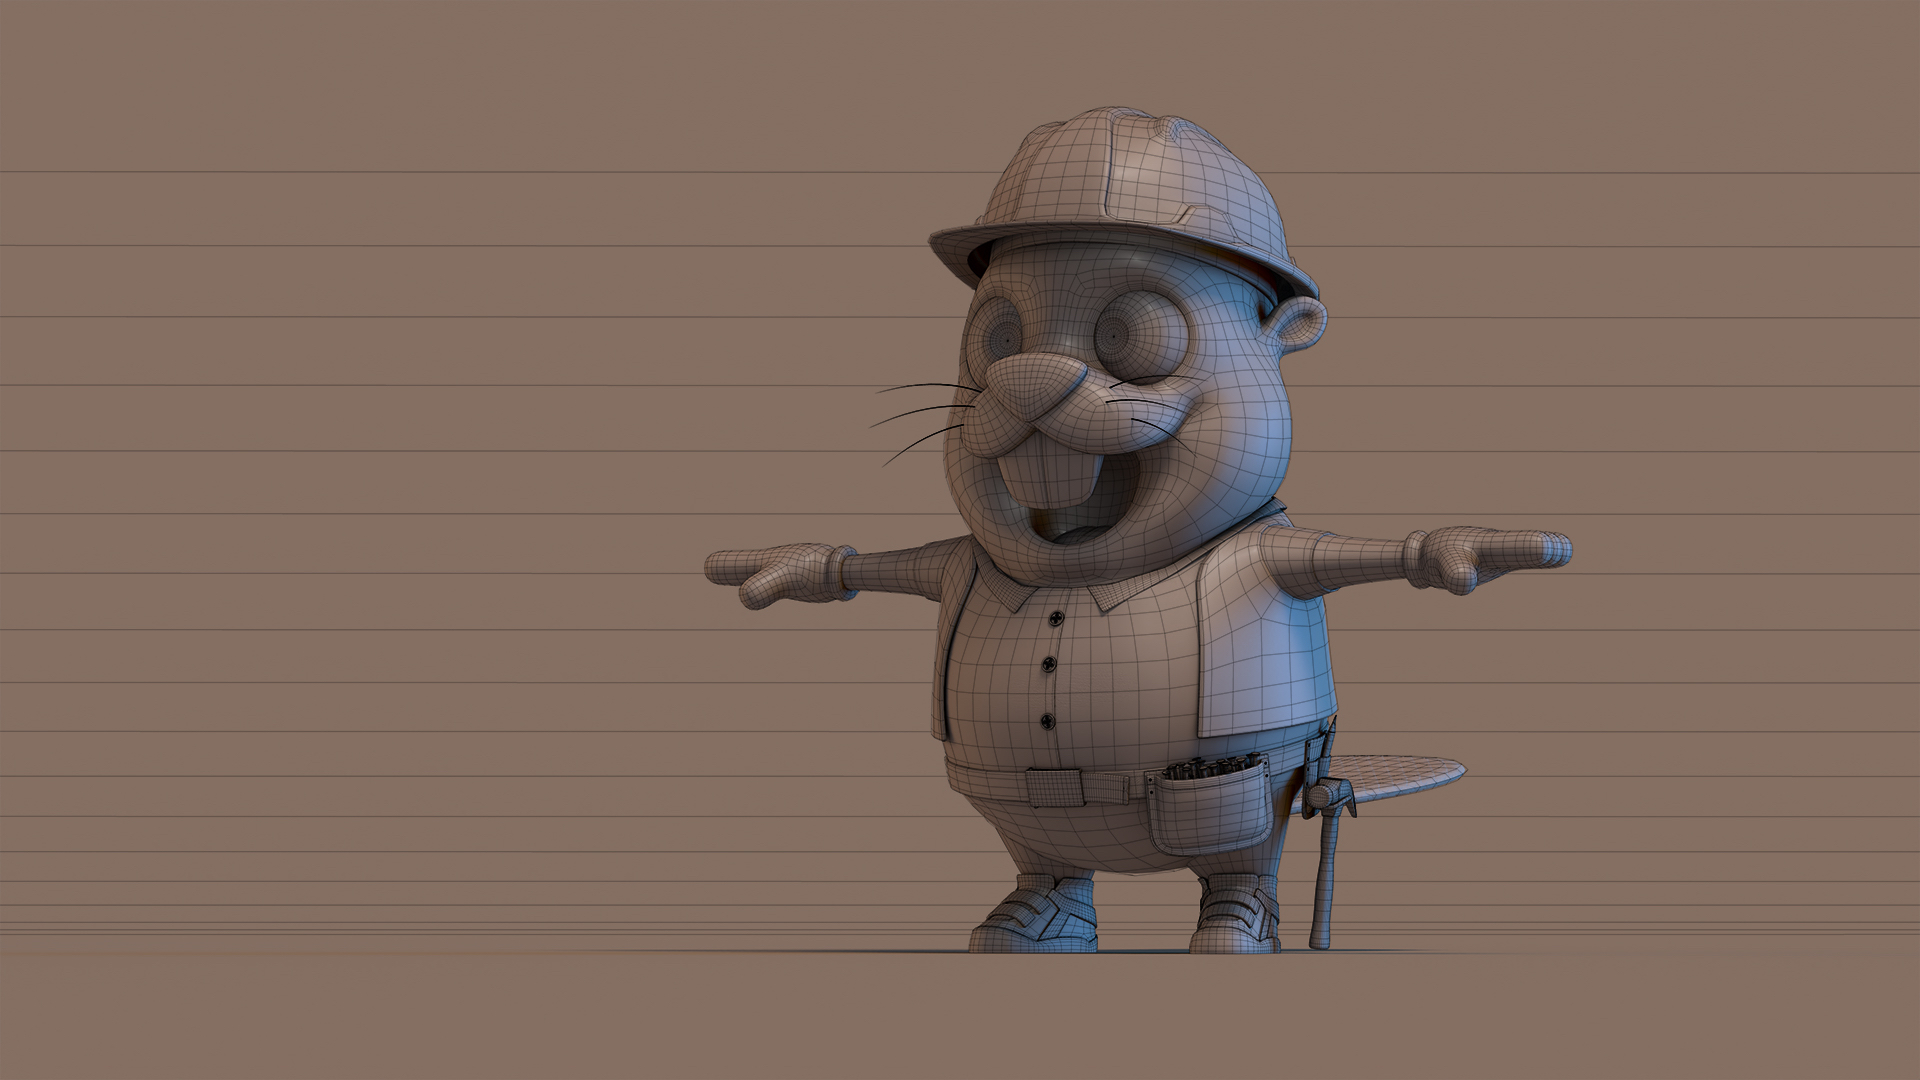
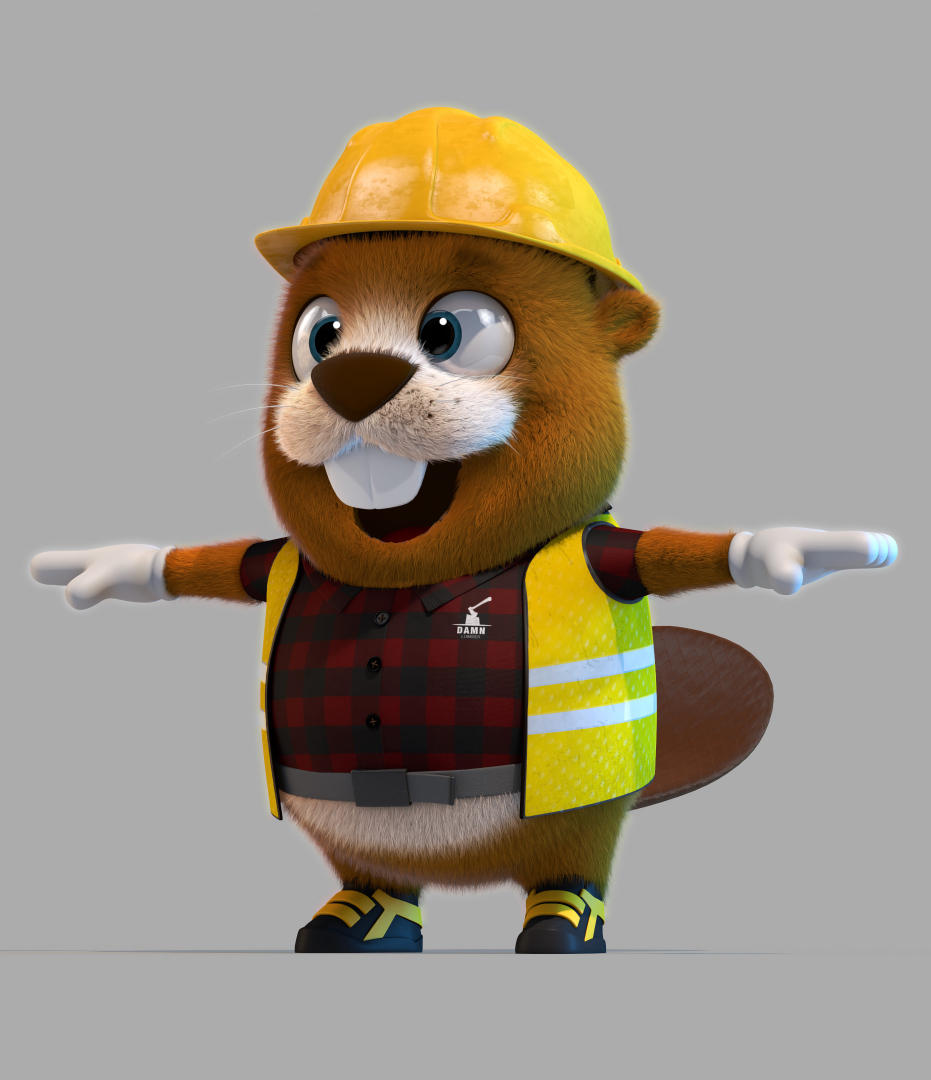
Some improvements:
- adjusted his shirt with a little collar and some buttons
- did some texture work on the shirt, vest and helmet
- made a new embroidered logo
- made the brown hair a bit darker

 2
2 -
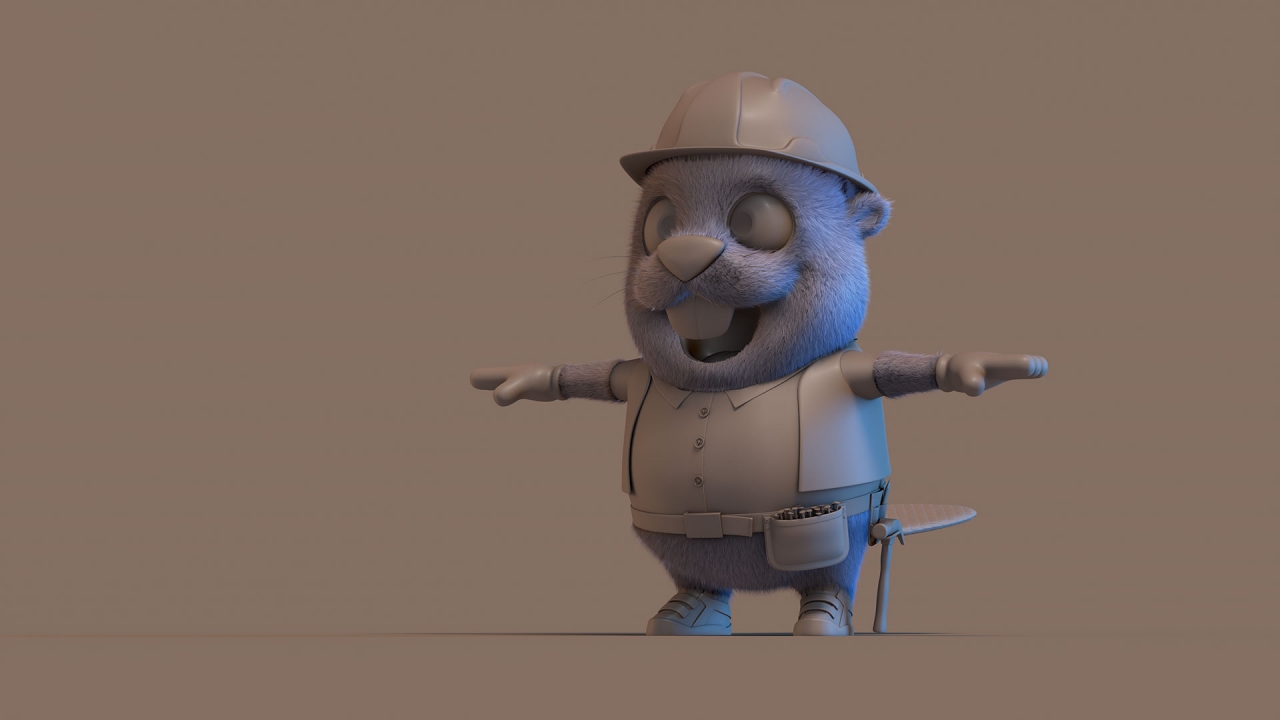
Made some sketches for a client and gave them three options. Unfortunately, they didn't choose this guy. I really liked it, so thought 'why not just make it for my portfolio?'
At the moment, it's still in a T-pose, but as I'm pretty crappy with textures, I was wondering if you guys had some tips, especially for the clothes (shirt and safety vest)The helmet maybe could use some scratches and dirt, but I always seem to get stuck when it comes to shirts, jackets and pants. Does it need stitching, folds or creases? Dirt? Do you always have to unwrap this stuff to get the textures right?
 2
2 -
Love the fact he doesn't have pupils! Makes him look like a mad zombie pig!
1 -
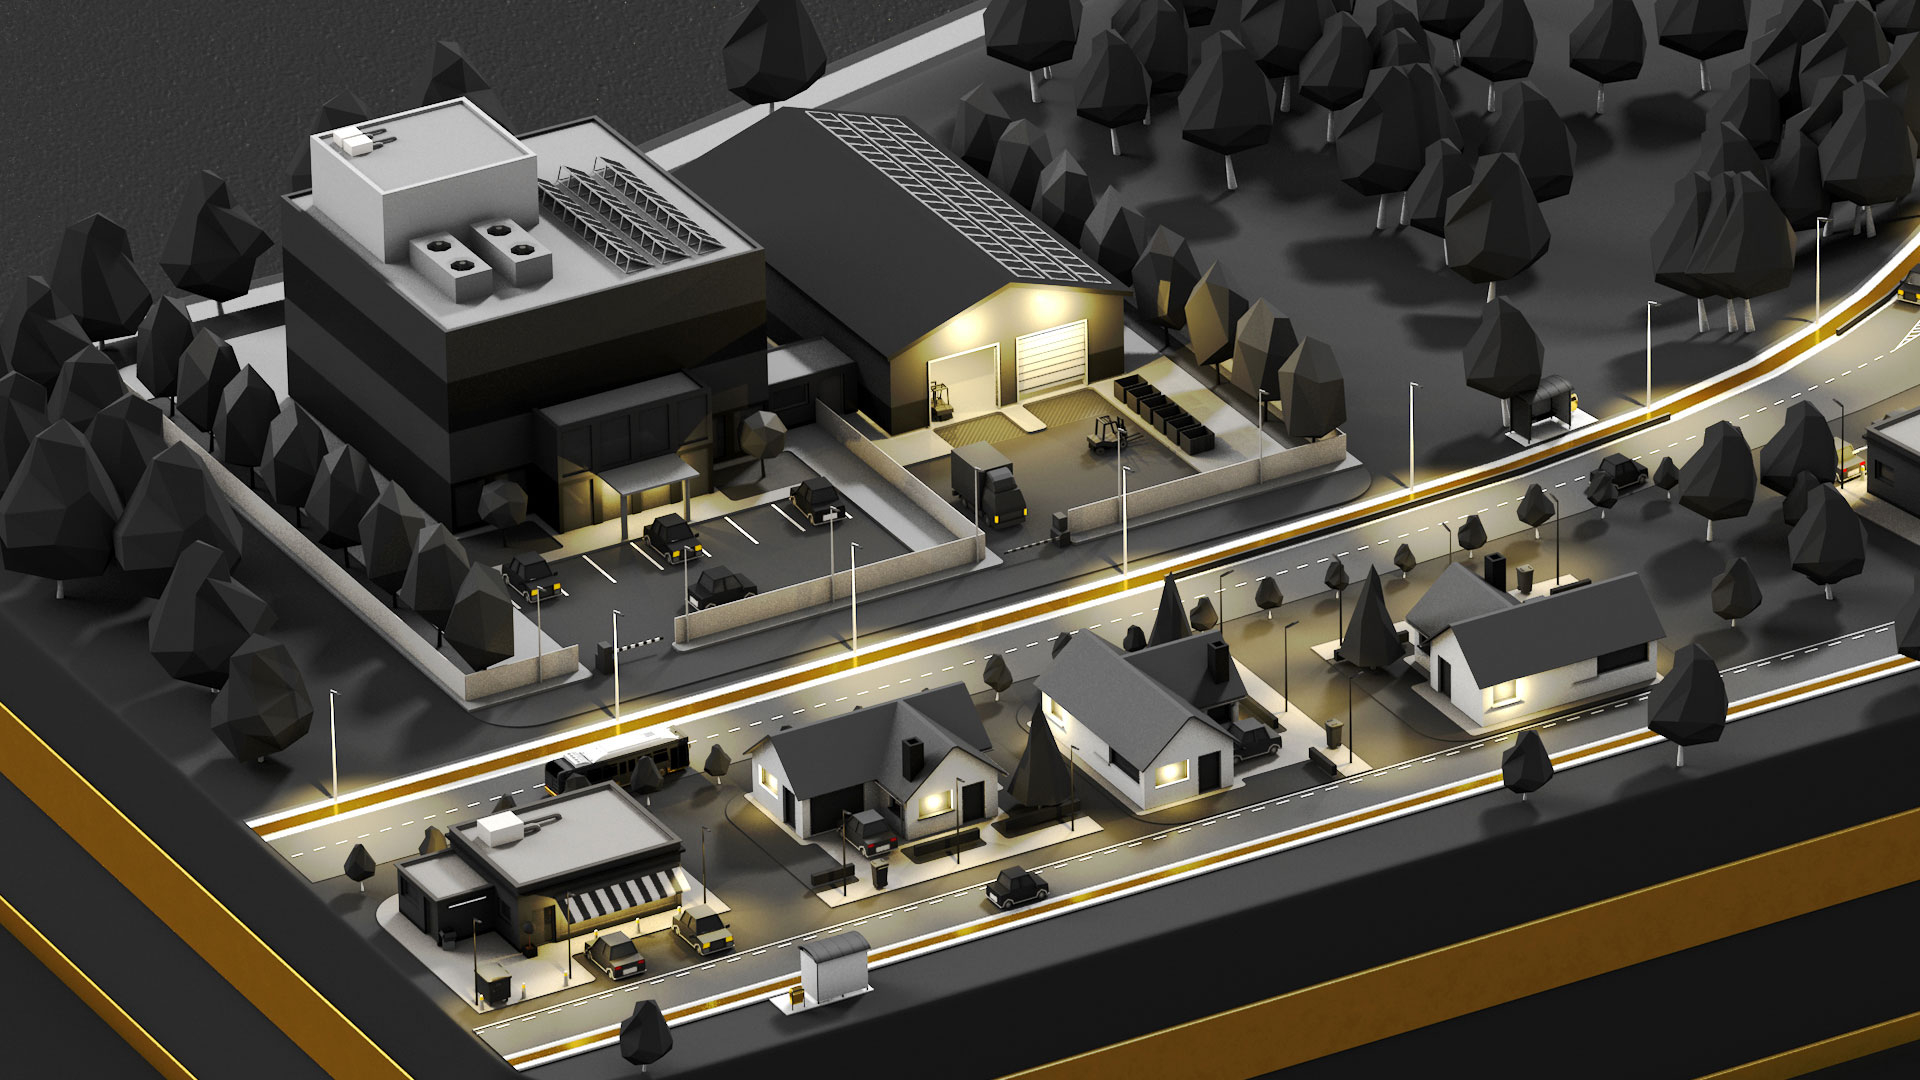
Great tips, guys! Thanks!
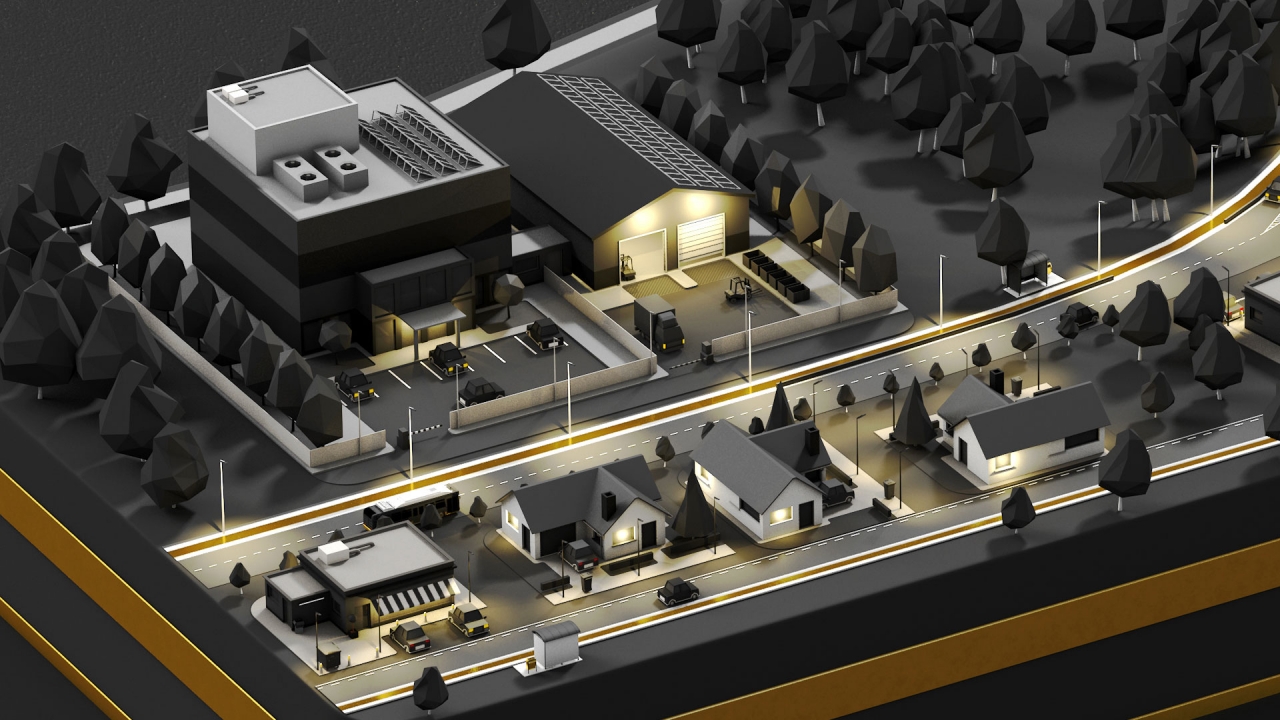
Something totally different, but also very fun to do, I made a visual to show possible clients I don't only do stupid characters =D


 2
2


Help with C4D hair system
in Cinema 4D
Posted
Haha, yeah, it really is a maze and a puzzle all at once sometimes.