


natevplas
-
Posts
664 -
Joined
-
Last visited
-
Days Won
10
Content Type
Profiles
Blogs
Forums
Gallery
Pipeline Tools
3D Wiki
Plugin List
Store
Downloads
Videos
Posts posted by natevplas
-
-
Check it out: https://www.maxon.net/en/cinema-4d
Looks like mainly particles, as predicted! Some minor rigid body and connector improvements, and some ZBrush stuff. I'm downloading it now!
0 -
@deckthanks for giving it some thought. The Delay Effector idea didn't work for me, although it is nice if you have a stuttery animation, but you want just a little springy animation between the hold keyframes. I tried Mograph Cache, but it doesn't work if you change the frame rate after caching.
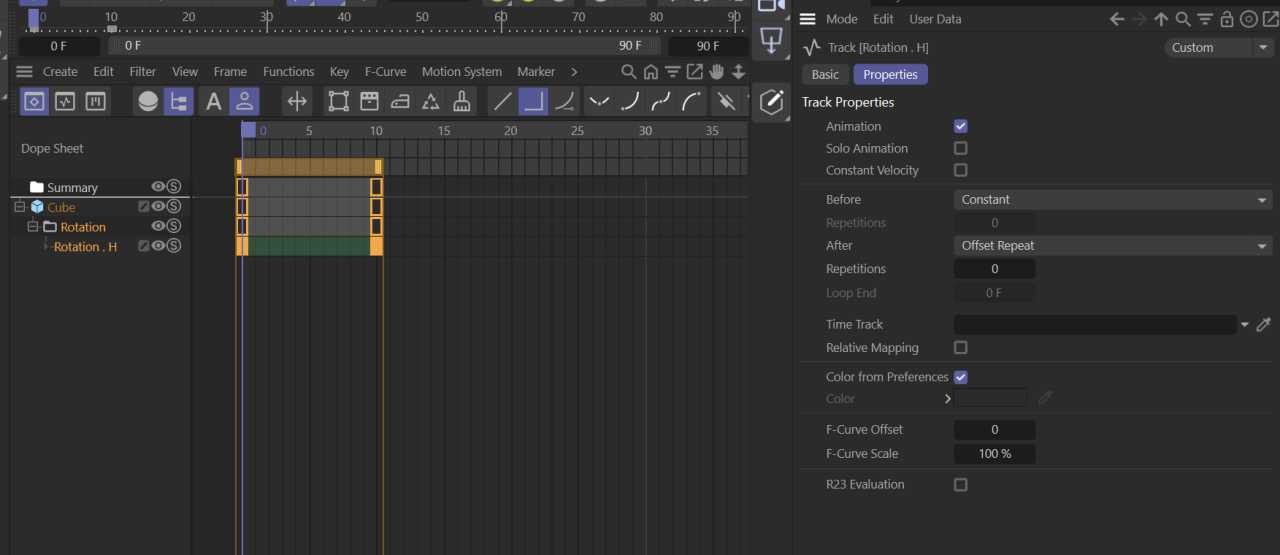
That's a great technique, @zeden! Perfect for the clock example from the OP. I may be able to use something like that in my project. For those who are searching or haven't downloaded Zeden's file, he basically just has 2 hold keyframes (Step interpolation), one at 0 degrees and the next, at 1 second, at 2 degrees. Then he has that rotation track set to "Offset Repeat" in the "After" drop-down (these settings show up if you select the Rotation.H track in the Summary list on the left). This way, every second, it jumps to the next multiple of 2.
 0
0 -
Thanks for the info, guys. Unfortunately the "Track Modifier Tag" doesn't work for many properties, especially with Mograph. I'm trying to create some FUI (fake user interface) holograms, and I want some of the animation of my Cloners to be stuttery- like 6-10 fps. The problem is, they have Shader Effectors with animated noise shaders. I could just lower the frame rate of the entire project, but I'm compositing this into 24 fps footage, tracked into the scene. Are there any other hacks you guys know about that could work for me? My last resort would be to set my project to a low frame rate, export stuff as Alembic, then set my frame rate to 24. I'd really rather keep things parametric, but maybe this is the only way?
0 -
Looks super interesting! I've also had TFD for nearly a decade and it's been pretty great the entire time! I'll have to check out Reactions.
0 -
1 hour ago, kingcoma said:
Too bad I'm still stuck on R21, R23 has this cartoon rig? Don't know if it's something handy and easy to use.
I haven't used it myself since I'm still on R20, but @everfresh designed that cartoon rig and it looks amazing!
0 -
He looks great! Your client is an idiot for not choosing this adorable little guy!
0 -
I agree, yes, yes, and yes! In addition to smaller leaves, I think you need more branches and more "branchy" branches, for the lack of a better word. This is a cool stylized tree, so I wouldn't want you to ruin it by adding too much. One easier thing to try as well would be just make the trunk twice as long before any branches, and maybe add a knot hole or two. You may also consider straightening the trunk a bit, just because large trees simply don't grow very high if they're this crooked. They'd just fall over. The trick with trees is that the size is almost directly proportional to their age, so making it look older could make it look bigger in some ways.
@EAlexanderis right that your camera lens can play a big role. Also consider where the ground plane would be that a photographer would be standing, and put your camera there (lower).
0 -
The new website looks great, Martijn! So much good stuff on there, I need a couple days to digest!
0 -
I love your little computer so much! I don't care if he only takes floppy disks, I'll trade him for my machine any day!
 1
1 -
Ahhh, gotcha!
0 -
@kingcomathat sounds about right!
And I like this "cute-ified" version of that cute little car! Looking forward to seeing the wrap! The neon logo is great- really detailed and nice. The only part that feels off to me is the number of little segments you have on the inner parts of the two outer half circles. Seems like too much to me since they could easily make that in 2 pieces or less with real neon tubing. Although, I don't know what the regular logo looks like- maybe it's dashed lines?
0 -
I love this so much! And I love cats! Except my cat, Rosie, who looks just like Storm (or Strompie?). She is such a pain. In fact, as I'm typing this she's trying to walk on my keyboard and sit on my lap. Now she's purring. Ah, who am I kidding. I still love her.
Great work, man!
0 -
Wow, congrats to the winners! Really fantastic work!
0 -
Hi Amyraa! Welcome!
1 -
Great solutions here! I figured out how to adapt @noseman's xpresso to a single wheel which looks ahead a bit rather than rotating at the exact tangent of the spline. I wanted to add a "lean" effect where the wheel (or I might adapt it to a flying bug or airplane) leans into the curve like you would on a bicycle. Ideas?
0 -
On 2/21/2020 at 2:23 PM, kingcoma said:
Agent very happy now! ^^
LOL! We all very happy now!
Great work!
0 -
On 3/6/2020 at 1:52 AM, ahven said:
Seriously great stuff. Love the use of different approaches with 2d/3d.
Thanks so much, @ahven! I don't know why I just saw this now, but I really appreciate you commenting.
0 -
On 3/1/2020 at 8:04 AM, noseman said:
Recently I pinned a reply on the Youtube Chat.
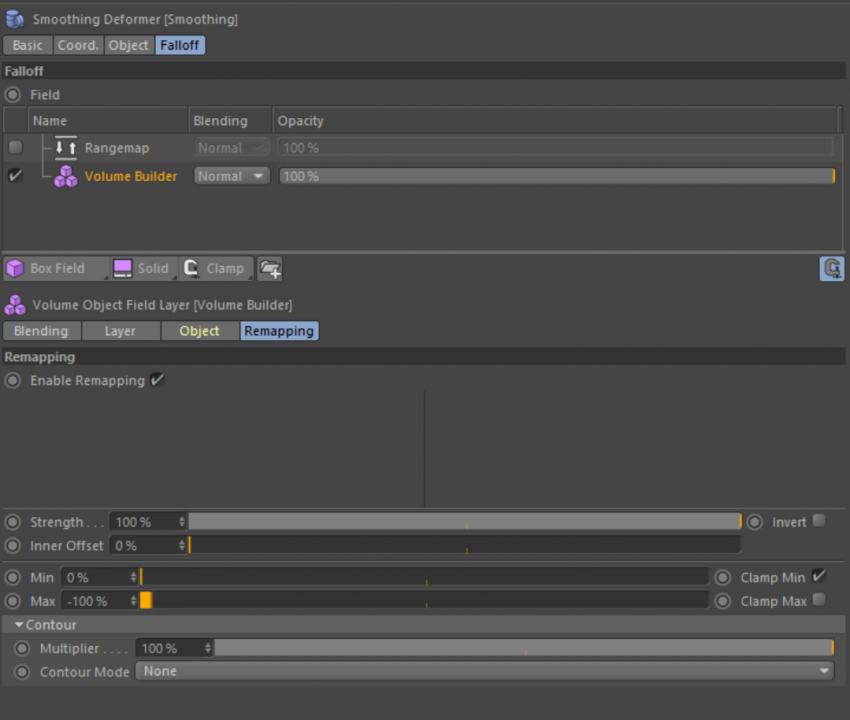
If you're on R20, the Volume builder, by default, has remapping ON. You need to turn OFF remapping for the Volume Builder Field.
R21 does that by default. I missed that difference in the original recording.
Let me know if it worked.
Thanks! Yes, this solved my problem! I was still confused why this didn't work by just using the Remapping tab of the Volume Builder Field. I tried "Invert" next to "Strength," but that didn't do the right thing. Then I happened upon this solution- Set the Max to -15 (you have to type it in) and uncheck "Clamp Max." I did an A-B comparison of the two options and I get the exact same result as with the Rangemap layer. Just thought I'd throw that out there if people want to simplify the number of Field layers in their project. I'll admit that the Rangemap is more intuitive to me, though.
 0
0 -
I should have mentioned that @everfresh helped me out with some of the rigging for the bra clips at the end. And of course many other clips were collaborations, but I directed and/or played a lead role in all the work seen here.
1 -
14 minutes ago, Rectro said:
Hey Nate, love the reel like your style. Be great to see more of you and your works, maybe you post in other forums categories and iv missed your posts. I really should put a reel together myself.
Keep up the cool work.
Dan
Yeah, I've been a bit quiet lately, but I'll try to get on more often. Thanks for the kind words, Dan!
1 -
@Igor thanks so much, man! I really appreciate it!
0 -
Hi, you might know me from around the Cafe already (been here for several years), but I wanted to put an official introduction out there. My name is Nate VanderPlas and I've been using C4D since 2011. I also do lots of other animation stuff besides 3D- like VFX, compositing, motion graphics, and 2D character animation. I have a brand new website and reel. Check it out:
Thanks for reading and have a great day!
Nate
 2
2 -
Thanks, Nose Man! I went through the whole thing twice, following all your steps exactly, but I can't get the Rangemap to do its job to reverse the data. My spheres look just like yours before the Rangemap (kinda lumpy and squished in the wrong places), but when I add it and adjust the Max Output to negative, it's like the Smoothing is just turned off. Any ideas? I'm on R20- not sure if it only works in R21, but I don't know why that would be. Has anyone else tried it in R20?
I've attached my project file if that's helpful.
Thanks!
0 -
Thanks, @Shibby! To ease everyone's minds, I did just receive an email reply from him, so I can confirm he's not trying to scam us
0


Fit a plane to a camera view precisely
in Python
Posted
@jedcould you please share that file again? It says it's unavailable.