rasputin
-
Posts
1,167 -
Joined
-
Last visited
-
Days Won
8
Content Type
Profiles
Blogs
Forums
Gallery
Pipeline Tools
3D Wiki
Plugin List
Store
Downloads
Everything posted by rasputin
-
 Please register for full access
 -
 Thanks so much. Coming from you, it is an especial compliment.
 -
From the album: Rasputin's Gallery III
-
 Thank you so much, HV, for your comments. They are well-taken. What are "visual tangents", please? I had been inspired by this 1930's Hollywood image:
 -
Thanks so much. I wish I had your amazing skill at caricature!
-

From the album: Rasputin's Gallery III
Rendered with Corona 7. -
From the album: Rasputin's Gallery III
Human figure is a posed Daz3D model; the dress I did in Marvelous Designer, all else modeled and textured within C4D. Corona 6 Render: 42 passes. -
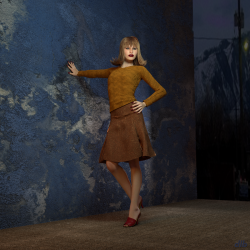
From the album: Rasputin's Gallery III
Figure and plant are third-party; dress modeled in Marvelous Designer; all else was modeled and textured within Cinema4D. -
From the album: Rasputin's Gallery III
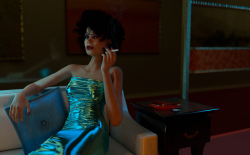
Human figure: Daz3D Victoria 4, but with my own facemap created from real photos. Clothing I made in Marvelous Designer. Hair, shoes and scene modeled in C4D R20. Corona Render: 7.6% noise level. -
Please register for full access
-
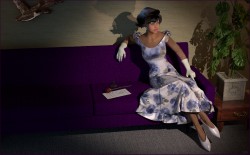
From the album: Rasputin's Gallery III
Female figure imported from DAZ. Dress I made in Marvelous Designer, but textured in C4D. Hair styled in C4D. Corona Render, 150 passes. -
Please register for full access
-

From the album: Rasputin's Gallery III
An image I made this week. Figure is a DAZ3D figure. Dress made in Marvelous Designer. Hair and all else done natively in C4D. Corona render, 64 passes.© rasputin
-
 Really, really lovely. Love the painterly quality of the colors.
 -
.png.2d62eab0a8b93e8f4a88527f419cf467.png)
From the album: Rasputin's Gallery III
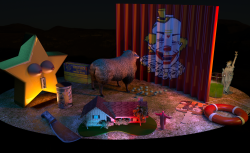
Fun with Volume Building, Hair and Mograph. Render in Corona Renderer.© © David Lincoln Brooks
-
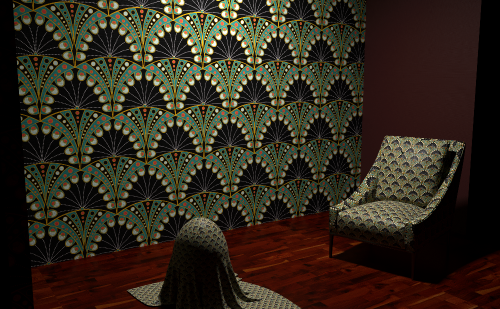
Version 1.0.0
22 downloads
This is an Art Deco repeatable design, recreated directly in Adobe Illustrator from an authentic French textile design of the 1920's. Included in the ZIP archive is one single seamless iteration of the pattern, in high-res PNG format, whose UV tiling repeat may be dialed large or small to get the look you desire. Suitable for interior room wallpaper, upholstery or any kind of cloth or textile, like curtains or bedspreads. Simply load this PNG bitmap into your material's Color channel. Cubic UV repeat is probably the best option.Free -
 So very beautiful... and so very strange...
 -
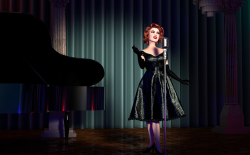
From the album: Rasputin's Gallery III
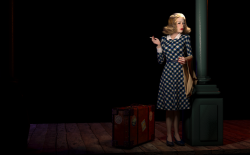
Imported V4 character, clothing I modeled in MD, other objects I modeled and textured natively in Cinema 4D. Rendered in Corona, 150 passes. Of chief interest to me was trying to model that 1940's hairstyle. With Cerbera's help, I modeled those shoes using the Sub-D method... the first time I'd ever tried that method in all my years of doing C4D. Cerbera was right: it's a great way to model, especially organically-shaped objects like shoes.© © Rasputin (2020)
-
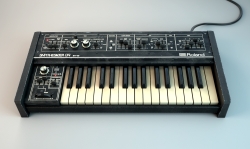 Bravissimo. I've modeled 3D synths before, and I know how jolly hard they are to texture. Specifically if you don't have a proper ("brand official") texturing source of the symbols/verbiage on the synth's interface. I, for one, know that you have to model FIVE different types of white-key shapes! I like the ageing you've done on this 1970's unit, too. Scuffed edges and yellowed keys from playing in too many smoky bars, haha. Even the dirt that tends to linger up in the hard-to-clean crevices of the keys! Did you model this, if I may ask, just by eyeballing a photograph of the synth?
 -
More of my more recent C4D renders.
-
-
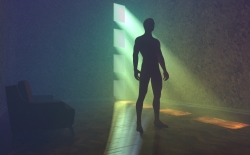
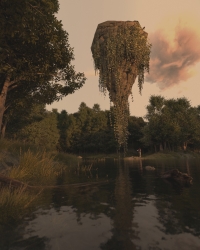
From the album: Rasputin Gallery II
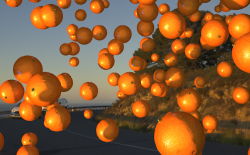
Here I am experimenting with CORONA's Volume Shader. Filling this space with a kind of fog/haze. -
 May I ask: What DPI are you rendering at? It looks so refined and whisper-smooth...
 -
So very lovely, Evgeny.
-
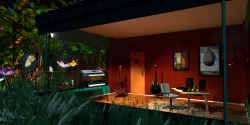
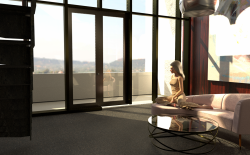
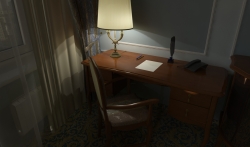
From the album: Rasputin Gallery II
Corona 3 render, 64 passes. half the models I made myself in C4D, the other half were freely avilable on the 'Net. This scene I based roughly on a real architectural photo from 1959, taking some liberties, of course. -
Please register for full access