

Vozzz
-
Posts
3,078 -
Joined
-
Last visited
-
Days Won
21
Content Type
Profiles
Blogs
Forums
Gallery
Pipeline Tools
3D Wiki
Plugin List
Store
Downloads
Everything posted by Vozzz
-
awesome. Also, would it be hard to export an image map of the whole terrain map? like a displacement map? Displacement + normal would probably be even more useful. So you could use a lower res mesh. Just thinking out loud 🙂 will look into that export mode!
-
Thats awesome! I remember you had some train rig plugin that a studio i was working for used on a GE project.. damn that was a long time ago.. Yeah i can tell it's a very different tool. I'm trying to achieve the effect you had in your old tool and wondering if we can do that here. The one at 3.05 where you can place the spline and the terrain always matches it's height. seems very useful. Is it possible with your new tool? would also be cool if we could generate vertex maps for use in other renderer, which are based on the various operators.
-
are you by any chance related to c4djack? he also made a terrain plugin many many years ago 🙂
-
Just playing with this! really liking it! So intuitive and convenient. Only thing i find missing is displacement which isn't restricted in the y-axis. For example i want displacement on the edge of a steep hill ( like rocks ) but they all only displace up vertically. also when you make a curved terrain with a small radius, the edge get all scrunched up. https://yadi.sk/i/5zh2G663OGD-tA
-
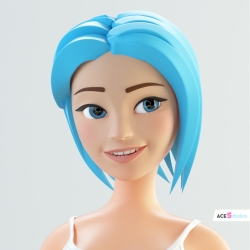
A character i've been working on
-
-
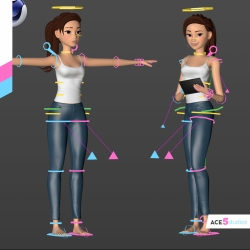
From the album: Mia
-

From the album: Mia
-

From the album: Mia
-

From the album: Mia
-
From the album: Mia
-

From the album: Mia
-

From the album: Mia
-
Octane works fine with r23. maybe download a newer version?
-
octaneX works on macs. people seem to be quite happy with it. no real news about redshift, but im guessing they are focusing on getting it working on macs.. [edit]: looks it is available, check gavins comment below
-
I have up to 50% off bundles for C4D rigged characters 🙂 https://ace5.cc/blackfriday
-
thanks :) :) :)
-
great stuff! Love the drawing! been doing more of that recently. Definitly helps! Keep on keeping on, i want to see more!
-
i think you should watch my cloth sim tutorial :) https://ace5studios.com/cloth-sim/
-
you have some modelling skills, but its hard to just sell them, since there are so many stock model sites and if you just offer modelling, it's not a very well paying job. It's good that you have animation skills, but you need to work on making your stuff look more modern. Check out instagram, look for the #cinema4d tag here: https://www.instagram.com/explore/tags/cinema4d/ also checkout this guy, does some really nice stuff. https://www.instagram.com/yambostudio/ And as others said, that website really needs an refresh. that front page will be the last page anyone looks at. That kind of menu has a very dated feel to it. Since you have the time i reccomend figuring out wordpress and a theme like enfold. I've actually been thinking of starting a tutorial series of helping people make nicer looking renders. If you are interested, send me a pm and we can talk. also your website doesn't have your contact information.
-
yeah, my us number rings a couple of times a week with bullshit like this.. some of them i answered a couple, some are clearly identity theft operations offering free medical treatment and asking for your personal details.
-
Cinema 4D’s cloth sim system isn’t the most advanced in the world, but i did find a way to simulate a nice top with it. So here is a tutorial about it. https://ace5studios.com/cloth-sim/
-
11.11 sale #SinglesDay Enjoy 20% off with the coupon 1111 on all my stuff! One Day only! https://https://ace5studios.com/products
-
My Botanical Experiments
-
-
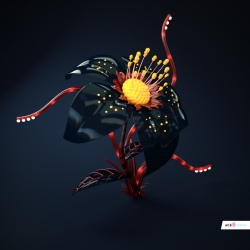
From the album: Botanics
-

From the album: Botanics