


southpaw
-
Posts
480 -
Joined
-
Last visited
-
Days Won
4
Content Type
Profiles
Blogs
Forums
Gallery
Pipeline Tools
3D Wiki
Plugin List
Store
Downloads
Videos
Posts posted by southpaw
-
-
The .STL or .STEP file format has worked for me in the past.
Maybe ask whomever supplys the CAD files to export in one of thise formats. Then use File/merge/Not sure if they will import iwth the File/Open command.
The models tend to need some clean up, how much depends on whether you need to deform or uv unwrap them easily.
Hope this helps.
0 -
I'm not a Redshift user, but I know that in Cycles4D, you need to render in a 32 bit format like TIFF or .EXR to have the ouput render look the same as the IPR.
So my workflow is to render in a 32bit format, import into a compositor, (if AE, set the colour space to 32bit & Linear colour) and then render out a png sequence in 8bit for the final edit.
Not sure if this will help, but might be worth a try with a single still image.
Be advised that 32 bit TIFFs and .EXRs produce large file sizes which ever renderer you use.
0 -
You can do it with a little xpresso.
I've attached a scene file for refernece.
You could probably do it with Spline Dynamics and constaints too.
1 -
Very clean Jed, thanks for sharing
 0
0 -
If understand you correctly, you need to drive the "to" parameter of the Spline Wrap with the "Position" parameter of the "Align to Spline" tag (As both use 0-100%)
Also set the mode in the Spline Wrap to "Fit" rather than "Keep Length".
Scene file is atached, hope this helps.
0 -
For anyone in a similar situation on future projects, i found his solution:
I made a new Take in each of the .C4D files named Alpha Mattes.
I then set the following render path:
../$take/$prj/$userpass/$userpass
This wll make the following folder structure: Alpha Mattes/Project Name/Object Buffer Name/Object Buffer Name
I found this approach useful, as I need to pass the fils onto anoher user who was not familiar with C4D, but needed to add the files to a render queue to work on them in post.
Best to get the suitable file paths set up first though so you don't need to open a bunch of files to add the new Take anfr change all the render settings.
0 -
I've set a relative render path for object buffers usings tokens like this:
../Renders/Alpha Mattes/Scene 001-Shot 001/$userpass/$userpass
It woks fine if I render from within the C4D file using Render/Render to Picture Viewer, but when I add the file to the Render Queue, I get an error.
Any ideas how I can get around this?
I have 37 files to render, so would rather just have the relative path I've already set, than having to go through and manually set a path on the hard drive.
Any suggestions would be much appreciated.
0 -
I think the file you need to copy over is C4DImporter.aex
On PC you would copy it to :
C:\Program Files\Adobe\Adobe After Effects\CS5\Support Files\Plugins\
Not sure about Mac.
0 -
3 hours ago, Igor said:
Definitely a psychedelic experience.
 Well done, it was a nice journey.
Thanks for taking the time to view it Igor, I can assure you there where no drugs involved
 1
1 -
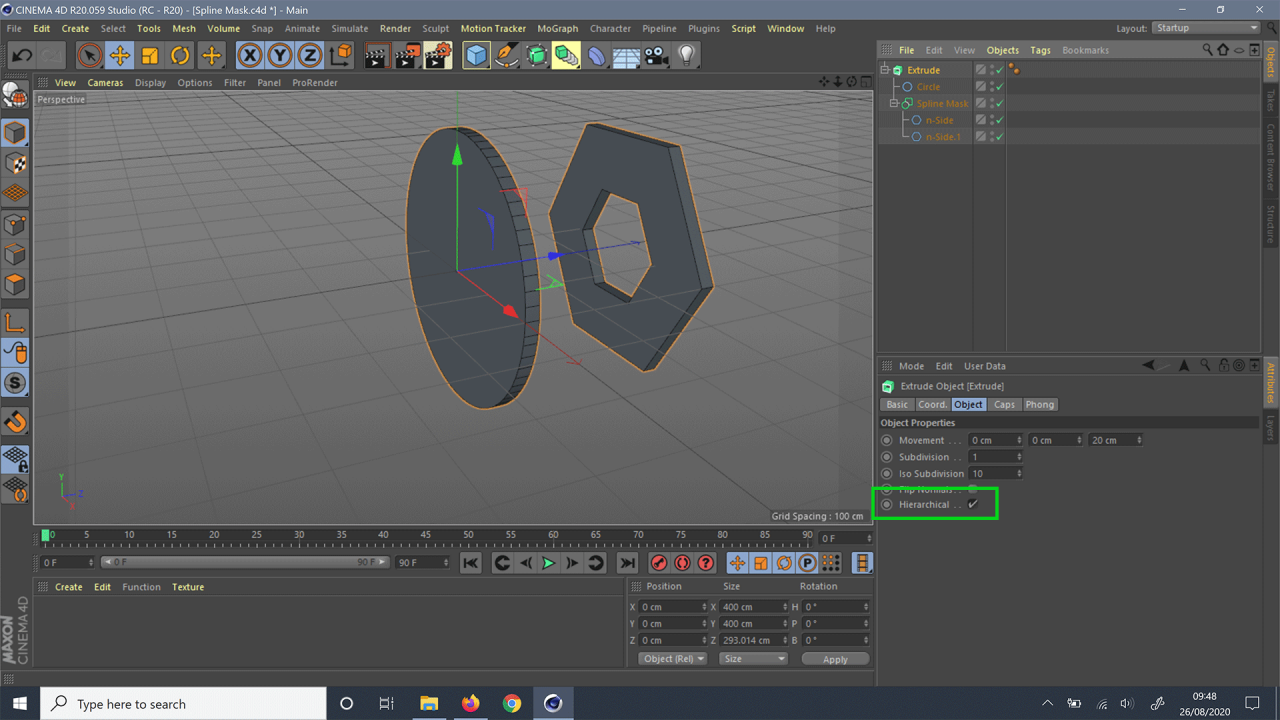
You can also do it with a spline mask, and by selecting the Extrude Nurbs, and enabling Hierachical in the Attributes Manager.
This gives you the freedom to animate all splines individually if needed.
Screen shot is attached for you.
 0
0 -
Just wanted to share a recent personal project, exploring the creation of complex geometric designs from a single animated object.
Pretty simple, just playing around with Mograph cloners. Rendered with Cycles4D, post production in After Effects.
https://www.philrichards.co/work/project-one-6xh4f-dxrsd
Here's a few stills,


 3
3 -
On 8/13/2020 at 6:11 PM, Hrvoje said:
That is unfortunately a bug...
Ah, ok, thanks for taking a look Hrvoje. Much appreciated.
0 -
Hi Hrvoje,
I've attached a scene file, less clones (for speed) but same set-up.
If you export a single frame for testing, it's best to export from frame 100 onwards.
The hierachy is maintaned in the alembic file only if I put the cloned spline into sweep nurbs and add a profile spline.
Otherwise only the clones in the first cloner appear in the alembic. The rest appear as Null objects.
Thank you for your time
0 -
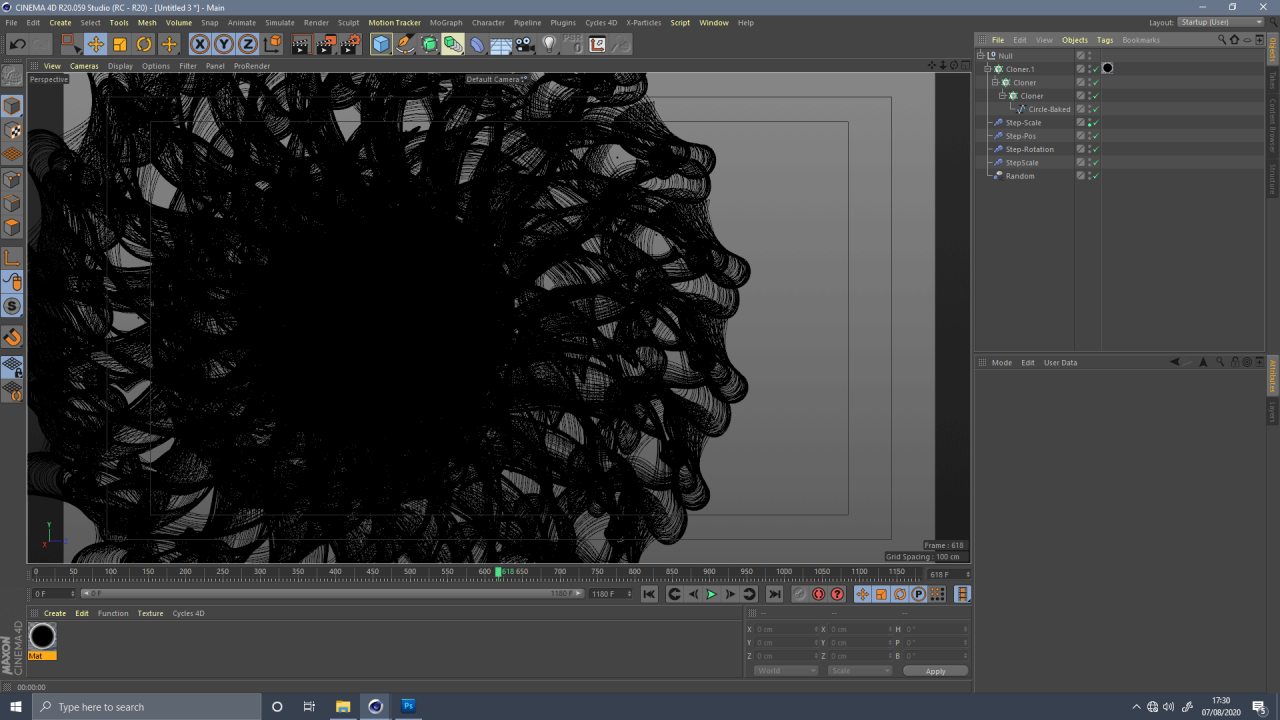
I'm trying to export a mograph animation as Alemic. I've attached a screen shot of the scene.
I've cloned an animated spline using multiple cloners, but when I export, the nested cloners appear as Nulls without the splines in the Alembic file.
NOTE:
If I drop the spline into a sweep nurbs, it works, but was hoping to eport ONLY the spline animation to keep the scene fast, and export times, down.
Any would be much appreciated.
 0
0 -
I've definitely learnt more about the memory node thanks to this thread, I was aware if it, but didn't really undertand how to use it.
1 -
Really clever stuff jed
Thanks for sharing.
0 -
Here's a variation using the Time Offset feature of the Step Effector, as with Jops' example, you can adjust the spacing in the Step Effector's position parameters. But this version uses the Time Offset function as a delay.
 1
1 -
I think it's the Memory node but I can't be sure.
You can the moInstance object from the Mograph menu to create these effects.
The docementation expains quite well how to use it, but basically you would select the text object, then add the moInstance object and animate that.
1 -
OK, I've tried a slightly differnet approach.
Disks and spline are in two seprarate clone objects.
The Disks use a Rail spline to set the their rotation.
The cloners both set to Object Mode and clone onto two seprate Cirlce splines.
Some Xpresso sets up the rest.
Scene file is attached.
0 -
Try selecting your Cloner, then adding a Target Effector, pull the Target Effector around the viewport and the Clones should rotate to face it.
0 -
Fantastic work, love the facial expresssions.
Thanks for sharing
1 -
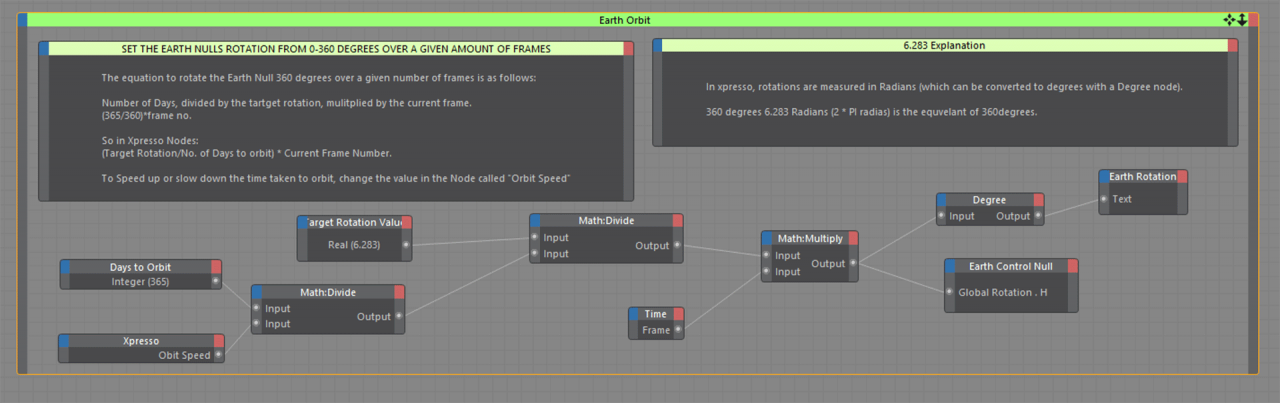
A test piece for a faux title sequence, re-adapted from a previous commercial project produced for ITV (UK based TV channel).
Produced mostly in C4D, the rotations of the planets were calculated via xpresso, I found the orbit times foreach planet on Wikipedia, then set up the expressions for each planet's orbit time. (A collegue helped me with the math).
Finally the animation was exported as Alembic, then shaded and rendered with Blender/Cylces, composited in AfterEffects.
Just a bit of fun really, trying to explore a workflow between C4D/Blender.
Screen shot of the the Xpresso to rotate the Earth mesh. The other plants follow the same set-up, with a change in the 'Days to Orbit' node.
 0
0 -
Great breakdown, thanks for sharing
0 -
I like Cycles4D, but when using the CPU it can be pretty slow.
I don't think you'll see much speed increase over Physical render if your using a mac, unless you have a high core count, but you will definitely be able to reach a more photo real looks with the right settings and shaders.
Best to download a demo if possible and play around to see if it suits your workflow.
If you want fast rendering, GPU is the currenty the best option, or a machine with a high core count.
I've found the realtime viewport a big help in giving a quick indication of how things will look,
I usually set the samples quite low, and set the resolution lower than HD for fast previews, then once I get closer to what I'm looking for, I make some test renders at higher samples and full HD to get rough time estimates for the final render.
Another thing to note is to render at 32bit TIFF or 32bit .EXR format, otherwise your rendered image will look different to what you see in the realtime viewport. The rendered files can be pretty big, but you can always convert them to png after compositing.
The documentation is quite reasonable too.
1


C4D can't import CAD or Solidworks files
in Miscellaneous - Do Not Post Here
Posted
Not sure what a .CGR material is, but the usual workflow for me would be to import the step file, then build materials/textures from within the C4D material system or whichever external renderer you are using., E.g Redshift, Octane, Cycles, Arnold etc.