

Jaee
-
Posts
320 -
Joined
-
Last visited
Content Type
Profiles
Blogs
Forums
Gallery
Pipeline Tools
3D Wiki
Plugin List
Store
Downloads
Posts posted by Jaee
-
-
Hi! I used a Plane and Random Field to create a grass animation that moves like it's swaying in the wind.
I have two questions.
First, can I make the red grass animate a few frames later than the green grass? I want the green grass to sway in the wind first, followed by the red grass. I need to adjust the animation's time offset, but I'm not sure how to do it.
(I tried using Alembic to implement the time offset, but it seems impossible in the actual working file due to the large number of objects)Second, can I make it so that the bottom part of the grass is hardly affected by the wind, and only the upper part moves? This way, the section of grass close to the ground will be mostly unaffected by the wind.
I'm sharing a test file and a video file as reference. Thank you!
0 -
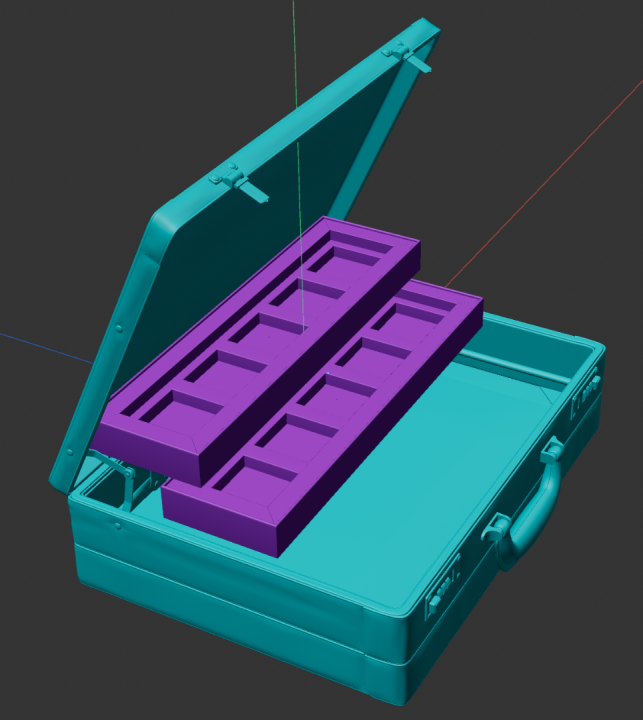
I want to rig a cantilever tackle box and create an animation where the box opens naturally. Could you guide me on how to get started?
 0
0 -
Thank you, Cerbera!
1 -
Hello! I'm trying to model this logo image in 3D, and it's a bit tricky.
It looks like it's wrapped around a sphere. Does anyone know how I could approach this?
Would using a surface deformer to wrap a cube around a sphere to create the shape, and then fine-tuning the shape afterward, be the best approach?

 0
0 -
When I click the render button in Houdini's Redshift Render View, I get this error. It seems like an OpenIOColor issue. Could you help me figure out how to fix it?
 0
0 -
I applied a Rigid Body tag to the cloner to simulate small rocks on the ground. I want to use a Pyro simulation in the Field Force to spread the small rocks by affecting them with the Pyro, but the small rocks aren't moving. Could you help me figure out what might be wrong? Attaching the recorded video file and the scene file. Thanks!
0 -
Can anyone model this? I can pay for it.

 0
0 -
Please DM me as soon as possible when you have time. Thanks!
0 -
Hi Cerbera, the modeling in the FBX file I sent seems to have too many broken polygon triangle shapes. So, I'm planning to remodel it. How much would it cost to commission you for the modeling? This project needs to be completed fairly quickly. Also, if the modeling fee is too expensive, could you provide step-by-step detailed instructions for every part?
0 -
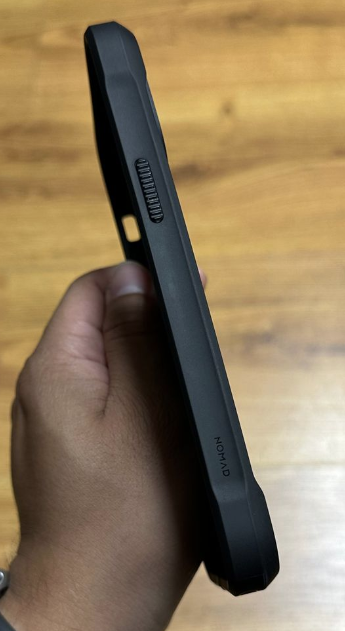
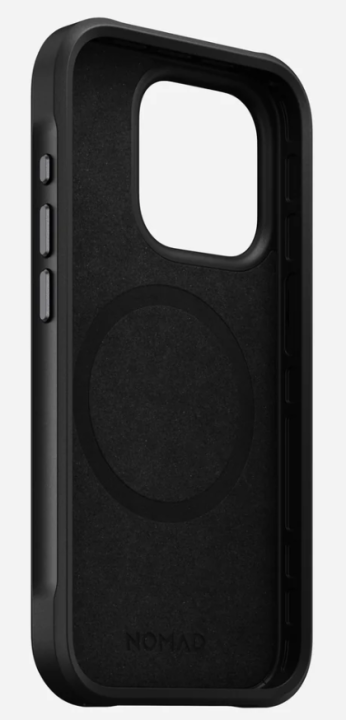
Hello! I need some help modeling a phone case. Is there anyone who can help me? It's urgent :( so I need it done as soon as possible. I've attached reference images and an FBX file. Thank you!


 0
0 -
On 3/21/2024 at 10:03 AM, HappyPolygon said:
Yes that. I miss named it
Thank you!
On 3/21/2024 at 1:31 PM, Havealot said:@Jaee Is your setup correct? I assume what you are trying to do is to use the simluted (low res) version of a mesh to deform a high res net. But your deformer is a child of the wrong object.
Oh Thank you!
0 -
8 hours ago, HappyPolygon said:
Have you tried using the Collider Deformer ?
Are you referring to collision deformer?
0 -
Hello, I would like to create a natural animation where the net reacts and sways when the ball hits it on the tennis court. I tried using Mesh Deformer to test the movement of the net, but only the box moves, not the net itself. Does anyone know how to fix this? Or is there a better method? As you can see in the scene file, the net is divided into three separate objects. I've attached the scene file.
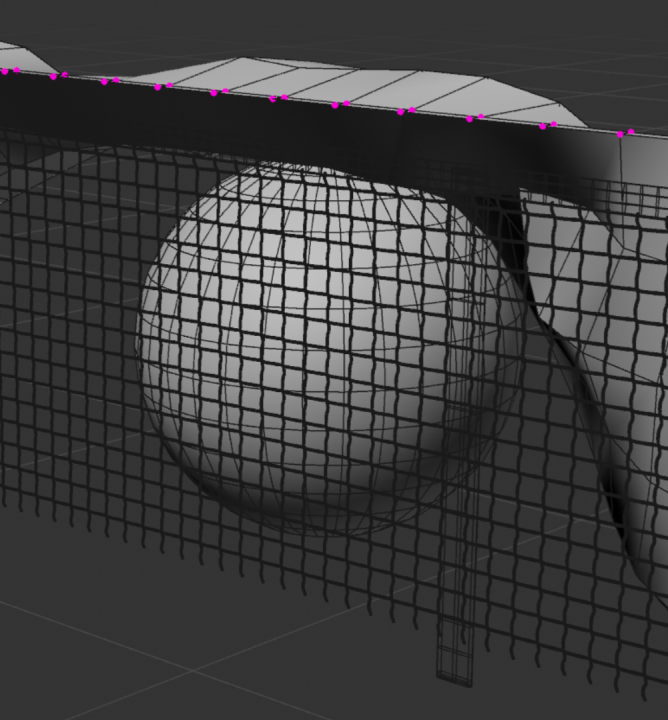
 0
0 -
On 3/18/2024 at 10:44 AM, HappyPolygon said:
Ah ! sorry, didn't see the scene file and assumed the deformed thing was the plane ...
Umm... you've mixed two different simulation methods.
The Sphere has a tag from the Bullet system while the Plane has a Collider tag from the newer system. You'll never see the sphere collide with the floor this way
But the weird deformation wasn't attributed to that. You had the "Self Collisions" enabled.Thank you!
0 -
On 3/17/2024 at 2:08 AM, HappyPolygon said:
What exactly did you expect to happen ? I find completely normal this result
When the ball falls to the ground, I want it to bounce back softly with a slight compression. However, I want to avoid the ball becoming severely distorted upon impact.
 0
0 -
Using the soft body bullet tag, I'm trying to make a sphere fall naturally onto a plane. However, when I press the play button, the sphere suddenly distorts into a strange shape. I used smaller objects to match the actual sizes of the objects. And I opted for using Bullet instead of soft body cloth tag because I needed to utilize the mograph selection. Could you please explain why this issue is occurring? I'll attach the scene file.

 0
0 -
8 hours ago, Cerbera said:
Need more infromation, and the scene file.
Is this Bullet dynamics or new Rigid Body sim ?
CBR
I used the Rigid Body - Simulation Tag. Also, I'm attaching the scene file I was working on. Could you please check what the issue is?
 0
0 -
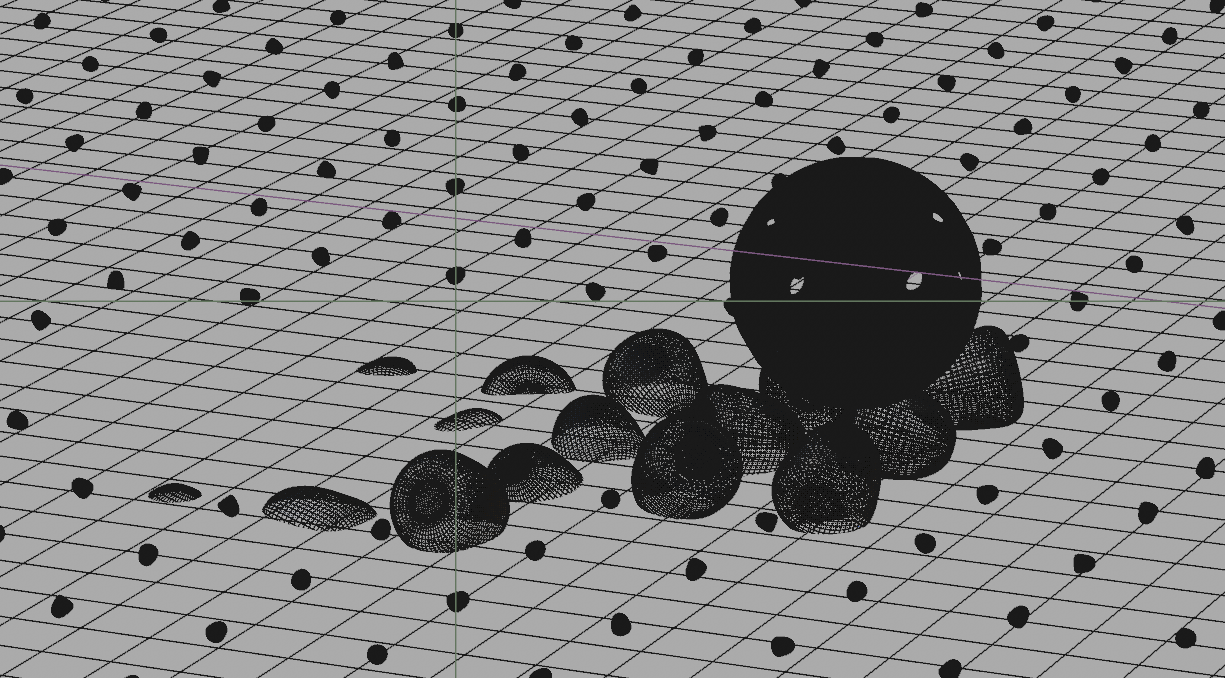
In Cinema 4D, I'm trying to make objects appear and naturally fall onto a plane where a ball has bounced away using Rigid Body dynamics. However, when the objects generated by the Cloner aren't too large, they seem to pass through the plane and fall below without triggering dynamics properly. Do you know what might be the issue? Increasing the size of the cloned objects seems to make dynamics work better. I've tried adjusting settings like steps per frame and maximum solver iterations step in project settings, but it didn't help. I also experimented with substeps, iterations, smoothing iterations, and damping, but didn't work.
 0
0 -
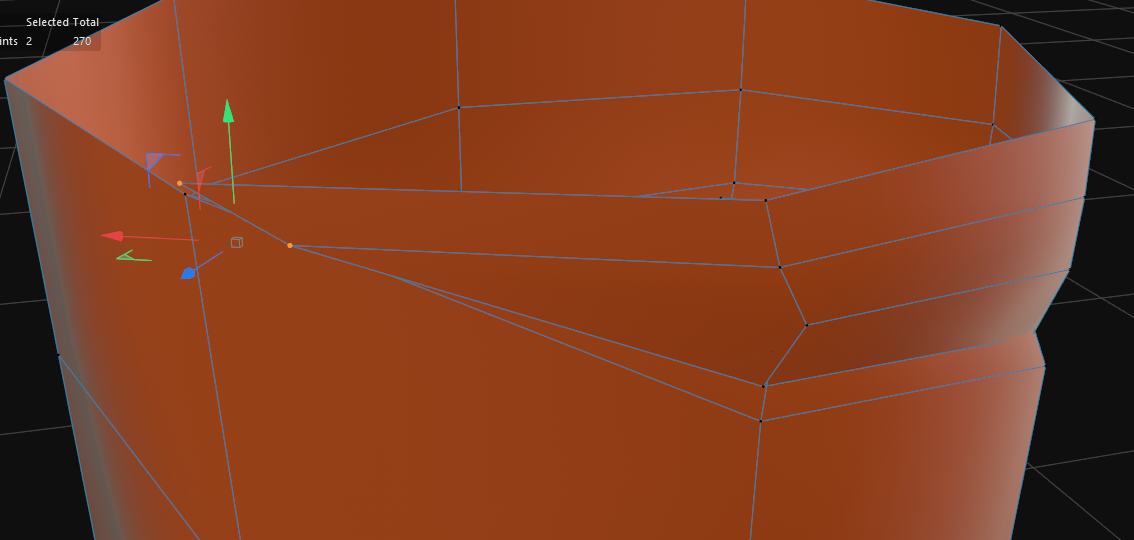
30 minutes ago, Cerbera said:
We only need to eliminate ngons (leaving quads and tris), which we do by checking for stray ones in points mode, and ctrl-sliding those into neighbouring points.
We can let triangles pass here because SDS will turn them into quads for us.
Here, I fixed yours...
JAEE pickball wrap 01 fixed.c4d 356.99 kB · 0 downloads
Only modelling purists like me would feel the need to chase all quads in the base mesh.
CBR
Thank you!0 -
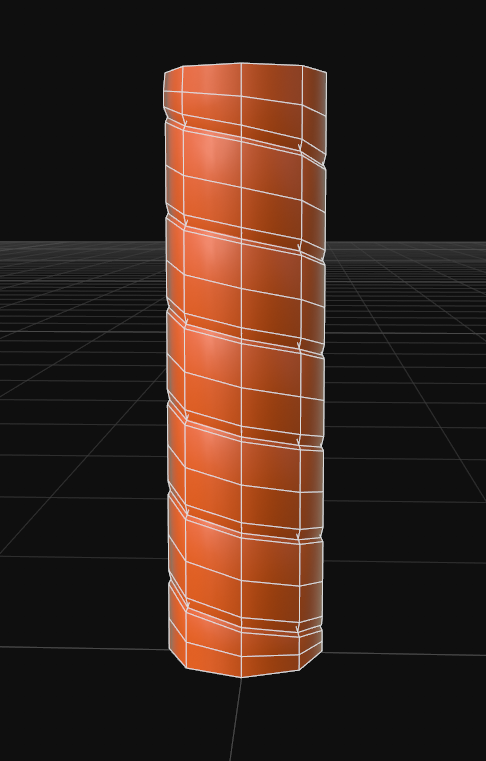
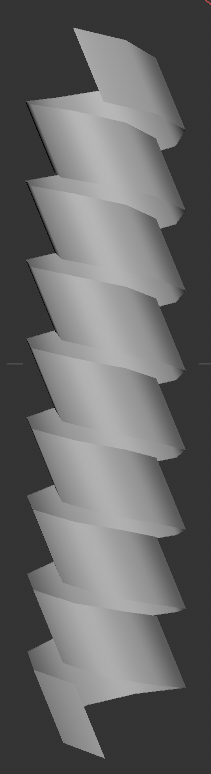
20 hours ago, Cerbera said:
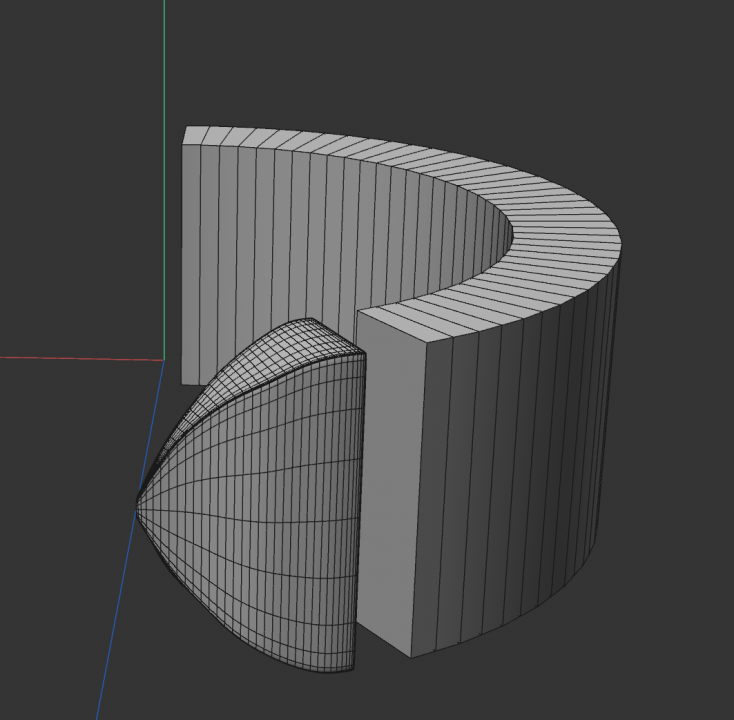
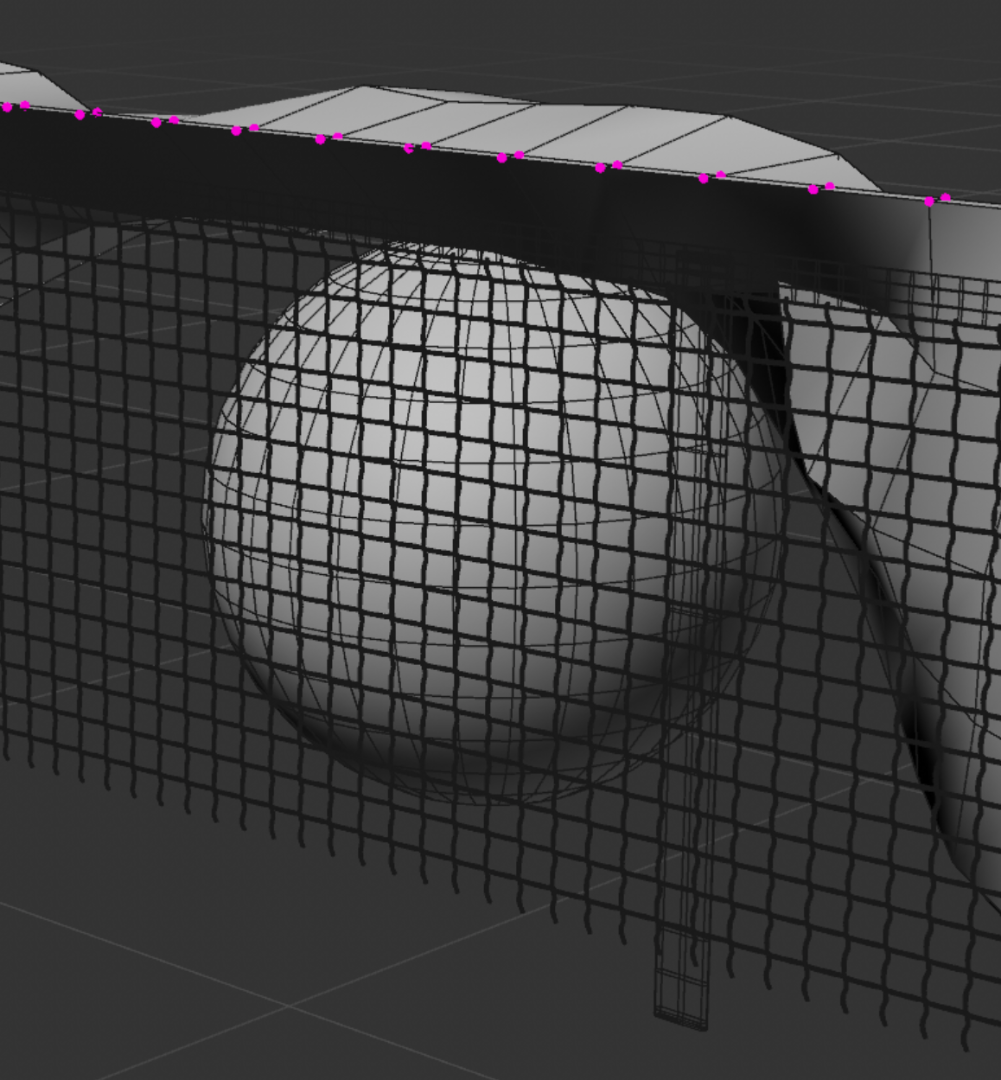
Ok, here's a closer look at stage 2 where we have just made our overlapping extrude editable... and then on the right, once we have added loops top and bottom and at 50%, which helps with SDS tightening later. The entire bottom and top loops get scaled in on XZ (presuming Y is up) with subtly different amounts, and we use the Remove A / B option in Plane Cut to decapitate it flat at both ends...

Solving that to quads at the ends can be done a number of ways, all of which are quite hard to put into words, so I'll show you a closeup of what I did at the top for example... we don't actually have to be this tidy (will be covered in black wrap) but it's nice if we are...
This gives us the following SDS result, which is looking fairly decent, but of course remains cylindrical so far, so we need to sort that out next...
CBR
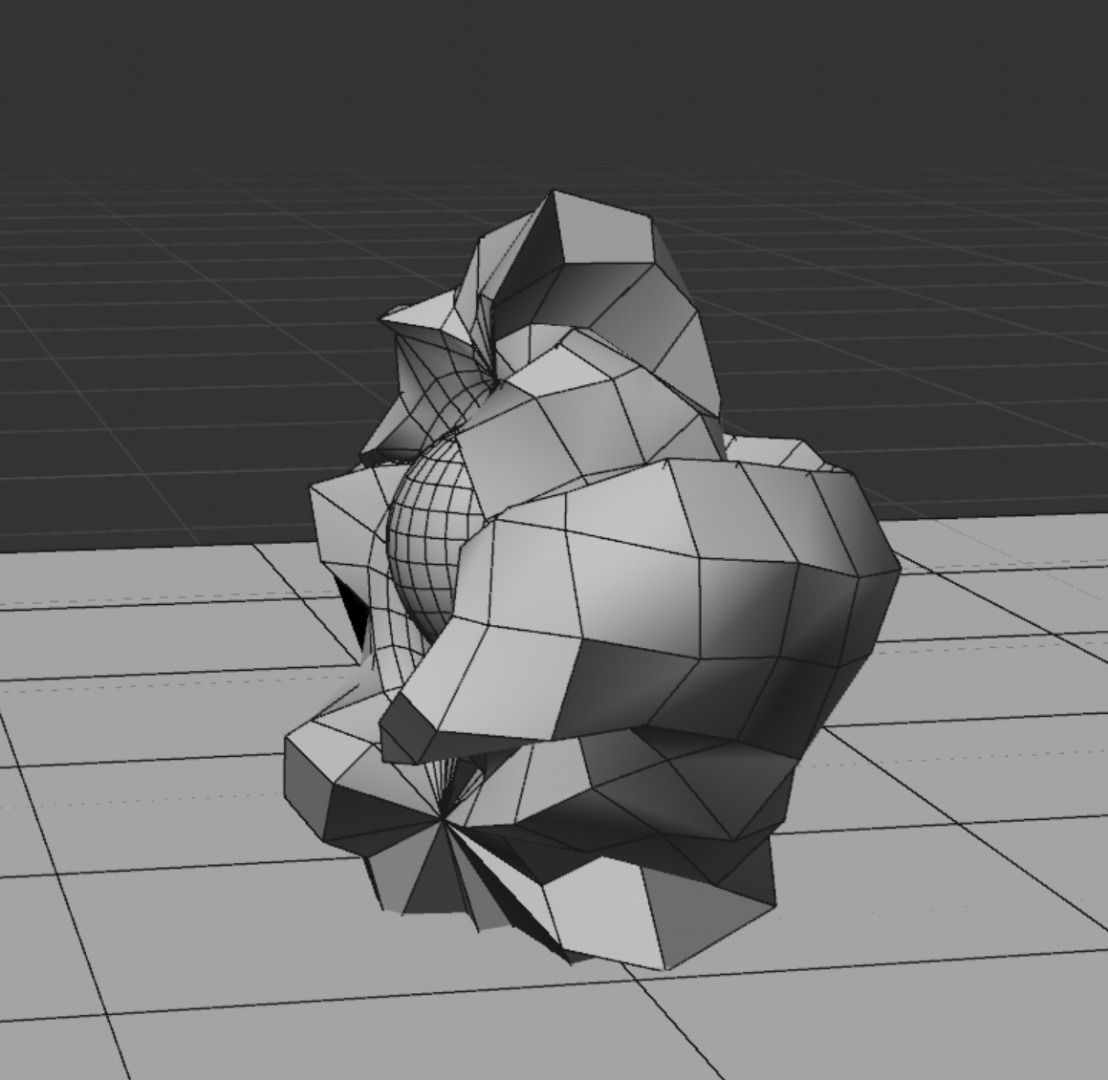
It's not easy to organize the points after cutting the top and bottom ends with a plane cut. Could you possibly help me with this? I'll attach the file I'm working on.0 -
15 minutes ago, Cerbera said:
Change Extrude direction to Y.
CBR
Thank you!
1 -
2 hours ago, Cerbera said:
Ok, here's a closer look at stage 2 where we have just made our overlapping extrude editable... and then on the right, once we have added loops top and bottom and at 50%, which helps with SDS tightening later. The entire bottom and top loops get scaled in on XZ (presuming Y is up) with subtly different amounts, and we use the Remove A / B option in Plane Cut to decapitate it flat at both ends...
Solving that to quads at the ends can be done a number of ways, all of which are quite hard to put into words, so I'll show you a closeup of what I did at the top for example... we don't actually have to be this tidy (will be covered in black wrap) but it's nice if we are...
This gives us the following SDS result, which is looking fairly decent, but of course remains cylindrical so far, so we need to sort that out next...
CBR
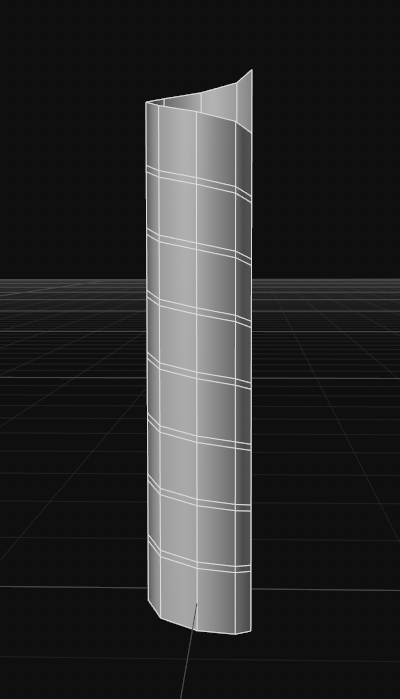
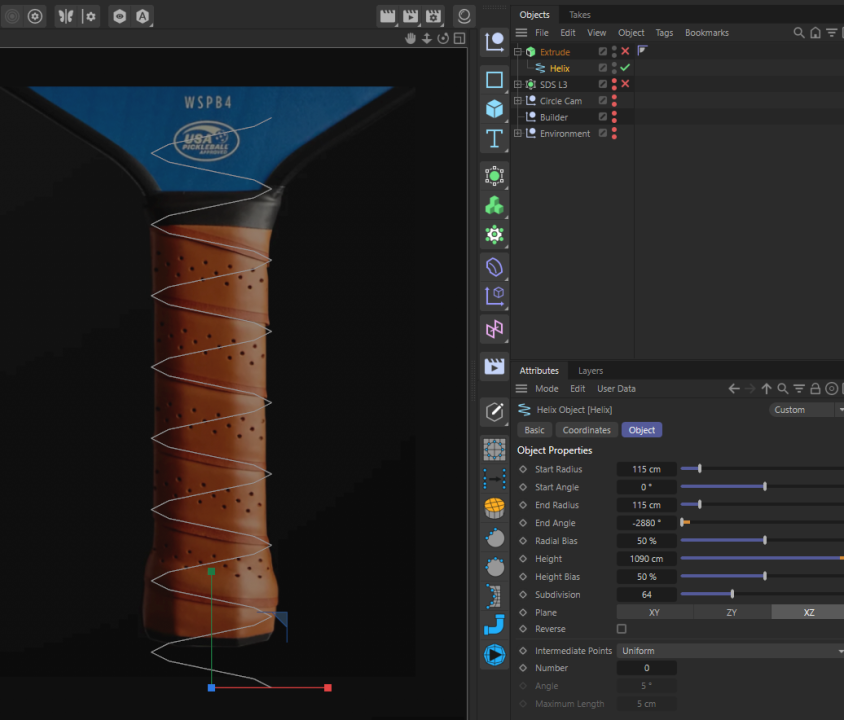
I did it the way you suggested, but my modeling looks a bit off... After adjusting the parameters for the Helix as you mentioned, I made it editable and scaled it down a bit.
 0
0 -
14 hours ago, Cerbera said:
If you need assistance at that level of detail you may be waiting a while I'm afraid - quite a heavy workload at the moment, and those sort of posts take hours to compose. However I have built it (to proof-of-concept level), and so can give you edited highlights now...
There are about 4 principal stages, thusly...
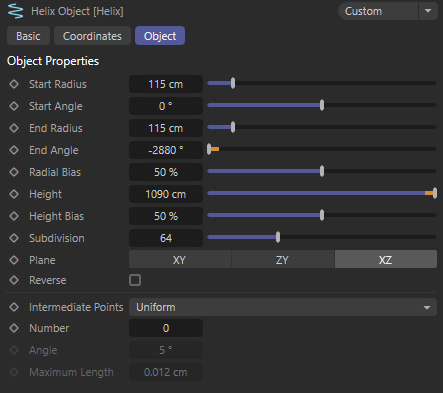
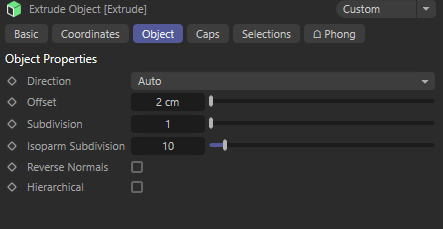
1. Helix spline in Extrude, but with very specific settings. In the helix the number of points is 8 x number of complete rotations. The end angle is -360 x number of rotations. Do 1 more spirals at each end than you need (I did 8 total), as you will be slicing this flat at both ends later. There should be zero spline interpolation, so that each full turn contains no more than 8 points in the resulting geometry. The Extrude should also have no (depth) segments initially, but should be deep enough to overlap itself by about an 1/8th of the depth of each band.
2. At this point we need to take an editable polygon copy of that via CStO, so we can edit and add loops to it. We need to add loops using Loop Cut (K,L) to both top and bottom of the spiral, so that the border edges can be scaled in on XZ to fix the overlaps and tuck the wrap under itself nicely. A further loop can be added to define the narrow darker strip at the bottom of each wrap at this point.
3. In the next group of steps we need to re-orient the model (but not its axis) by 22.5 degrees on H, top and tail it to flat, non-spiral borders at both ends using Plane Cut (K,J), solve the ends to quads and scale groups of edges apart to better match the elongated shape, before selecting the edges and bevelling them to gain additional support loops there, and harder creases on the corners.
4. Last stage is FFDing that with a great many Y segments so you can match XZ curvature around the handle from top to bottom of it...
I will pop back to add further detail as time permits this week...
CBR
Thank you. While you upload some screenshots of the detailed progress, I'll follow the instructions you provided above!
0 -
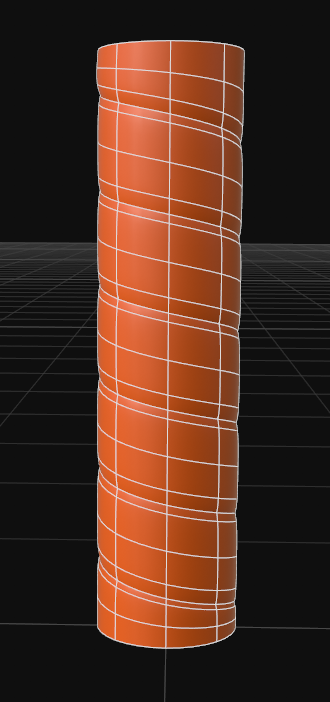
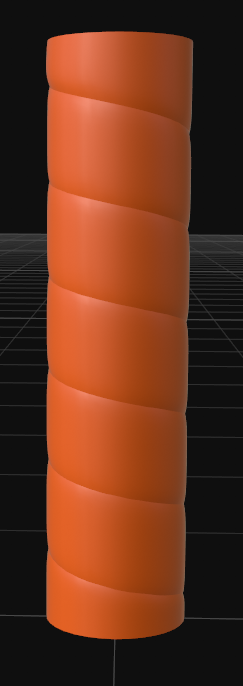
58 minutes ago, Cerbera said:
Ah, so NOT a hexagon then - an oblate octagon ! Useful to see it with no wrap so we can see where it angles in at the top.
OK, working with the assumption that we do the holes with texturing (a lot more faff if we have to model those too) I will show you the main stages of how to make a slightly overlapping skewed helical band matching that profile.
Essentially it'll start off with single band matching the profile, but with ends offset, cloned, unified, conformed and FFD'd into the right shape down its length.
CBR
Oh, thank you. I hadn't thought about using FFD to deform the shape. Could you possibly walk me through the modeling process with some screenshots, step by step?0


C4D Modeling Help
in Cinema 4D
Posted
I want to model this exact shape in Cinema 4D. Could you help me out? Attaching a C4D file for reference.

01.c4d