
HappyPolygon
-
Posts
2,052 -
Joined
-
Last visited
-
Days Won
119
Content Type
Profiles
Blogs
Forums
Gallery
Pipeline Tools
3D Wiki
Plugin List
Store
Downloads
Everything posted by HappyPolygon
-

R25: Moving Objects Will Not Stay In Holes. Losing sleep over this...
HappyPolygon replied to BLSmith's topic in Cinema 4D
Non-linear animations are hard to animate. Your angular movements create differential accelerations to the deformation of your rods and springs. It's going to be hard to produce the tension you are want. You will literally have to adjust the deformation and position frame-by-frame. My money is still on Xpresso. -
Version 1.0.0
229 downloads
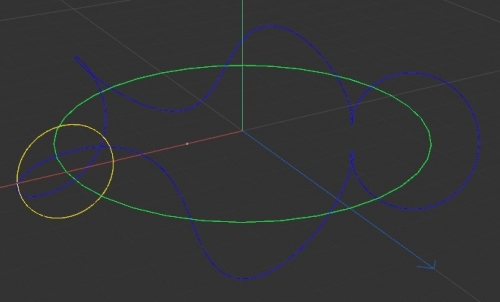
A simple but complete Xpresso rig for making an orbit trail. It can be customized by substituting the Yellow and Green circles with other splines for more interesting trails to make spirograph-like results. The rig can be easily scaled for more orbits. This rig is time-dependent which means that the Yellow circle is fixed to always complete one full orbit in the project time-scale.Free -
Close a spline helix for perfect loop animation?
HappyPolygon replied to catnap's topic in Cinema 4D
I like your thinking. I've constructed an Xpresso rig that parametrically describes this kind of orbit. It still is NOT a totally parametric solution for CATNAP. CATNAP in order to use this: Play with whatever parameter you like in the main Xpresso Tag (2-Body Orbit). Let the animation run until the last frame. (Use the Go to Next Frame button to make sure you don't miss it unless you have the Loop Animation disabled) At the last frame use the Current State to Object command on the Tracer object. Close Spline on the new object. Select the first and last points and make them smooth. @Igor can we put this file somewhere for people to find ? Do we have a repository for useful nodes/rigs/models ? Torus Orbit.c4d -
Close a spline helix for perfect loop animation?
HappyPolygon replied to catnap's topic in Cinema 4D
If you don't mind this: I don't think there is a procedural way to make this happen. The only way to do this is to apply a Current State to Object on your helix and then check Close Spline. But in order for that to work you should make your helix close properly. Set Start Angle at 0 and End Angle to a multiple of 360 - 1 or -2 (the -1 or -2 prevents the end and start point to overlap that could interfere with the animation when traveling from one point to the next, it could look like the traveling capsules temporarily pause on those points) -
Thanks 3D-PANGEL ! I've never subscribed to this magazine because it used to be quite expensive outside UK. Now with the digital editions it's cheaper but I still want to single my options out 'cause not all issues contain articles that interest me, plus they publish enough articles on their website for free. My oldest issue is 75 March 2006 with "Full 3D modelling and animation software Realsoft 3D 4.5 worth $700" and a chance to "Win a remote rendering worth $20.000". They had so good deals back then it was hard to pass issues like that. Now most if not all computer related magazines are DVDless. I don't know what happend to marketing since then, imagine Maxon giving a 3-month R23 with a magazine, would'n it boost the sales on R26 40% more than expected without the give-away?
-
R25: Moving Objects Will Not Stay In Holes. Losing sleep over this...
HappyPolygon replied to BLSmith's topic in Cinema 4D
Where would you attribute those inconsistences ? Xpresso should be very rigid with the calculations. One thing drives the other and the outcome should be solid. Only a situation where two seperate things drive a common target could lead to inconsistncies. My setups are always straightforward with no logical collisions. I've never tryied to create such collitions and I don't know how C4D or Xpresso itself handles those. Scene nodes work in a single tree structure preventing cyclical non- deterministic and non-terminal calculations. Xpresso has a more loose and open structure where multiple tags can affect the same objects. I think this could be what we see here although I haven't checked it TBH. -
R25: Moving Objects Will Not Stay In Holes. Losing sleep over this...
HappyPolygon replied to BLSmith's topic in Cinema 4D
Xpresso isn't a simulation. Why would it need to catch up ? Am I wrong ? -
How can we access the code ? Can we actually substitute the models with others ?
-
R25: Moving Objects Will Not Stay In Holes. Losing sleep over this...
HappyPolygon replied to BLSmith's topic in Cinema 4D
I've got no idea what's wrong here. I also thought that a tag priority could be the issue but it's not. I haven't checked the OM priority though. I suggest faking it with a Shear Modifier (Curvature and Fillet off, Unlimited mode on) driven by Expresso. Make nulls that will serve as anchors on the "boomerang" thing and have the shear follow them. For the Shear fails I suggest the Spline Wrap. It's easier to control a spline on both ends and have the object be controlled by it. I also helps with the spring deformation. The scene was quite heavy to playback for my pc but did not disable all Xpresso tags to verify the source. If Xpresso tags do involve in low framerate then you might need to limit the use of them too if you plan on adding more moving stuff in there. -
The article is just 4 pages with the author info, a small introduction and the big show-off image of the transparent camera occupying 2 pages alone. For me the article is very basic touching just the minimum essential knowledge of someone that just begun using C4D would need. The 9 small steps the article explores are: The Default Camera Add a Camera object Camera object properties Camera with a target Using a target camera Focusing the Camera Depth of Field Use the "Look at Camera" tag Apply the Camera Morph tag It totally avoids getting any deeper with camera deformer, camera rigs, stereoscopy, lens types, lens effects, HUD helpers and panoramic renders. The article points to this link which is a zip containing all examples from the issue. Generally speaking I read the magazine mostly for its content with backstage FVX from movies and commercials. They rarely write anything too advanced and when they do they will split it in two or three issues to keep up with their standard page limit. I just found this issue more C4D packed than normal that's all. It used to be more informative with DVDs full of video tutorials, Demos and full applications but since then internet speeds got better and people could find content easier by themselves.
-
The release is the first version of UE5 to be targeted officially at users working in markets outside game development, including previs, virtual production, visual effects and architectural visualization. Large World Coordinates: support for double-precision data for building very large virtual worlds New features in Preview 1 include the Large World Coordinates (LWC) system, intended for generating very large virtual worlds within Unreal Engine “without the need for rebasing or other tricks”. According to Epic’s blog post, the change involves moving to double-precision values for co-ordinates, plus “performance and memory optimization to help ensure that these changes have very little overhead”. Mass AI: new crowd AI system for large open worlds Other major new features include Mass AI, a new AI-based crowd animation system for open worlds capable of simulating “thousands” of agents. Crowd agents can interact with props and environment objects via a new Smart Objects system which packages the information needed for the interactions in the objects themselves. Agents can also avoid other agents and entities via Mass Avoidance, a new force-based avoidance system based on MassEntity, Mass AI’s framework “for data-oriented calculations”. Animation: new Blueprint templates, IK rig, retargeting, and pose warping Further updates to the character animation tools include Animation Blueprint Templates, for creating animation graphs that can be reused independently of specific skeletons or character assets. Other key changes include a new IK Rig and IK Retargeter, for pose editing skeletal meshes, and automatically transferring animations between characters with different bodily proportions. In addition, animators get new Distance Matching and Pose Warping systems intended to match the play rate of an animation and pose of a character to better match the motion of that character in-game. Pose Warping includes dedicated tools for common use cases, including foot placement and climbing stairs. Lighting and rendering: updates to Lumen and the Path Tracer render engine In the lighting and rendering toolsets, Lumen gets full hardware ray tracing support, support for landscapes, and final gather and glossy reflections on translucent materials. Path Tracer, Unreal Engine’s hardware-accelerated ray tracing engine, gets support for hair primitives, and Unreal Engine’s eye shader model. Niagara: experimental support for GPU ray tracing Niagara, Unreal Engine’s particle system, gets experimental support for using GPU ray tracing to calculate particle collisions, and updates to the Cascade Converter for automatically converting legacy assets. Virtual production: updates to nDisplay, and new OpenCV and Consolve Variables Editor plugins Users working in virtual production get updates to nDisplay, Epic Games’ system for displaying output from Unreal Engine on matrixes of multiple displays and very large displays like LED walls and dome projections. Users can now apply transform operations like rotation and scale to viewports directly in the Output Mapping panel of the nDisplay Config Editor; and can choose to overlay stats on a per-viewport basis. Other changes include overscan support for the inner frustum, and the option to visualise its border. In addition, open-source real-time computer vision library OpenCV is now available in Unreal Engine via a standalone plugin, rather than users having to integrate it manually. The plugin adds new Blueprint nodes for ArUco marker tracking and chessboard tracking. There is also a new Console Variables Editor plugin, intended to provide a central location to view and modify all of the console variables and commands set in a project. System requirements and availability Unreal Engine 5 Preview 1 is available now. The production release will be available “targeting 2022”. The current stable release, Unreal Engine 4.27, is available for 64-bit Windows, macOS and Linux. Use of the editor is free, as is rendering non-interactive content. For games developed with the engine, Epic takes 5% of the gross royalties after the first $1 million generated by a title. Anyone wanting to try the new functionality directly can download the project files for Valley of the Ancient, Epic Games’ new demo scene, which runs in real time on PlayStation 5 and Xbox Series X. It makes use of several of the new toolsets covered in this story, including Nanite, Lumen, the new animation features, improved Chaos fracture workflows, and modular gameplay and level organisation.
-
Usually 3DWorld mag doesn't feature much C4D but the latest issue was unexpectedly packed with it. Feature - Kitbashing - Character Development (page 36) 3D visual artist Florian Renaux delivers a guide to kitbashing compelling CG characters The Pipeline - Get started with the Cinema 4D camera (page 50) This tutorial, designed for users unfamiliar with Cinema 4D, will teach the starting points for camera control, enabling artists to show off their scene to the best of their ability The Pipeline - Model a mech with Cinema 4D (page 68) Learn the stages to building a VFX shot with our new series; in Part One, we focus on developing the CG hero character Artists Q&A - Your CG problems solved (page 73) How do I manage separate x-particles emitters in a single system? - Mike Griggs replies
-
Yeah that was pleasantly unexpected...
-
How Do I Reduce The Harsh Contrast of C4d's Hatch Shader?
HappyPolygon replied to Kartofel's topic in Cinema 4D
The dark parts of an object usually referred to as diffusion but also any other shadows the object can cast on itself when lit from a light source, for example the head casting a shadow on the solder. Usually in non-photorealistic renderings we don't want shadows from lights in order to illustrate the form without obstructions that's why the manual suggests using the shader in the Luminance Channel. Using the Luminance channel it's like having the object emitting any textures and features as if they where painted on a lightbulb, that prevents shadows from appearing on the surface. What the Hatch does is "paint" strokes in places where diffusion shadows would appear overriding the feature of Luminance to cancel any shadows. -
Is this how you generally feel about the next release or are you an alpha/beta tester ?
-
Must have confuse it with Rhinoceros 3D...
-
Isn't MODO a Nurbs-based modeling software ?
-
The polygons protruding the microwave oven are the flowers themselves not the rest of the plant. It has to do with the flower model spreading too much. Try limiting the area of flower spawning away from the oven walls. Or just delete those that clip out. Wait.... the chamber is that big to take up space behind the settings panel ?
-
Actually the image resolution in AI output is a painful subject*. To get an image 700px - 1000px you need a 16GB GPU, greater images need GPUs not available in the market. Generally just because the whole AI thing is a monopoly of NVidia and hardware dependent software, companies are not in direct danger. But as for the concept art thing .... I think it already is quite useful as it is right now. AI can help enlarge an image up to 16x but still need a very powerful GPU. Anyway, any AI involvement requires a lot of time to calculate (not talking about the training of the neural network that takes weeks) for a single frame on a typical PC. Most people want to be independent and will use free AI software rather a company (not only Nvidia) that charges per parameter for a single image. Taking all these into account plus the high price of chips in the market I think we are fine. If an AI system needs 9GB of assets to run to produce a 500px face in 1 minute on a 16GB GPU it would need TBs of data and hours of calculations to produce a 500-polygon object with textures. Actually AI is already making animations. They train an AI into using a body (biped, quadruped whatever) and tell it to find a way to a goal avoiding obstacles (jumping gaps, climbing stairs, not tripping over floor obstacles, even using fighting moves to defend against enemies)
-
I think I like it more this way. The centralized online nature of it makes it better on the fact that I don't have to use space for a ton of things I don't need. And the fact that it updates like the last Rocket Lasso entry, makes it even more appealing. There are downsides but not for my use cases. No, you also miss Vector Import from SVG files, USD imports and a USD Bridge (never used it but the whole industry uses it more and more). This isn't a good argument since those apps are specialized in the area of UV texturing while C4D is not. It's like arguing that C4D has better animation tools than Rizom... Anyway the new UV tools (I don't use them 'cause I'm not into model texturing) can be seen below, and support with Forger if you sculpt with it. The Bend, Twist, Bulge, Shear, Taper deformers have an Alignment parameter The Push Apart Effector for MoGraph. And those were since S22, I don't remember what was introduced between R20 and S22. Was Spline Mask introduced after R20 ? Arc Spline Tool ? I don't remember when Material Nodes were introduced but it can substitute some shader plugins like NoiceScape. For me the next best things that came after the Voronoi Fracture (no need for Toporizer and NitroBlast plugins) and use them very often are : Volume Builder (no need for the Proc3Durale plugin, also helps with liquid/melt forms) Remesher (no need for the Exoside Quad Remesher) Field Improvements (reaction-diffusion effect, works with Volume Builder, plenty of uses all over C4D) Push Apart Effector (so better not having those instances collide with each other) Bevel Deformer (I think nested Bevels did not work under R21, no need for the MoFractal plugin) SceneNodes (DualMesh and Greebler make some plugins like Trypogen obsolete) I also like to use the Solidify node instead of the Cloth generator to add thickness. Capsules are a big + Changes from last release to latter release are few but they will add up significantly if you don't upgrade to R27.
-
Primitives 2.0 - Community driven SceneNodes project
HappyPolygon replied to HappyPolygon's topic in Nodes
Maxon is all over the place in here, I think they would have told us... And I'm surprised he (Chris) isn't around here (might be but never saw him). (There is no way we are trying to do the exact same thing) I'm not sure I understand what you mean by that. If I ask him and he confirms he works on something like this does it really matter if the project still proceeds ? I mean why should he be the only one know-it-all and the rest of us depending on him ? (rhetorical questions) I didn't suggest this project for its difficulty level or because we absolutely need it. I did it as an opportunity to involve in something (that has multiple levels of difficulty, repeated patterns and some innovation) to help our skills get better over the new system by collaborating with each other over the same problem. It's better to learn and understand a complex node tree incrementally as it progresses rather having all the mess land on your feet by once from Chris. -
How Do I Reduce The Harsh Contrast of C4d's Hatch Shader?
HappyPolygon replied to Kartofel's topic in Cinema 4D
There is a texture missing, it's the one used for emulating the strokes. But this although making the problem from my side more pronounced could help solving it. this is what I see when I open the project Disabling the Normal channel we get this Now if you look closely to your shader in the Luminance channel you'll notice what the shader actually does with your texture. See the white background ? Couple that with the fact you use it in the Luminance channel it's not surprising you get this bright contrast. Try making the following adjustments : Move the shader to the Color or Reflectance channel Make a mask out of the texture layer and put a less bright background Increase the density of the scattered texture Disable the Normal Channel If you still have hard edges you should edit your texture, maybe it doesn't fade to background 100% near the edges of the image boarders. Although the location suggests it's a Maxon texture so you probably don't have to change that... Not all of these are necessary but since I don't have the texture I can't tell which is most pleasing or works best with the rest of the hidden layers in the shader. I know the manual suggests using the shader under the Luminance channel but that's to eliminate self shadows, maybe you don't want that. I have an example material called Hatch 06 with the following result and parameters. It might help you understand how to smooth out your light using the Cell shader under the Layer. -
What happens when Disney copies the mistakes of Warner Bros ?
HappyPolygon replied to HappyPolygon's topic in News
Space Jam 2 and The Matrix Resurrections were also not taking themselves seriously and they weren't meant to be taken seriously but the audience received it wrong burring their reputation deeper than the Mariana Trench. Even Don't Look Up was not successful. For some reason it's like people get offended for things they shouldn't. It's like they are being in denial when shown the reality through exaggeration lenses, they feel they are being mocked at. I think it's safe to state that a parody will never be as good as a comedy. The only successful parodies I can remember are The Disaster Artist, Kung Pow, Scary Movie (the 1st one), Space Balls and Monty Python, and none of those had a big budget. I'm not sure if it is a parody or a comedy but with so many references it does tip the scale towards parody. It's sad to see so much money thrown to make movies like this. Will children even understand it the way we do ? I don't think so. There is not a single frame in that trailer targeted to an audience below 27. I guess Disney knows too well it's clients. Kids don't pay for the stream, and adults will buy Disney+ more for themselves than for their kids. -
That's very sad.
-
It's Space Jam 2 all over again...