


BigAl3D
-
Posts
2,637 -
Joined
-
Last visited
-
Days Won
8
Content Type
Profiles
Blogs
Forums
Gallery
Pipeline Tools
3D Wiki
Plugin List
Store
Downloads
Videos
Posts posted by BigAl3D
-
-
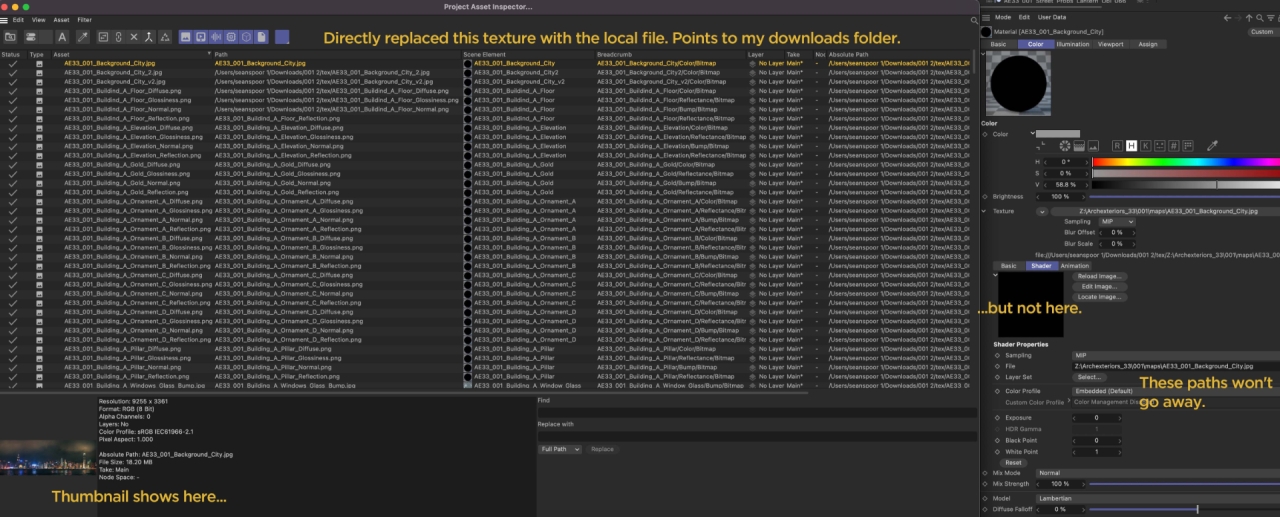
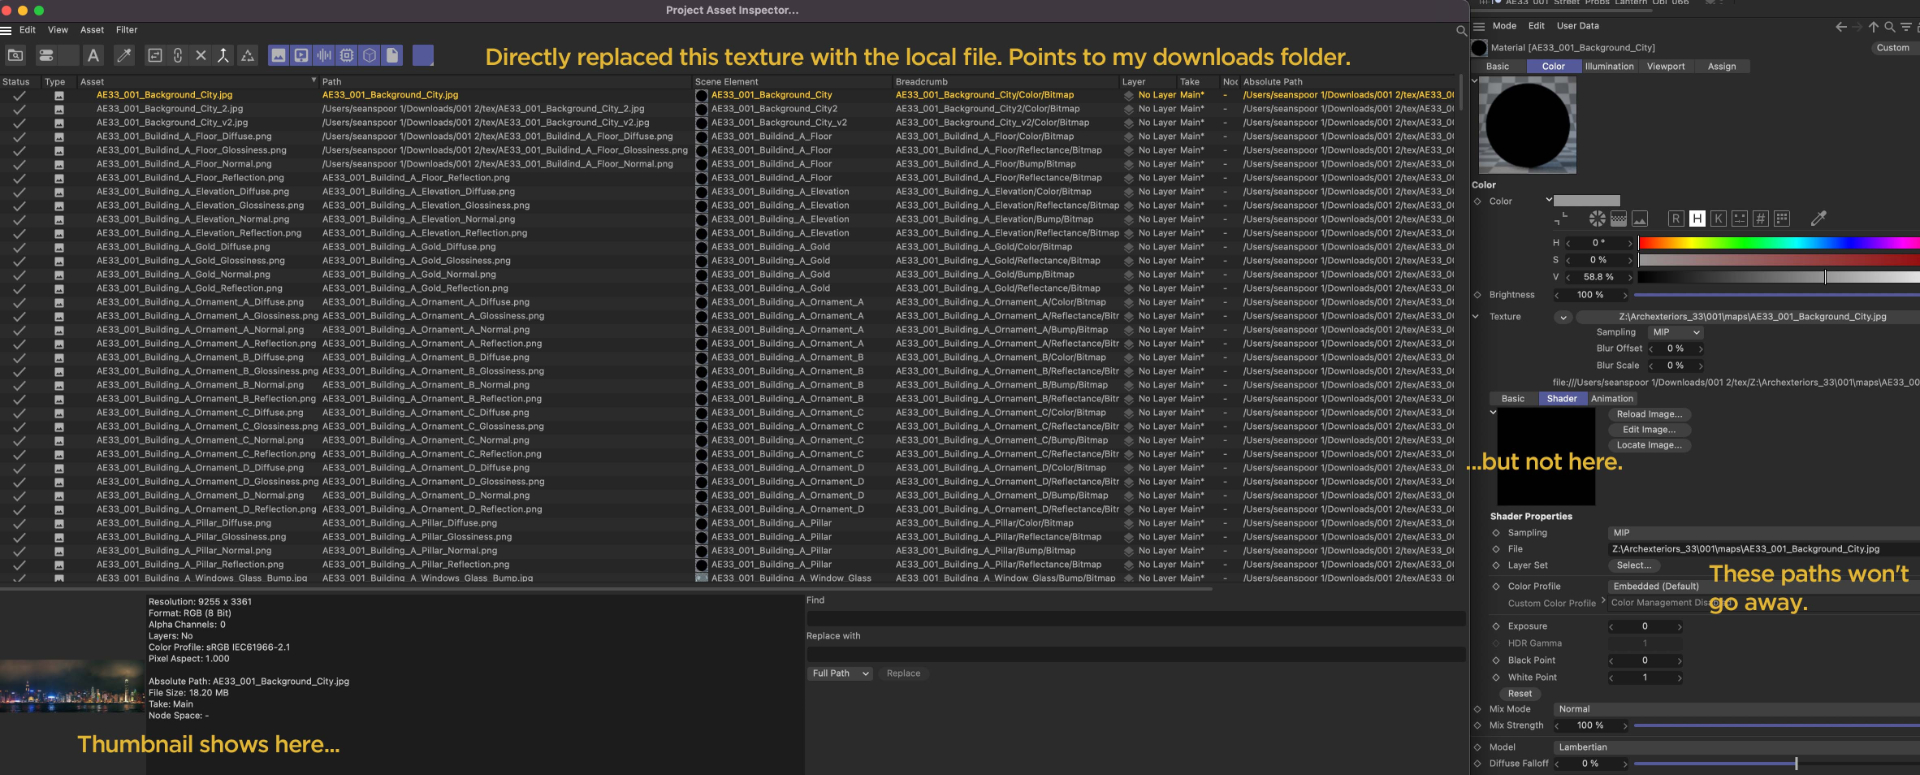
I'm running r25 on Mac, but this happens in any version. I purchased a model and find the C4D scene is using V-Ray. I don't have that engine as I use Corona. They have a scene converter, but you have to own both. So, there is an FBX option. I open that scene and, as you can imagine, all the texture filepaths are broken. Not a problem when you have the Project Assets Inspector. Select all, Relink Assets and pick the folder where all the texture files live. Boom All items now show checkmarks instead of red Xs. But..... all the texture still appear as missing.
As you can see in this image, I went a step further on the first one, and directly replaced it with the correct file. At the bottom, there is the correct thumbnail. If you look to the right in the material attributes, there is a black preview and as you can see, the author's original filepath is still there. You can even see the one in the middle show a mix of new and old paths.
Some of the paths appear different in the main list as I have been experimenting with relative, absolute paths and the like. What I am trying to do here, is relink these standard C4D materials, then use the Corona Scene Converter tool, to make them all Corona Physical materials and at least get me close. In most cases with this city scene, many will be view from a distance so detailed adjustments won't be necessary. I'm at a loss. I even saved the .c4d file inside the "tex" folder to no avail.
How can I fix this? There are around 375 materials in this scene. It would take forever to do manually. Any ideas are welcome.
 0
0 -
I was going to chime in about the pusher not pushing. In my head, I thought "I wonder if they cached the animation"? That would explain it as you would only see the cached dynamics. At least I think so.
0 -
Here is a scene I made for a rug client, so this rug looks like their own design. It's not good enough for closeups, but gets the job done. I used the photo method of taking 8 shots of samples at different angles and letting Adobe 3D Sampler create the maps. I had to tweak things, but it works. I know I could use some hair to add more detail, but it's tricky since I'd have to match a real product. I'll find a link I have that shows an artists workflow using Max to make the most insanely realistic rugs. Anyway, I love Corona render engine. I mean I'll get the first pixels usually within 10-15 seconds on my old iMac Pro.
 0
0 -
Super nice. Curious if you made the designs/patterns/textures up your self, or are you recreating a real-world rug for any of those?
0 -
Looks good. Might be over my brain cells though. How I feel whenever I see a bunch of nodes. Curious if you could do the sims on one PC, mirror it's screen to a second PC which is doing the streaming. Seems like that would reduce the load on the streaming PC exponentially. Never tried it though.
0 -
Doesn't hair respond to the Force objects? Wind, Turbulence, etc. I feel like I did this years ago, of course not with RS.
0 -
I've used Team Render for years without too many issues. Big help since I have a couple higher-end CPUs available to me. I have used this setup with much success. This example shows r20 with the error, but I have had this error with r25 too. What I didn't post was the entire list of assets that successfully download, but then at the end the error. Any ideas why the project file won't download to the render client? The same error with the two Windows clients.
I am also confused by the red lights on the machines list. I can't find what red means. So in that image, I pinged each one. The results were bad, good, good from second in the list to the bottom.2023/03/09 15:55:53 Downloaded Asset(s) in 20.537 seconds
2023/03/09 15:55:53 (Error) Render-Job failed: Could not open file: (file:///Users/-----/Library/Preferences/MAXON/CINEMA 4D R20_7DE41E5A/teamrender_client/users/client/pv_27/Restoration Hardware_Collected_Final2.c4d)
2023/03/09 15:55:53 Peer-to-Peer Statistics:
> Alexs-Mac-Pro.local. Download-Speed 13.66 MiB\s (68x)
> Machine Download-Speed 25.24 MiB\s (23x)
Peer-to-Peer Statistics End 0
0 -
Can we assume they are using the Unreal Engine system made famous by The Mandalorian?
0 -
Merry Christmas to all and thanks for sharing your knowledge with the community.
 1
1 -
Usually you will shoot a printed grid of some kind with the same camera/lens that shot the video. Or find a clip someone else shot with the same camera. Then go through the steps to create a profile. This is mostly useful for when you use the Camera Calibration and Motion Tracking tools in C4D. Maybe these videos will help you.
1 -
@keppnWow. I never thought I'd see a reference to Aldus Freehand this many years on. Are you also going to say PageMaker is still better than InDesign or Quark? Ha. Two can play this game!
I don't use InDesign a ton, but I think you're not setting up your screen properly if you say it's "pixelate" and "can't see what you're doing". Is this what you're talking about?
 0
0 -
Just saw this video from Nick Campbell at Greyscale Gorilla. Might be some useful techniques in this to create something like that.
1 -
@imashinationActually in this scene each take has it's own camera which automatically activates the appropriate camera and render setting after I switch takes. So this already takes place. I'm just griping that when I get lazy, I can mess things up or over-write an existing render by mistake. C4D does so much for making the workflow easy, that I get sloppy.
@vizn Some great tips there. Thanks.
0 -
Am I the only one that is annoyed with having a scene with multiple takes, each with their own render settings, but when you switch Takes, the render settings switch, BUT the previous render settings are still selected. I can't tell you how many times I go to adjust the render settings and see the tick turned on, but another preset is selected so I change the wrong one. Not a global catastrophe, but I find it annoying.
0 -
Well I'm a dummy. I downloaded the parts of the script, but not the file structure. This works perfectly. Just unZIP into the plugins folder and restart C4D. You'll find it in the Extension menu as Selection To Object 1.1. Boom.
https://github.com/safina3d/c4d-selection2object/archive/refs/heads/master.zip
1 -
I'm finding myself using assets from the Cosmos library to use in Corona. If I bring in a car for example, and I want to animate it, after converting the proxy file, it comes in as a single mesh with many selection tags. I know the manual way of selecting each one and using the split command, but it's very time consuming with many tags.
Is there another built-in way in C4D? I also found this script (https://github.com/safina3d/c4d-selection2object that claims to do just this with one click, but can't figure out how to install or run it.
Any tips is appreciated.
0 -
OK this is odd. My attempts at using this were from the other day. Browser tab still sitting there with blanks. I downloaded Microsoft Edge for Mac and it still didn't work. Then I came back to my Mac Firefox browser and the results were now visible! Wonder if running Edge added something to make it work?
0 -
Anyone have trouble getting this thing to work? I can paint and make the painterly version, but when I click the "Plz wait for 30s for the output", nothing happens. That button gets lighter for a couple seconds, then nothing. I'm on a Mac and have tried on multiple browsers. Haven't tried Bootcamp yet.
0 -
I know it's not that hard to create basic and decent PBR materials from quality images. I'm curious if anyone has experience using Apple's LiDAR tech in their newer phones to extract the depth map for use in Substance for example? I will be getting samples of rugs that I will be adding to archvis-style 3D rooms instead of traditional photography. I have recently tried dropping a detail rug sample into Adobe Substance 3D Sampler and it did a decent job of giving me a Bump and Normal map. (See link. It wouldn't let me upload the image).
Just looking for options to increase the realism and wondered if the new tech might be useful. Thanks.
https://www.dropbox.com/s/uktvbojp3sbawrh/RugTest_Substance.jpg?dl=0
1 -
Here is the link for the free plants, trees and shrubs. Donate what you want.
https://maxtree.org/products/plant-models-vol-60/
1 -
Here is a scene to work with. These grass meshes were part of a free plant set. I don't recall the site, but I could find it and post the source. Anyway, pretty simple and renders at a decent speed. I changed the render settings to be Fixed at 2 passes. To kick this up a notch, you can add the Variation shader to randomize the grass colors a bit. The ZIP is too large to post directly, so here's a Dropbox link. Enjoy.
https://www.dropbox.com/s/d4xvpqqbv7cutvs/Mograph Grass.zip?dl=0
3 -
Yeah, Corona Render also has a Scatter tool and Camera Clipping too. Helps reduce the load with objects off-camera. The processing is surprisingly fast as well. I'm sure C4D can do it also, but how fast.? Are you doing animation?
I'm going to assume you've tried closing sections of grass (mesh of a section of grass) and clone them around and randomize a few settings. This technique works best with mostly flat areas however.
I did this image in Corona before it had the Scatter tool. The grass was cloning grass meshes and mixing in some other plants.
2 -
I have never been able to get the Connect Object to a point where it produces something useful. Never. It's always chunky, wrinkles. Never smooth and it's just guesswork with the settings. I was trying to get a nice and smooth blobby effect, similar to Metaballs, but lighter. Imagine a cartoony, fluffy cloud, made up of simple spheres that blend smooth together, yet you can still see the roundness of each sphere. Seems like this would be ideal for the Connect Object.
What am I missing?
0 -
With great power, comes great responsibility.
1


Fixing Texture Filepaths
in Cinema 4D
Posted
Well, you won't believe this. When trying some of the ideas you suggested, I got the spinning wheel of death. Might have come out of it, but after 5 min., I forced-quit. Now, I still had r19 open. Many models sold online are build with Max and provided in a couple of formats such as r11. I have r19 so I can open and save a scene to open in newer versions. Anyway, I thought, what the hell. I opened the same scene in r19. Broken textures as expected. I brought up the old Texture Manager, which for me anyway, used to be super slow to load fully. It loaded instantly and I tried Relink Assets and BOOM! It fixed all the links properly in 3 seconds. I reopened the scene in r25 and all is well.
I have my workaround, but not explanation as to why the scene cannot be fixed in r25.