

Cerbera
-
Posts
17,815 -
Joined
-
Days Won
698
Content Type
Profiles
Blogs
Forums
Gallery
Pipeline Tools
3D Wiki
Plugin List
Store
Downloads
Videos
Posts posted by Cerbera
-
-
9 minutes ago, Duca said:
Great Cerbera, but you didn't use a cloner, if i am right.
Indeed I didn't.
10 minutes ago, Duca said:It's okay, but I thought I could use a cloner to do it ...
I think you probably still can, but not in the way you originally envisioned. What @bezo mentioned is certainly one way to go that does use the cloner.
Again, it all depends what you want the animation doing !
CBR
0 -
16 minutes ago, Duca said:
The target is to get the WIFI logo on the left but NOT to be progressively bigger. So, how can I change the scale axes to obtain it?
You can't. You need a different setup altogether

Something like this...
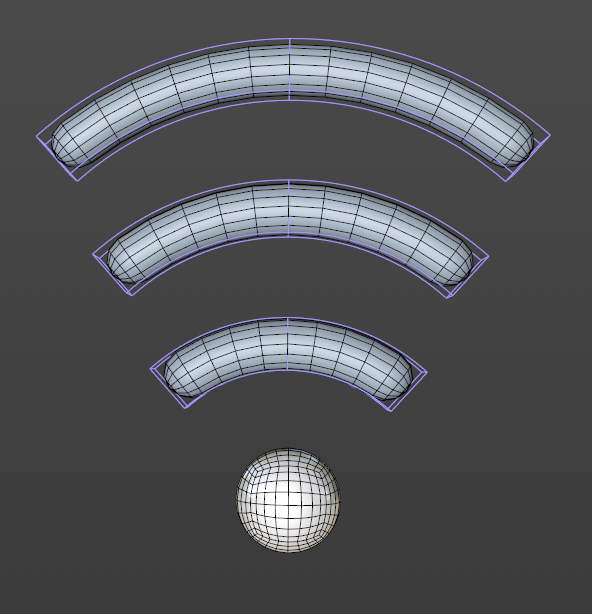
If we look at what needs to change in order to do what you want, it is the following (presuming you are using 2 bend deformers per arc like I am).
- Capsule object properties (not transforms) - height
- Bend bounding box and position on either side
- Capsule Height segmentation value (if you want them even)
But I'm still unclear on exactly how you want them animating, so whilst the proportions may now be correct, this still may not be the ideal setup for your plan !
CBR
1 -
They are distorted in the right cloner because that only has a scale value in one of the 3 axes.
25 minutes ago, Duca said:I'd like simply to maintain the proportional size of the waves, because on the right they are progressively bigger..., in the right side they are distorted...
That doesn't make sense. On the LEFT cloner they are progressively bigger because all the scale axes have the same value.
But I don't think that is what you want either. If we look at the standard WiFi logo, the capsule object gets longer in those upper arcs, but crucially its gets longer ALONG its curve, not in the sort of linear way that non-uniform cloner scaling can address.
CBR
1 -
Hmmm. If Otoy support thinks it's a hardware issue I would tend to believe them.
Did the card come with any sort of testing / diagnostic apps you can leave running overnight ?
CBR
0 -
No, you can do this with regular Mograph. So pop all your bricks inside a Fracture, and with that selected, add whatever effectors you need to make the bricks move upwards away from their final positions. The simplest option there would be a plain effector that moves stuff up on Y (presuming Y is up in your scene). Then you can use a Linear (or any other) field in the falloff of that, and animate its position so the bricks fall into place.
If you need a more spectacular (say dynamics-based) animation then the key there would be to begin the simulation with all the bricks in place, run and cache your dynamics that make them all float off (positive gravity value), then reverse the whole animation in post to make them appear to fall into place...
CBR
0 -
Welcome to the cafe !
Please take care to post in the correct section, which is not Forum Updates / Software Problems. Moved to Procedural Modelling.
This has nothing to do with controls. It is bending, but not in the right axis. You need to rotate the bend deformer 90 degrees in each axis until you find the correct one. Once you have found the right axis don't forget to do 'Fit to object' again in the attributes.
CBR
1 -
On 9/20/2019 at 6:12 PM, catnap said:
I guess it could be a pose-morph model, but it looks like the liquid paint is going in the crevasses (nooks) of the pen as it recedes back in space.
It might look like that., but I don't think it's the case. Probably red reflections on chrome that gives that impression ! I still think any kind of liquid sim is overthinking this...
CBR
0 -
Yes and no. The following tips below will all help, but at the end of the day there are not many serious modelling projects where you don't spend the majority of your time vertex tweaking ! So the ultimate solution is to grow to love doing that
 But that is not to say it can't be minimized...
1. Always use Isoline editing, so you are looking at the useful base mesh rather than all the thousands of polys generated by SDS.
Same applies when uploading images, so we too have an easier time seeing the edge flow.
2. Create each new part you can by splitting away sections of the existing mesh, which will of course already match its curvature.
Split and occasionally Disconnect are the tools you need for that.3. HB Modelling bundle (which you should have if you are serious about modelling) contains an awesome retopo setup that can be pressed into a secondary service and used to build new part topology directly on the surface of existing objects where you have the massive advantage of being able to re-project / align it to the surface of the source mesh at any time with a single click.
4. Simple snapping modes like Poly snap can help polys stick to the surface of others as you model.
5. Avoid Soft Selection, on the whole, which is very difficult to precisely setup so that it affects the areas you need without also breaking areas you don't want to alter.
6. Instead of Magnet Tool use the Sculpt Grab brush, but with 25-50% smoothing added in via the FX modifier button in the tool. That way your polys will 'auto-regularise' as you tweak them, which tends to lead to clean, even, non intersecting geo more than when not doing so...
7. If there are hundreds of base mesh vertices to move / align, consider doing it with an FFD instead, so you have to wrangle many less points.
8. If using poly pen for vertex tweaking, turn off auto-weld, which will stop it doing that annoying thing where it welds points unintentionally. Additionally, always work with a new mesh object, so the new part you are adding cannot be accidentally welded to the underlying mesh.
9. If you have the base mesh for an existing new part, you can project it to the surface of the underlying model using the oft-overlooked Project mesh Command. This ONLY works if the object you have doesn't have vertical depth, so is best used when you have the 'flat version' before any thickness is added.
10. The Surface Deformer has UV modes which can be useful in repositioning elements while they continue to match underlying curvature.
Think that's the main ones, but doubtless there are many more that will come back to me over time
Hope that's enough to be getting on with...
CBR
2 -
Pose-morphed model I reckon...
CBR
0 -
Please take care to post in the correct section, which is not The Lounge. Moved to Procedural modelling etc.
Not quickly, no. It took that guy 3 days, presumably WITH mograph ! You can do all this with primitives and regular keyframed transforms of course, or you could use something much more complicated like Xpresso driven rigs, but it's obviously a lot more manual work if you're not using the primary tool designed for this sort of thing...
CBR
0 -
...or just turn off Materials in the Viewport Options ?
CBR
1 -
I like to use the Hide Mode of Push Apart to avoid overlaps most effectively for denser tree areas. Just checking you've tried that...
CBR
0 -
Quadriflow
in C++
Man, you gotta stop putting those massive human eyes on everything - I've had nightmares about those !
But what a plugin ! Truly great work there Sir ! I am a definite customer for this one.
While I'm here though... thought I'd ask - is there any chance that this plugin could work a little bit more like Instant meshes, in that we could somehow use splines or guides or something else to direct the general flow around key areas ? This would still be good without that, but having it would tip it over into being one of the most useful plugins ever !
CBR
0 -
Please take care to post in the correct section, which is not Procedural modelling - this is clearly a Mograph question, so it belongs in the General Mograph Category.
CBR
0 -
You mean added the Extrude as a parent of the spline right ?
I would have expected that logo to consist of fair sight more than 8 sub-paths, but it won't be Cinema that makes them, it'll be Illustrator that determines that I think...
Could you post the scene file so we can more clearly see what you mean ?
CBR
1 -
Or maybe formula deformer ?
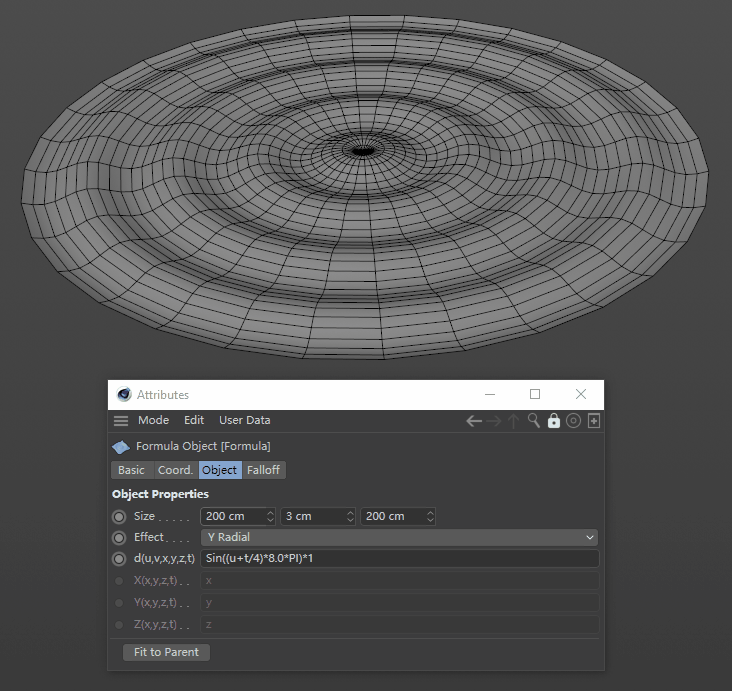
Should be easy enough to get that texture with a bump channel (low delta)...
CBR
1 -
A lot has changed about the sculpting system since R14. Better to watch one for more modern versions like this one.
CBR
1 -
2 hours ago, AlexisB said:
Octane, but i didnt post it on there cause i think this has to do with the technicality of texturing, not directly connected to the renderer..
Nope - that very much IS directly connected to the renderer, and generally speaking, the people that have Octane are best placed to help you, which is why it should say that in the title and be in that category..
CBR
0 -
Which renderer are you using ?
CBR
0 -
Well, the good news is that it's quite easy to make hair look like that, and the hair tool(s) are very much up to the job in this case. No need to do it with 'fur'. In fact you can't do it with fur if you need to manually style it.
Grooming it can be done with the hair tools like brush, comb etc, all of which you can find about in the manual or by watching one of the more comprehensive hair tutorial series' that are floating about youtube... here's a good one from cafe member @Rectro which is very well regarded and thorough, though probably way more detail than you actually need to make this.
You only really need to know how to apply hair, how to alter its length, and some general basic knowledge about the hair material which controls its overall appearance to make this, so perhaps this starter hair video is more useful to you than the complete guide above...
The secret to producing really nice 'luxury' fur is to have very thin hairs, and many thousands of them, and to get the scene lighting right, on which fur looking good so heavily depends. Just 2 omni lights with soft shadows would be ideal. You also want to render with Standard Render, not Physical because hair always looks better with the renderer it was designed for.
CBR
1 -
2 hours ago, Paul Milinski said:
How do I prepare this?
That's quite a broad question
At the simplest level ferns are quite easy to texture because they are fairly uniform green, and presumably we're not going close enough to actually see the cells / veins in the leaves. If that is the case we only need color, luminance (for SSS) and reflectance channels in our material to get a decent base.
But what makes 'hero' ferns tricky specifically is what happens to those leaves as they die - they go brown and crinkly at the edges, and that works its way inwards over time until eventually there are holes everywhere and it all goes brown, curls up and dies off. A realistic scene will have to include some of that on hero plants, and that's why we need UV mapping (unless we do it with vertex maps instead). How good are you at UVs ? I ask because it's way too huge a subject to have to teach in any single forum post ! To go over that step by step for someone who hasn't done it before would require an hour on 2 Skype (which would be a chargeable event I'm afraid, but do PM me if you'd like to do it).
The overview looks something like this.
- Using the clone and distribute methods from the posts above I would go on to complete my hero leaf. I haven't had much time to spend on this, so mine looks a bit rushed and sh*** but it does show the sort of stage you need to get to before you UV (or vertex) map your hero leaves. This is a very much 'non-hero' texture but even that would work for background plants...
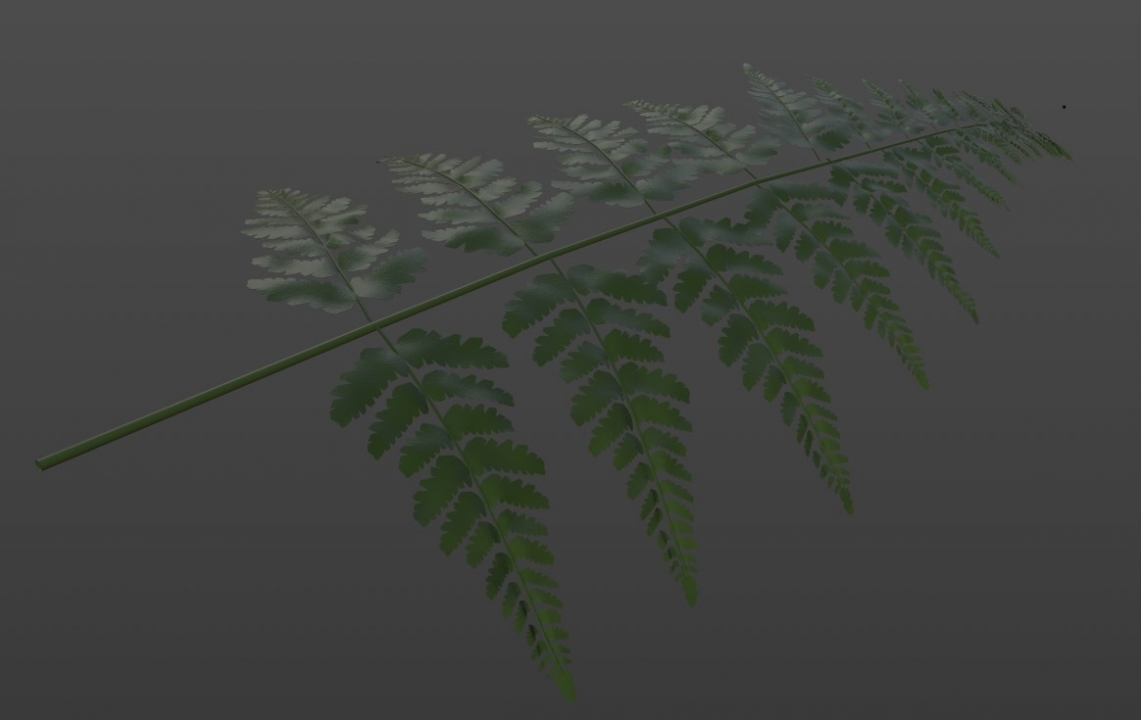

As you can hopefully see, this is one complete frond made up of 27 instances of the model we made above (the tip is another copy but rotated so it's facing down Z) with a new stem, the displacement happening in world space so it is different across every leaf and 3 large bend deformers added to tweak the general shape and hang of the frond and new stem..
- Next step would be to get an editable copy of that combined into a single mesh, but without the bend deformers applied (easier to UV map without them).
- Then you would Unwrap this single frond onto a single UV canvas, (probably using frontal projection from a top view initially and using overlapping UVs so that you didn't have to texture the reverse sides as well).
- Once you have UVs you are happy with you can output a PSD with a UV mesh layer to use as a guide, and then move into Photoshop to start making your texture.
- We actually need to make 5 or 6 different texture maps that all use the same UVs, so that our leaves don't look identical when there's a whole bunch of them. We only need colour maps though, so no need to worry about making bump and specular versions as well, which does save a lot of time.
- I would make a base layer which is the main leaf colour, and then a series of damage layers over the top, which we could switch in and out to make the various maps you need.
- When you have your maps, now it's time to head back to Cinema, and duplicate your hero frond as many times as you have texture maps, then make a material for each and assign those, using UV mapping as the mapping type, so it uses the maps you have made.
- Now you can do what you like with those fronds - clone them, bunch them, deform them, scale and rotate them; whatever you need to do to build a decent plant out of them !
So, as you can see, it's quite an elaborate process for hero plants, and you will of course need to do that for the other hero plants in your scene too. The background ones are a good deal easier - I would do those procedurally with layered noises, and gradients.
Hopefully that's some help...
CBR
1 -
1 hour ago, Langley said:
Ive downloaded the demo now but cant see anything obvious so how would I go about using that? And would it be better for this?
Yes it's definitely faster than the other ways.
The icon for it looks like this
 , and should appear with all the other UV shortcuts at the top of the UV texture panel in BP UV Layout.
CBR
0 -
Thanks. We should tell Admin @Igor about this - I didn't think guests were able to post at all !
CBR
0 -
3 hours ago, Langley said:
As for trying to do it in R19, is there anyway to do it?
Thanks
Lang
Yes, the Magnet tool, with the right radius settings could sort that out from where you are now, but it would be difficult to keep all the UV points even that way.
So a better option would be to select all the top points of the UV and do 'Border to Circle' which will make a decent arch with them you can non-uniform negative scale so it matches the curve of your label. Repeat for the lower points separately and use 4,5,6 keys (move, uniform scale, rotate) to further adjust them until it's all lining up in the perspective viewport...CBR
1


Feather trough tube effect. without hair
in Modelling - Do Not Post Here
Posted
Here's how I'd do it.... Pose Morph and Morph Deformer with linear falloff.
Let me know if you need any more detail on that...
CBR