Leaderboard


Popular Content
Showing content with the highest reputation on 09/08/2021 in all areas
-
Hello, I am devlopper, I live in Paris, I use C4D from a long time and I hope find here a nice place to share and talk. 🙂3 points
-
Thanks! Yeah it’s fun seeing things come together after long nights of work. and I’m super into 3D printing and bringing projects into the real world. So fun to bounce in and out of reality.3 points
-
So I’m working on getting the little ship to break the wall. Trying to make it a bit more realistic. See if I add the video correctly. 🤞 sorry, haven’t figured out how to embed properly, lol https://youtu.be/1xwrg6wGRCI2 points
-
I wish i learned c4d sooner. i started to learn 3D in 2006 with 3ds max 06 (the first version with mental ray). At that time i thought that software was great, but in fact didn't had any experience in other 3d apps to compare. Later in 2014/15 a friend of mine challenged me to learn c4d since we were doing a lot of work for advertisement and tv, and 3ds max sometimes was a bit of a strugle to do more complex stuff. That was the best advice i got in my entire professional life. Learning this software was an eye opener and i realized that i simply spent way to much time in such a crappy app like 3ds max. Of course there were things in max that i missed but it in the end it really changed my career for the best. When comparing both apps, these were the obvious things that blew my mind when i learned c4d, and made me never go back again to autodesk c4d xpresso -vs- 3dsmax wire parameters c4d constraints -vs- 3ds max constraints c4d mograph -vs- 3ds (nothing) c4d sculpt sys -vs- 3ds (nothing) c4d bodypaint -vs- 3ds (nothing) c4d character rigging -vs- 3ds max cat and biped c4d object manager -vs- 3ds layer system c4d multiple object and property selection -vs- 3ds (nothing) c4d object morph system -vs- 3ds max morph modifier c4d timeline curve editor -vs- 3ds max curve editor c4d graph/gradient editor -vs- 3ds crappy graph/gradient editor c4d procedural worklow -vs- 3ds max clunky workflow c4d object based modifiers -vs- 3ds max stack (sometimes was good but i prefer c4d's) c4d learing curve/interface -vs- 3ds max learing curve and interface c4d modelling (this one was harder, since 3ds max was also good,but in the end i think i prefer c4d) things that i missed from 3ds max 3ds plugins (some were great) 3ds Slate material editor (very good) 3ds edit poly as a modifier (super usefull) 3ds some modelling tools and some from the ribbon 3ds max UV tools I the end the gain was so obvious that right now i really dont feel the need to return to 3ds max. Thats why i really wished to learn c4d way sooner. cheers2 points
-
I think your test is very close to realistic. My only issue with maybe the gravity or mass of the particles. The chunks appear to made of lighter material than concrete. Aside from that, it looks great.2 points
-
Well Sketchbook 03 just maxed me out. It hit 12,500 views - so thank you all for looking! Time to start fresh with Sketchbook 04, so here we go. Working on modeling and put together this Art Nouveau Armoire. I modelled the base cabinet in Vectorworks and then moved it to Cinema for the detail work (carving) as well as materials, lights, render, etc. This is using Corona 6 with R23. Thanks for looking - away we go.1 point
-
I like The GOONIES too! It's one of my favorites 👍1 point
-
Thanks ! Yes, I made some plugins for C4D that you can find on my website 🙂 https://code.vonc.fr IRL I am backend web devlopper (PHP & Symfony) but I make some Python plugins on my free time. I also make some WebGL stuff you can see here : https://4d.vonc.fr/ I see that there is a group for devlopper yes, I would love to share my works 🙂1 point
-
@3D-Pangelyes I love all of that. And those 80’a movies had some special magic. That made me want to dream. When I originally moved to California in 95, I wanted to make models and animatronics but was told that industry was dead, so I decided to look into the CG side of things. but I still love the old ways and want to learn more which is why over the pandemic I built that for miniatures for a title sequence for explorers 2! Lol. Still compositing the live actors into the shot.1 point
-
I knew it! I myself got 5 22" Eagle kits a while ago - still building them. And two weeks ago I received my 1984 8bit Elan Enterprise computer - new in the box straight from an obscure storage depot in Cairo, Egypt. My plan is to model it in 3D soon. Afraid I am still going through a nostalgia-driven phase right now...1 point
-
for EXPLORERS FANS. another project in the works. https://youtu.be/RqWpxifXSJU Here's my multicade with all the 8-bit games and more. I had a midlife crisis a few years ago, lol1 point
-
That is all true, but it is Early Access. That technology JUST came out and I doubt it'd be really production ready until another year has passed. Just think about how long they patched UE4 and how many awesome features were added later on.1 point
-
Lovely job there, and glad I could help... CBR1 point
-
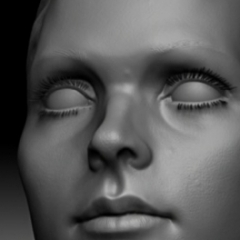
Hi Im sure others can fill in the gaps so here it goes. 1: Model base pose: You need to not use extreme poses for models you intend to rig. The previz character can have nice S curves in the pose but save that for previz. The actual model needs arms to the sides, fingers slightly apart, hands pronated, legs slightly apart, arms and legs slightly bent to aid IK natural bend. I like to model eyes half closed as its easier for weighting. 2: Prep and check the model: For the rigging stage to commence I will make sure there are no floating points, the model is 100% accurate and symmetrical for easier weighting (dependant on model) and that its scaled correctly, facing the correct way and centred in world space on the floor. I would also put the pivot at the feet. Zero out the Cords, and check the Uvs are perfect. 3: Name conventions Its good to name all joints and make sure you stick to a name convention. You also need to keep consistent prefix or post how you define left from right joints. R_Shoulder, L_Shoulder for example. This will aid in correct mirroring later on. 4: Joint placement: You got to be careful not to follow the placement of joints to match real human anatomy. The spine is located toward to back on a real human but it should be centred of the torso so as to not deform badly in either extreme. Shoulders can be a pain but with proper placement its half the battle over, always inline with the armpit I found to work well. Joints slightly toward the knee, and elbow aids the Ik, more so if your limbs are straight. I also zero out cords as I go, more so the Controllers to enable (Reset PSR) for base the pose later. 5: Auto weighting Vs Manual Auto weighting could well take you way longer to get good results by tweaking weights than to flood a designated area or limb, then blend it. Auto weighting is fine for starters but the best results come from flood weighting and smooth blending. 6: PSR corrections to hide bad weighting. Its tempting to fix weighting issues with PSR morphs, or commonly known as (Join Controlled Morphs), don't do this. Make the weighting do most of the work, then clean it up with corrections after. 7: Check the rig is working as you go. Don't assume all is fine, you could have some dependency issues which need sorting. Its easier to find and fix a fault as you go than discover it days into a complex chain of events that is hard to unpack. 8: Add your own controllers for Ik, I like to add my own controllers and use them for the Ik. Your get better positioning for them and they look better. If they are spline based you can get more control over the shape, and move the pivot if needed, you cant with Nulls. Thats enough for now, I let others add some. Dan1 point
-
@Igor Here's some thoughts on improving renders that I tell my students: There is no substitute to education as spending time in the software. You just need to build and render as many scenes as possible. Every days and quick studies have been instrumental in my learning - and a lot of them fail or never see the light of social media, but I still learn tons from them. It takes a lot of time - learning the software is only part of the journey. Lighting is key - beautiful topology and hyper real materials will all be useless if the lighting is off or bad. This is the number one thing I see in renderings that need improvement. Imitation is the best way to learn at first. Too many people try to take on learning 3d or improving 3d and being a designer/photographer/stylist all at the same time. I suggest that you find photos that you like and try to reproduce them. This way you have a specific lighting goal in mind as well as architecture or design choices are minimized and you can focus on your craft. Later, you can design it all, but while learning - only take on one thing at a time. See attached - I still do this regularly to try and improve. I take liberties and change things around a bit, but the general look and feel vibe is already established. This is key. (this might be a great challenge too - post a photo and see if beginners can try to reproduce it. I have my students do this with modern kitchens.) Keeping in mind that I teach film and stage designers how to render - I think one should look to film lighting as the inspiration for making images. I think people get too tripped up in trying to be mathematically photo real, so if the sun is at this level and the window is this tall and the light should hit the wall here and then it should look real.... This is not how photographers and cinematographers work. No photographer for Architectural Digest goes on a shoot without a full set of lighting equipment. If you study film lighting, you will see that the proximity and the scale of lighting in film (HUGE) is used, even when subtle realism is involved. So I say study film lighting more in depth. See attached examples and take a look at: http://mattscottvisuals.com/lighting - a great resource that shows the lighting layout for advertising shots. There are lots of Instagram sites dedicated to film lighting and BTS setups like @filmlights and others. Subscribe to these and study the rigs. Hope that helps some - always happy to share my settings and lighting setups for any images I post if folks are curious. -evan1 point
-
1 point
-
More Sub D practice. It's still dense and lots of mistakes, but each one gets better, so I just need lots of practice. All quads though, just too many of them 🙂1 point
-
Made this after a member on the forum here said he needed to make an airplane interior. Thought it would be cool to do something like this since lots of people are looking forward to be able to travel again without COVID19 concerns. Let me know what you think. Thanks.1 point
-
Got to this point currently. It's pretty clean but I only fly private so 😂1 point
-
Hi, here is a R20 ProRender render test of mine. Render with an AMD WX9100 GPU, 600 iterations, 2560*1280 output about 0.5 hours. This scene shows these features: Performance Improvements/Subsurface Scattering/Multi Passes. Cheers, Yan1 point