


SimonTheSorcerer
-
Posts
65 -
Joined
-
Last visited
Content Type
Profiles
Blogs
Forums
Gallery
Pipeline Tools
3D Wiki
Plugin List
Store
Downloads
Videos
Everything posted by SimonTheSorcerer
-

Version 1.0.0
26 downloads
This script can offset the animation tracks of multiple objects. To use it, select the object to offset, and run the script. A dialogue will appear asking for the amount of Frames to offset. Use a positive or a negative numerical value and click ok. Change frame or hit "a" to see the change. To install the script, go to the Extensions/User Scripts menu and open the Script folder. Copy the script along with its icon there. You may need to restart Cinema 4D for the script to appear. Feel free to check out my work: https://www.orestiskon.comFree -
 Great work!
 -
Version 0.3
25 downloads
This scripts allows you to bake multiple objects into Global Space. This can be achieved in multiple ways by using modifiers: 1. Default (no modifier): Creates Nulls copies of the objects in global space and bakes them 2. Shift modifier: Creates Nulls in global space at without baking, this is essentially "Convert to Nulls" 3. CTRL modifier: Creates Nulls in Global Space and bakes them, and constraints the original object to the nulls. 4. Alt modifier: Bakes the same objects in Global Space. You will need to unparent them manually in order to see the correct animation. About me: website: https://www.orestiskon.com twitter: https://twitter.com/orestiskon discord: https://discord.gg/qNrJ9CQTKNFree -
Springy adds non-destructive overlap to moving objects. It can be use it directly on: - Objects with keyframes - Objects without keyframes (e.g. children of animated objects) - Objects driven by expressions FEATURES: - Ease of use: Just select your objects and create Springy - Different Modes: Spring, Smooth, Spring & Smooth - In hierarchies, work Cumulatively or Individually - Work in Global or Local Space CONTROL IT: - Use Multiple Springies in the same scene. Target different objects for maximum control, or layer them together on the same objects. - Separate Position / Rotation parameters and individual channels - Work in Global or Local Space - Per Object Strength falloff curve
-
Congratulations Igor! I think opening up to more software is a good move, the industry is an ecosystem and there're things to learn from each other. There's a lot of c4d users that are using other software too and this could be a good place for them. Nice new logo as well.
-
Wow these are amazing, congratulations to the winners and all participants.
-

Cinema 4D Modifying an alembic animation question.
SimonTheSorcerer replied to Unstable's topic in Animation - Do Not Post Here
There is a time offset parameter in the alembic generator that you can use to offset the animation. In R19 it's called Animation start, and in R20 it's simply called Offset. -
Cinema 4D playing pose morph animations
SimonTheSorcerer replied to Nornel's topic in Animation - Do Not Post Here
I didn't understand the question. You start with pose-morph but then a game engine is implicated and sub-surface (subdivisions maybe?)? If you rephrase it in a clearer way, with image/video examples, you can increase the chances of having a useful reply. -
Cinema 4D 'Allow keyframes between keyframes'
SimonTheSorcerer replied to johanh's topic in Miscellaneous - Do Not Post Here
Thanks for the GIF, it makes things easy. In these situations, always look for the snapping option. In this case it's in the Timeline's Edit menu -> Frame Snapping, shortcut "X". -
Cinema 4D crowds in c4d?
SimonTheSorcerer replied to spiralstair's topic in Animation - Do Not Post Here
Ok I see, it behaves a bit different in R19 than in R20. It seems it doesn't loop backwards. Go to the Effector tab on the Random effector, and in the Min/Max set the Maximum to 0%, so it won't offset the animation forward. -
Cinema 4D crowds in c4d?
SimonTheSorcerer replied to spiralstair's topic in Animation - Do Not Post Here
Parakalo! Could you share a simplified scene file to take a look? -
Cinema 4D baking a mograph animation to pla
SimonTheSorcerer replied to wasa's topic in Animation - Do Not Post Here
PSR is Position, Scale, Rotation. Do the similar workflow with a few changes. Don't use "Merge Generated" on export so it won't merge the cloner into 1 object. Then drag and drop all alembic cubes into the timeline, and bake the Position and Rotation on the bake dialogue. You should end up with the PSR baked individual cubes. You can transfer the tags by copying them on the parent and using the "Copy Tag to Children" command. Write if you have trouble making it happen. -
I didn't understand. Do you need a grid distribution or a random distribution? Are you trying to put trees on the steps? You can try to use a surface object and shape it with deformers, and then clone on that instead. Alternatively you can make polygon selections and clone on those. With R20 you can use procedural polygon selections or spline masks, but I tried to make it in a non-R20 way using a plane and a shrink-wrap deformer. I also used a formula effector to delete the clones were slanted. clone_on_surface_grid.c4d
-
Cinema 4D baking a mograph animation to pla
SimonTheSorcerer replied to wasa's topic in Animation - Do Not Post Here
No problem. About the materials, this will depend if Elements 3D can support polygon selections. The Connect object can create the appropriate selections. Drop the Cloner under a connect object, and then disable the Weld and set the Phong mode to manual. Then make the Connect Object editable and you will get a merged object with the materials and the selection tags. Delete the tags from the object you baked to PLA and copy all of these tags to that object. -
Cinema 4D baking a mograph animation to pla
SimonTheSorcerer replied to wasa's topic in Animation - Do Not Post Here
Do you need PLA animation or PSR animation? An easy workflow for either, is to bake to alembic and then bake that to keyframes. To bake to PLA, enabled Merge Generated in the export dialogue to merge the cloner into one object. To bake the alembic to keyframes (psr or pla) drag and drop the objects you want to bake in the Timeline. Here's a video on how to do it: https://www.dropbox.com/s/cs0petrh3k17mnn/mograph_PLA_high.mp4?dl=0 -
Cinema 4D crowds in c4d?
SimonTheSorcerer replied to spiralstair's topic in Animation - Do Not Post Here
I recently made a tutorial on how to control animation with MoGraph. I used a crowd-like animation as an example, even though it's not a real crowd simulation, since the characters are not avoiding each other, but it might suffice for many crowd-like shots. Alternatively, one could push it further and make it particle-based to achieve a more crowed-like behaviour. For cloning multiple characters you could either clone multiple children or use multiple cloners that are cloned on the same matrix or points. You can watch the tutorial here: -
Fair enough, thanks for reporting the issue Dan.
-
Hey Dan, can you share scenes that exhibit the problem? Have you reported these to MAXON? Providing examples about the problems can go a long way towards getting them fixed: https://www.MAXON.net/en/support/how-can-we-help/
-
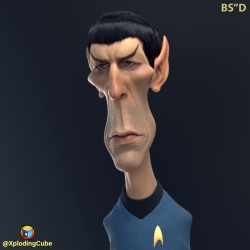
Fantastic work, that's really a great likeliness model. It captures the personality of the character with great accuracy. I will disagree with most here though, I think the hair is the weakest part of the rendition. They look too soft to me, especially on the beard, as if the hair strands are too thin and too many. In the actual character they look more scruffy and rigid I think (open in new window to see full resolution): That isn't to say that there hasn't been an amazing job already. Thanks for the breakdown as well!
-
Hi all, my buddy and ex-coworker Vito LaManna started making tutorials for Blackmagic Fusion (ex. Eyeon Fusion) recently. He's a great 2D/3D artist, and the high-end knowledge that he shares, especially in the Le Buck's Ring tutorial, is quite rare to find in the tutorial scene. For those who don't know Fusion, it is a nodal compositor similar to Nuke. It's quite powerful for 3D workflows, and the Free version is good enough for many single-seat freelancers, supporting up to UHD resolutions. Long story short, there is a running competition with prizes from Blackmagic: The rules are to follow Vito's Lightbulb tutorial using your own 3D design, and using the free version of Fusion. The tutorial will be released in a few days, but it's already available for his Patreon supporters. It runs until February 8th. I think Fusion makes a good combination with C4D, so feel free to try your luck, learn some nodal compositing and maybe win a prize on the way.