Leaderboard


Popular Content
Showing content with the highest reputation on 08/01/2022 in all areas
-
Hi folks, I just wanted to say how much I enjoyed the competition and seeing all the great entries! I thought it was a great challenge and wanted to say good luck to all my competitors. 🙂4 points
-
I agree fixing other people's models, animation, whatever is awful. I can only imagine how much more difficult it must be to be a programmer trying to fix (or improve upon) someone else's code.2 points
-
Agreed. I wouldn't go as far as saying I hate modeling, but I am quite reluctant when it comes to modeling anything. However, this time I kind of enjoyed coming up with subjects and solutions to model within the given limits. I am sorry I didn't quite post a few WIPs in this thread. But most entries I created were completed in a few hours. And once "in the zone" the subject was completed before even being able to post a single WIP. I also enjoy seeing all different entries that have been submitted. Wishing good luck to everyone.2 points
-
Hi all, I thought i will share this tiny tip. I find it very useful . Good for beginners, but also for c4d old timers. It might have been a old feature, but i discovered it recently. When your cursor is in the value field, you can change each decimal place number with keyboards arrow keys. by increments of one. Simply move it to right place (LEFT/RIGHT) and change the value with UP/DOWN. If the value is for example 1 and you want more decimal places, simply press RIGHT and DONW/UP to add another decimal place point number and so on. This one is more common i think : In addition to this while holding ALT button and dragging with your mouse will change the values by smaller increments. SHIFT will change it by bigger increments1 point
-
One of the main reasons I stopped working with one of my main freelance clients a while back. They were technically in charge of the entire art department and I was working under them, but it did my absolute head in watching them piss away week after week working on things which just flat out didn't matter. A month spent on a single building... one of 100's of buildings that we see on screen for 5 seconds... far away.... in smoke.... at the edge of the screen. Not once did they get anywhere near hitting the deadline, it was always up to everyone else around them to pick up the pieces and clean up their mess of incompetence. The last project they did, they hit the premiere and only half of the 3D work was done. It was up to some poor sod to take everything and cobble it together to finish it for the launch within a few hours. We're talking taking what was rendered, recolour it, mirror it, re-crop it and shove it out of AE and hope nobody notices that they doing the video equivalent of making the second half of a computer game by running backwards through all the same levels. He won an award for it. I died a little inside.1 point
-
Depends what its being used for. I had to reprimand someone a while back because I found out they had spent days remeshing an imported CAD model to clean off all the triangles. When I asked them to show me the difference it made in the final renders, there was basically nothing there to be seen. If we were blowing it up, or running physics sims on it, or deforming them, then ok. But if you're slapping a generic metal texture on it and the imported model has normal tags to clean off all the phong garbage, then it often just doesn't matter. eg. those triangulated caps may look nicer in the editor as an ngon, but theyre internally turning straight back into triangles as soon as you hit render.1 point
-
Speed, non-destructive work flow and booleans. We just gotta talk about it. Creating things expeditiously is so precious and we often don't talk about it. Speed= productivity of course, but also makes 3d more fun. Time for a Speed Run. Using a hard-surface-boolean-centric approach...how fast can a moderately experienced, moderately gifted artist like myself create a SciFi gizmo like this? Will the results satisfy? I'm just now exploring a couple new Blender addons and I'm crazy enough to try them out in this speed run. At 7:45 pm Sunday night Aug 1 I begin. I'll track time. Share screen grabs/progress. Tell you honestly about challenges, frustrations, etc. Update: 90 minutes into this I'm flopping around like a fish on shore. I really want to push myself but I need a reset, LOL. I'm relying on two new addons that I've only used for a couple of days, and I don't understand everything I need to. Round one: I lose. I will be like Rocky. Take a fall and get right back up! Also: This speed-design topic really isn't a sci-fi thing. Deserves it's own thread, and I hope to start that in days to come.1 point
-
Step 4: Dial things in (Please indulge. These screen grabs are gawd-ugly...just trying to convey info quickly...) In this scenario we don't want the rivets positioned on the poly center but on the perimeter, so we want to choose, "Vertex" in the cloner distribution. This gets us part of the way there. To wrap things up I added one vertex with a cut, and I made a selection of the desired vertex targets. I saved that vertex selection as a tag, and forced the cloner to only place rivets on those target points by feeding it that selection. Also tweaked rivet size. For this simple demonstration we are done. To summarize tweaking: -Use c4d's additive modeling tools to create additional vertexes for added rivets (knife, bevel, extrusions, etc) -Use selection tag to cull out any undesired rivet locations. -We use a split-off mesh so that we do not impact the base topology. Can freely add vertices to determine exact rivet locations. It's a modest process that provides precision, flexibility and speed.1 point
-
Those are super, Keppn! Thanks for posting. Winged portions make me think of the ornithopters in Dune. Also love the conceptual push-pull of heavy cargo and feathery wings. Makes the ship unique and very interesting. Really enjoyed seeing your work. Wanted to share a rivets tip that I learned for Blender, but applies the same for c4d. This can speed the process of adding rivets and placing them precisely. As we know, Since there are virtually no other Blender users active here I'll just share how the method translates to c4d. Here is the general idea and then I'll show a few screen shots: We want to use a cloner, right!? This technique will leverage the fact that a cloner can lay down instances on faces or vertexes.1 point
-
Ha, let me get a super old design of mine out of the garage. This must be from the Cinema R10 era, when I bought my first license and began to dabble with 3D for realz 😄 So, please be gentle with critics 😄 The design is about a carrier spacecraft - more or less, just a "strap-on-engine" to standardized modular containers. In this case, for people 🙂 I was interested to explore a design that combines extremes... a fat block of unwieldy cargo, but combined with some delicate elements reminding of dragonflies or seagulls. Some topics mentioned in this thread can be recognized as well... areas of high detail vs low detail, lights for scale, core/shell etc. Random additional infos: - The little yellow globe is the cockpit with 270°-View. There are even little people inside, but I don't have a close-up - I don't think I've posted this anywhere yet, so these are images waiting decades for their premiere😄 - Standard Renderer -- those took ages on some brutal VAIO-Laptop. That thing was so loud XD1 point
-
Agreed. I was specifically addressing adding lights for scale. Interesting factoid about the porthole lights in the Death Star trench from Star Wars. While the components were made from casts of about 6 or 8 individual tiles laid out in various combinations, they realized that they needed to add portholes. Well, rigging fiber optics to around 40 feet of trench would have been a monstrous task. So, the next best solution was to glue reflective little pieces of highly reflective front projection material to the model which were filmed in a second pass. And there were thousands of those little squares. Well, after it was all done, I think it was Gary Kurtz who looked down the trench through a camera and said "The windows need to be smaller", Ouch! Dave1 point
-
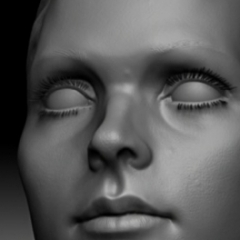
Hello guys. The long awaited Random Walk Sub surface scattering has now been added which for some will be a huge addition to Redshift. A move from point based to Ray traced SSS was a move in the right direction but the new standard for SSS has shifted for some years with other DCC packages. Arnold known for its quality skin renders using the AL Surface was ahead in the game of realistic portrait 3D Art. Arnold moved to the new method Random Walk which is highly accurate and helped produce some stunning renders using this method of SSS. Redshift own methods for SSS just didn't hit the mark, especially for realistic skin rendering. This has now changed with the inclusion of Random Walk in which further improvements are on the cars I'm sure. The big deal for Skin and high frequency detail models is that SSS needs to offer the ability to produce back scattering for thinner objects, frontal scattering for the soft look of skin while being able to retain high frequency detail often lost when SSS is applied. In addition to this bleeding was often a problem in areas such as the lips, eye lids, and nasal creases. The difference with Random Walk is significant. Alsurface render within Vray. 6+ hours Redshift Raytraced render (Principled Hair shader) Redshift Random Walk (Principled Hair shader) 2080 ti 1hr 13m1 point
-
The brush looks very cool!1 point
-
In Customize Palettes, enable "Edit Palettes". Then double-click icons you want to delete.1 point